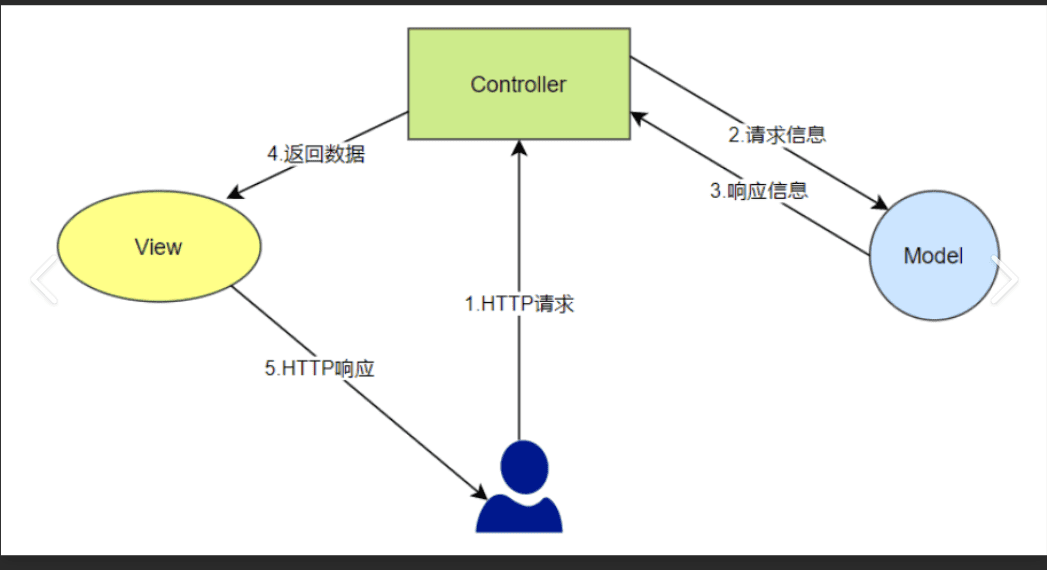
1. SSM环境搭建回顾
spring
springmvc
mybatis
spring springmvc mybatis 简单功能 员工添加 查询
1.1 pom.xml引入依赖
1 2 3 4 5 6 7 8 9 10 11 12 13 14 15 16 17 18 19 20 21 22 23 24 25 26 27 28 29 30 31 32 33 34 35 36 37 38 39 40 41 42 43 44 45 46 47 48 49 50 51 52 53 54 55 56 57 58 59 60 61 62 63 64 65 66 67 68 69 70 71 72 73 74 75 76 77 78 79 80 81 82 83 84 85 86 87 88 89 90 91 92 93 94 95 96 97 98 99 100 101 102 103 104 105 <dependency > <groupId > junit</groupId > <artifactId > junit</artifactId > <version > 4.11</version > <scope > test</scope > </dependency > <dependency > <groupId > org.springframework</groupId > <artifactId > spring-core</artifactId > <version > 5.3.6</version > </dependency > <dependency > <groupId > org.springframework</groupId > <artifactId > spring-beans</artifactId > <version > 5.3.6</version > </dependency > <dependency > <groupId > org.springframework</groupId > <artifactId > spring-aop</artifactId > <version > 5.3.6</version > </dependency > <dependency > <groupId > org.springframework</groupId > <artifactId > spring-context</artifactId > <version > 5.3.6</version > </dependency > <dependency > <groupId > org.springframework</groupId > <artifactId > spring-context-support</artifactId > <version > 5.3.6</version > </dependency > <dependency > <groupId > org.springframework</groupId > <artifactId > spring-jdbc</artifactId > <version > 5.3.6</version > </dependency > <dependency > <groupId > org.springframework</groupId > <artifactId > spring-web</artifactId > <version > 5.3.6</version > </dependency > <dependency > <groupId > org.springframework</groupId > <artifactId > spring-webmvc</artifactId > <version > 5.3.6</version > </dependency > <dependency > <groupId > com.alibaba</groupId > <artifactId > druid</artifactId > <version > 1.2.4</version > </dependency > <dependency > <groupId > mysql</groupId > <artifactId > mysql-connector-java</artifactId > <version > 5.1.38</version > </dependency > <dependency > <groupId > org.mybatis</groupId > <artifactId > mybatis</artifactId > <version > 3.5.6</version > </dependency > <dependency > <groupId > org.mybatis</groupId > <artifactId > mybatis-spring</artifactId > <version > 2.0.6</version > </dependency > <dependency > <groupId > com.fasterxml.jackson.core</groupId > <artifactId > jackson-databind</artifactId > <version > 2.9.3</version > </dependency > <dependency > <groupId > org.aspectj</groupId > <artifactId > aspectjweaver</artifactId > <version > 1.9.5</version > </dependency > <dependency > <groupId > org.aspectj</groupId > <artifactId > aspectjrt</artifactId > <version > 1.9.5</version > </dependency >
注意: spring相关依赖要保证版本号一致
1.2 编写spring.xml配置文件–工厂可称为父容器
1
2
3
4
5
6
7
8
9
10
11
12
13
14
15
16
17
18
19
20
21
22
23
24
25
26
27
28
29
30
31
32
33
34
35
36
37
38
39
40
41
42
43
44
45
46
47
<?xml version="1.0" encoding="UTF-8" ?> <beans xmlns ="http://www.springframework.org/schema/beans" xmlns:xsi ="http://www.w3.org/2001/XMLSchema-instance" xmlns:context ="http://www.springframework.org/schema/context" xmlns:tx ="http://www.springframework.org/schema/tx" xsi:schemaLocation ="http://www.springframework.org/schema/beans http://www.springframework.org/schema/beans/spring-beans.xsd http://www.springframework.org/schema/context https://www.springframework.org/schema/context/spring-context.xsd http://www.springframework.org/schema/tx http://www.springframework.org/schema/tx/spring-tx.xsd" > <context:component-scan base-package ="com.baizhi.service" /> <bean class ="com.alibaba.druid.pool.DruidDataSource" id ="dataSource" > <property name ="driverClassName" value ="com.mysql.jdbc.Driver" /> <property name ="url" value ="jdbc:mysql://localhost:3306/ssm?characterEncoding=UTF-8" /> <property name ="username" value ="root" /> <property name ="password" value ="123456" /> </bean > <bean class ="org.mybatis.spring.SqlSessionFactoryBean" id ="sqlSessionFactory" > <property name ="dataSource" ref ="dataSource" /> <property name ="mapperLocations" value ="classpath:com/baizhi/mapper/*.xml" /> <property name ="typeAliasesPackage" value ="com.baizhi.entity" /> </bean > <bean class ="org.mybatis.spring.mapper.MapperScannerConfigurer" > <property name ="sqlSessionFactoryBeanName" value ="sqlSessionFactory" /> <property name ="basePackage" value ="com.baizhi.dao" /> </bean > <bean id ="transactionManager" class ="org.springframework.jdbc.datasource.DataSourceTransactionManager" > <property name ="dataSource" ref ="dataSource" /> </bean > <tx:annotation-driven transaction-manager ="transactionManager" /> </beans >
1.3 开发实体类
1
2
3
4
5
6
7
8
9
10
11
12
13
14
15
16
17
18
19
20
21
22
23
24
25
26
27
28
29
30
31
32
33
34
35
36
37
38
39
40
41
42
43
44
45
46
47
48
49
50
51
52
53
54
55
56
57
58
59
60
61
62
63
64
65
66
package com.baizhi.entity; import com.fasterxml.jackson.annotation.JsonFormat; import java.util.Date; public class Emp { private Integer id; private String name; @JsonFormat(pattern = "yyyy-MM-dd") private Date birthday; private Double salary; public Emp () { } public Emp (Integer id, String name, Date birthday, Double salary) { this .id = id; this .name = name; this .birthday = birthday; this .salary = salary; } public Integer getId () { return id; } public void setId (Integer id) { this .id = id; } public String getName () { return name; } public void setName (String name) { this .name = name; } public Date getBirthday () { return birthday; } public void setBirthday (Date birthday) { this .birthday = birthday; } public Double getSalary () { return salary; } public void setSalary (Double salary) { this .salary = salary; } @Override public String toString () { return "Emp{" + "id=" + id + ", name='" + name + '\'' + ", birthday=" + birthday + ", salary=" + salary + '}' ; } }
1.4 开发DAO组件
1
2
3
4
5
6
7
8
9
10
11
12
13
14
package com.baizhi.dao; import com.baizhi.entity.Emp; import java.util.List; public interface EmpDAO { void save (Emp emp) ; List<Emp> findAll () ; }
1.5 开发Mapper配置文件
1
2
3
4
5
6
7
8
9
10
11
12
13
14
15
16
17
18
19
20
21
22
<?xml version="1.0" encoding="UTF-8" ?> <!DOCTYPE mapper PUBLIC "-//mybatis.org//DTD Mapper 3.0//EN" "http://mybatis.org/dtd/mybatis-3-mapper.dtd" > <mapper namespace ="com.baizhi.dao.EmpDAO" > <insert id ="save" parameterType ="Emp" useGeneratedKeys ="true" keyProperty ="id" > insert into emp values (#{id}, #{name}, #{birthday}, #{salary}) </insert > <select id ="findAll" resultType ="Emp" > select id,name,birthday,salary from emp </select > </mapper >
1.6 开发Service组件
1
2
3
4
5
6
7
8
9
10
11
12
package com.baizhi.service; import com.baizhi.entity.Emp; import java.util.List; public interface EmpService { void save (Emp emp) ; List<Emp> findAll () ; }
1.7 编写Service实现类
1
2
3
4
5
6
7
8
9
10
11
12
13
14
15
16
17
18
19
20
21
22
23
24
25
26
27
28
29
30
package com.baizhi.service; import com.baizhi.dao.EmpDAO; import com.baizhi.entity.Emp; import org.springframework.beans.factory.annotation.Autowired; import org.springframework.stereotype.Service; import org.springframework.transaction.annotation.Transactional; import java.util.List; @Service("empService") @Transactional public class EmpServiceImpl implements EmpService { private EmpDAO empDAO; @Autowired public EmpServiceImpl (EmpDAO empDAO) { this .empDAO = empDAO; } @Override public void save (Emp emp) { empDAO.save(emp); } @Override public List<Emp> findAll () { return empDAO.findAll(); } }
1.8 测试Service组件
1
2
3
4
5
6
7
8
9
10
11
12
13
14
15
16
17
18
package com.baizhi.test;import com.baizhi.entity.Emp;import com.baizhi.service.EmpService;import org.springframework.context.ApplicationContext;import org.springframework.context.support.ClassPathXmlApplicationContext;import java.util.Date;public class TestEmpServiceImpl { public static void main (String[] args) { ApplicationContext context = new ClassPathXmlApplicationContext ("spring.xml" ); EmpService empService = (EmpService) context.getBean("empService" ); empService.save(new Emp (null ,"皮卡丘" ,new Date (),123.456 )); empService.findAll().forEach(emp -> System.out.println("emp = " + emp)); }
1.9 编写springmvc.xml配置文件–控制器可称为子容器
1
2
3
4
5
6
7
8
9
10
11
12
13
14
15
16
17
18
19
20
21
22
23
24
25
<?xml version="1.0" encoding="UTF-8" ?> <beans xmlns ="http://www.springframework.org/schema/beans" xmlns:xsi ="http://www.w3.org/2001/XMLSchema-instance" xmlns:context ="http://www.springframework.org/schema/context" xmlns:mvc ="http://www.springframework.org/schema/mvc" xsi:schemaLocation ="http://www.springframework.org/schema/beans http://www.springframework.org/schema/beans/spring-beans.xsd http://www.springframework.org/schema/context https://www.springframework.org/schema/context/spring-context.xsd http://www.springframework.org/schema/mvc https://www.springframework.org/schema/mvc/spring-mvc.xsd" > <context:component-scan base-package ="com.baizhi.controller" /> <mvc:annotation-driven /> <bean class ="org.springframework.web.servlet.view.InternalResourceViewResolver" > <property name ="prefix" value ="/" /> <property name ="suffix" value =".jsp" /> </bean > </beans >
1.10 配置web.xml
1
2
3
4
5
6
7
8
9
10
11
12
13
14
15
16
17
18
19
20
21
22
23
24
25
26
27
28
29
30
31
32
33
34
<!DOCTYPE web-app PUBLIC "-//Sun Microsystems, Inc.//DTD Web Application 2.3//EN" "http://java.sun.com/dtd/web-app_2_3.dtd" > <web-app > <display-name > Archetype Created Web Application</display-name > <context-param > <param-name > contextConfigLocation</param-name > <param-value > classpath:spring.xml</param-value > </context-param > <listener > <listener-class > org.springframework.web.context.ContextLoaderListener</listener-class > </listener > <servlet > <servlet-name > springmvc</servlet-name > <servlet-class > org.springframework.web.servlet.DispatcherServlet</servlet-class > <init-param > <param-name > contextConfigLocation</param-name > <param-value > classpath:springmvc.xml</param-value > </init-param > </servlet > <servlet-mapping > <servlet-name > springmvc</servlet-name > <url-pattern > /</url-pattern > </servlet-mapping > </web-app >
1.11 开发Controller组件
1
2
3
4
5
6
7
8
9
10
11
12
13
14
15
16
17
18
19
20
21
22
23
24
25
26
27
28
29
30
31
32
33
34
35
36
37
38
39
40
package com.baizhi.controller; import com.baizhi.entity.Emp; import com.baizhi.service.EmpService; import org.springframework.beans.factory.annotation.Autowired; import org.springframework.web.bind.annotation.RequestMapping; import org.springframework.web.bind.annotation.RestController; import java.util.List; @RestController @RequestMapping("emp") public class EmpController { private EmpService empService; @Autowired public EmpController (EmpService empService) { this .empService = empService; } @RequestMapping("save") public void save (Emp emp) { empService.save(emp); } @RequestMapping("findAll") public List<Emp> findAll () { return empService.findAll(); } }
1.12 部署tomcat服务器进行测试
测试插入数据:
访问地址:http://localhost:8888/ssm/emp/save?name=猪猪侠&birthday=2020/12/12&salary=234.567
测试查询数据:
访问地址:http://localhost:8888/ssm/emp/findAll
2.现有SSM开发存在问题
大量maven冗余配置
每次构建项目都要书写大量相同配置极大浪费了项目开发时间
每次整合第三方技术都需要编写相关配置文件
项目测试每次都需要部署到tomcat
注意:这就是早期的SSM或者SSH开发存在问题,是不是很麻烦
3. SpringBoot的引言 Spring Boot是由Pivotal团队提供的全新框架,其设计目的是用来**简化**Spring应用的**初始搭建**以及**开发过程**。该框架使用了**特定的方式来进行配置**,从而使开发人员不再需要定义样板化的配置。通过这种方式,Spring Boot致力于在蓬勃发展的快速应用开发领域(rapid application development)成为领导者。
Spring Boot 全新框架作用: 简化spring应用初始搭建和开发过程
如何简化 :开发人员使用springboot只要基于特定方式进行配置,简化spring使用
SpringBoot 微框架: 5分钟完成之前ssm中环境
springboot(微框架) = springmvc(控制器) + spring core(项目管理)
即:只要我们搭建了springboot环境就相当于我的项目中有了spring和springmvc环境
4. SpringBoot的优势 (1)创建完整的独立的Spring应用程序:传统ssm框架中是有父子容器概念的,父子容器是一定不能污染的(父容器扫到子容器,子容器扫到父容器),现在使spring、springmvc只有一个容器
(2)内部嵌入了Tomcat,无需部署WAR文件:springboot内嵌tomcat,应用跑在内嵌服务器
(3)简化Maven配置,自动配置Spring、Springmvc,没有XML配置:只需要引入少数几个依赖
“用了springboot,spring应用 再无xml”
5. SpringBoot的项目约定
总结:
6. SpringBoot环境搭建 SpringBoot官网:Spring Boot
新建项目时只需要建立普通的maven项目即可,不需要勾选任何选项:
新建后的项目结构如下,需要额外引入src/test/resources目录:
6.1 环境要求
1
2
3
4
5
6
7
8
9
10
# 1.System Requirements JDK 1.8+ MAVEN 3.2+ Spring Framework 5.x+ 即SpringBoot 2.5.0以上 # 2.ServletContainers: Tomcat 9.0+ # 3.开发工具 IDEA 2021版本
6.2 新建项目中引入依赖pom.xml
1 2 3 4 5 6 7 8 9 10 11 12 13 14 15 16 17 18 19 <parent > <groupId > org.springframework.boot</groupId > <artifactId > spring-boot-starter-parent</artifactId > <version > 2.5.0</version > </parent > <dependencies > <dependency > <groupId > org.springframework.boot</groupId > <artifactId > spring-boot-starter-web</artifactId > </dependency > </dependencies >
6.3 resources目录下引入application.yml配置文件
1
2
3
4
5
# 公共配置 server: port: 8888 # 修改内嵌服务器端口号 servlet: context-path: /springboot01 # 修改项目名 注意项目名必须以“/”开头 访问路径要拼上
6.4 编写入口类,启动项目
1 2 3 4 5 6 7 8 9 10 11 12 13 14 15 16 17 18 19 20 21 22 23 24 25 26 27 28 29 30 31 32 33 34 35 36 37 38 39 40 41 42 43 44 45 46 47 48 49 50 51 52 53 54 55 56 57 58 59 60 61 62 63 package com.study; import org.springframework.boot.SpringApplication; import org.springframework.boot.autoconfigure.SpringBootApplication; @SpringBootApplication public class SpringBoot01Application { public static void main (String[] args) { SpringApplication.run(SpringBoot01Application.class,args); } }
运行main启动项目
1
2
3
4
5
6
7
8
9
10
11
12
13
14
15
16
17
18
19
20
. ____ _ __ _ _ /\\ / ___'_ __ _ _(_)_ __ __ _ \ \ \ \ ( ( )\___ | '_ | '_| | '_ \/ _` | \ \ \ \ \\/ ___)| |_)| | | | | || (_| | ) ) ) ) ' |____| .__|_| |_|_| |_\__, | / / / / =========|_|==============|___/=/_/_/_/ :: Spring Boot :: (v2.5.0) 2022-04-28 11:29:21.768 INFO 10908 --- [ main] com.study.SpringBoot01Application : Starting SpringBoot01Application using Java 1.8.0_131 on cjn-PC with PID 10908 (D:\Software_Development\IDEA_code\SpringBoot\springboot01\target\classes started by cjn in D:\Software_Development\IDEA_code\SpringBoot\springboot01) 2022-04-28 11:29:21.775 INFO 10908 --- [ main] com.study.SpringBoot01Application : No active profile set, falling back to default profiles: default 2022-04-28 11:29:22.628 INFO 10908 --- [ main] o.s.b.w.embedded.tomcat.TomcatWebServer : Tomcat initialized with port(s): 8888 (http) 2022-04-28 11:29:22.642 INFO 10908 --- [ main] o.apache.catalina.core.StandardService : Starting service [Tomcat] 2022-04-28 11:29:22.642 INFO 10908 --- [ main] org.apache.catalina.core.StandardEngine : Starting Servlet engine: [Apache Tomcat/9.0.46] 2022-04-28 11:29:22.716 INFO 10908 --- [ main] o.a.c.c.C.[Tomcat].[localhost].[/] : Initializing Spring embedded WebApplicationContext 2022-04-28 11:29:22.716 INFO 10908 --- [ main] w.s.c.ServletWebServerApplicationContext : Root WebApplicationContext: initialization completed in 895 ms 2022-04-28 11:29:23.044 INFO 10908 --- [ main] o.s.b.w.embedded.tomcat.TomcatWebServer : Tomcat started on port(s): 8888 (http) with context path '' 2022-04-28 11:29:23.053 INFO 10908 --- [ main] com.study.SpringBoot01Application : Started SpringBoot01Application in 1.805 seconds (JVM running for 3.3) 2022-04-28 11:29:23.054 INFO 10908 --- [ main] o.s.b.a.ApplicationAvailabilityBean : Application availability state LivenessState changed to CORRECT 2022-04-28 11:29:23.056 INFO 10908 --- [ main] o.s.b.a.ApplicationAvailabilityBean : Application availability state ReadinessState changed to ACCEPTING_TRAFFIC //说明: 出现以上日志说明启动成功
注意:到这里项目环境已经搭建成功了
6.5 创建控制器并测试
1 2 3 4 5 6 7 8 9 10 11 12 13 14 15 16 17 18 19 20 21 22 23 24 25 26 27 28 29 30 31 32 33 34 35 36 37 @Controller package com.study.controller; import org.springframework.web.bind.annotation.RequestMapping; import org.springframework.web.bind.annotation.RestController; @RestController @RequestMapping("hello") public class HelloController { @RequestMapping("test") public String test () { System.out.println("hello springboot!" ); return "Hello SpringBoot!" ; } }
启动项目进行测试控制器:
1
2
3
4
5
# 注意: springboot的项目启动默认无项目名,此处指定了项目名 - 访问路径: http://localhost:8888/springboot01/hello/test # 注意: springboot的项目启动默认无项目名 - 访问路径: http://localhost:8888/hello/test
测试结果:
(1)配置项目名
(2)不配置项目名
与此同时,控制台输出:hello springboot!
7.相关注解说明 1 2 3 4 5 6 7 8 9 10 11 12 13 14 15 16 17 18 19 20 21 22 23 # springboot = springmvc(控制器controller) + spring(工厂) # 入口类 SpringApplication - SpringBootApplication: 全局入口类 有且只能有一个 # @SpringBootApplication: 注解 组合注解: 就是由多个注解组合而成一个注解 元注解 : 用来修饰注解的注解,如:@Target、@Retention、@Documented、@Inherited @Target: 指定注解作用范围 @Retention: 指定注解什么时候有效 包含下面三个注解: # @SpringBootConfiguration: 这个注解就是用来自动配置spring、springmvc(初始化servlet ...)相关环境 # @EnableAutoConfiguration: 开启自动配置 自动配置核心注解 自动配置spring相关环境 自动与项目中引入的第三方技术自动配置其环境 mybatis-springboot、redis-springboot 、es-springboot 、rabbitmq 第三方技术 # @ComponentScan: 组件扫描 根据注解发挥注解作用,默认扫描当前包及其子包 # 注意启动springboot应用时候需要传递main函数参数作为启动的第二个参数,它的主要作用是: 测试用,项目启动后动态传参,在启动时指定jvm参数覆盖默认配置
8.配置文件 8.1 配置文件的拆分
说明:在实际开发过程中生产环境和测试环境有可能是不一样的,因此将生产中的配置和测试中的配置拆分开是非常必要的,在springboot中也提供了配置文件拆分的方式。
这里以生产中项名名称不一致为例:
生产中项目名为: springboot_prod测试中项目名为: springboot_dev端口同时为: 8888 (也可设置不同)
1 2 3 4 5 6 7 8 9 10 11 12 13 14 15 16 17 18 19 20 21 22 23 24 # 主配置文件 application.yml:用来书写相同的的配置 # 公共配置 server: port: 8888 # 修改内嵌服务器端口号 # servlet: # context-path: /springboot01 # 修改项目名 注意项目名必须以“/”开头 # 激活环境配置,指定哪个环境配置生效(此处写配置文件名的简写) spring: profiles: # active: prod # 让prod生效 active: dev # 让dev生效 # 生产配置文件 application-pord.yml,其中prod为生产配置文件简名 server: servlet: context-path: /springboot_prod # 测试配置文件 application-dev.yml,其中dev为测试配置文件简名 server: servlet: context-path: /springboot_dev
启动项目后测试:
生产访问路径: http://localhost:8888/springboot_prod/hello/test
测试访问路径: http://localhost:8888/springboot_dev/hello/test
控制台同时输出hello springboot!
8.2 启动指定配置文件
说明:往往在企业级开发过程中为SpringBoot应用启动时指定一个完整外部配置也是经常用到的,在SpringBoot中也提供这个方式来启动项目,如下所示:
application_local_prod.yml配置文件代码
1 2 3 4 5 # 公共配置 server: port: 9999 # 修改内嵌服务器端口号 servlet: context-path: /springboot_local_prod
需要额外进行配置:
1 2 3 4 5 6 7 8 9 Program arguments:需要指定绝对路径 例如: --spring.config.location=D:\Software_Development\IDEA_code\SpringBoot\springboot01\application-local-prod.yml 复制application_local_prod.yml路径方法:选中文件---右键---Copy---Absolute Path 外部部署时打包成jar包:java -jar --spring.config.location=绝对路径 xxx.jar
启动项目后测试:访问路径:http://localhost:9999/springboot_local_prod/hello/test
控制台同时输出hello springboot!
9.创建项目的两种方式 9.1 方式一:基于maven
File—New—Module—Maven—可以不选任何骨架 / 可以勾选maven-archetype-quickstart / 可以勾选maven-archetype-webapp,完成项目创建后需要额外添加test目录下的resources目录。
9.2 方式二:基于Spring Initializr快速初始化(推荐)
File—New—Module—Spring Initializr—选择SDK和starter service URL
设置Group、Artifict、Type、Packaging、Java Version等参数
选择依赖
创建后的项目结构如下:
通过Spring Initializr创建的项目结构完整,生成的其他文件说明如下:
1、创建项目时,建议各字段间以-分割,例如:spring-boot-day02
2、.mvn属于隐藏文件,主要用于配合mvnw(Linux)、mvnw.cmd(Windows)进行项目启动
3、.gitIgnore属于Git忽略文件配置文件,用于Git使用
4、Spring Initializr创建项目完成后默认配置文件为application.properties,建议修改为.yml后缀,即:application.yml,相比于properties,yml更加主流
1 2 3 4 5 6 7 8 9 10 11 12 13 14 15 16 17 18 19 20 21 22 23 24 25 26 27 28 29 30 31 32 33 34 35 <parent > <groupId > org.springframework.boot</groupId > <artifactId > spring-boot-starter-parent</artifactId > <version > 2.6.7</version > <relativePath /> </parent > <dependencies > <dependency > <groupId > org.springframework.boot</groupId > <artifactId > spring-boot-starter-web</artifactId > </dependency > <dependency > <groupId > org.springframework.boot</groupId > <artifactId > spring-boot-starter-test</artifactId > <scope > test</scope > </dependency > </dependencies > <build > <plugins > <plugin > <groupId > org.springframework.boot</groupId > <artifactId > spring-boot-maven-plugin</artifactId > </plugin > </plugins > </build >
9.3 添加配置
1 2 3 4 server: port: 8888 # 修改内置服务器访问端口 servlet: context-path: /spring-boot-02
9.4 新建Controller测试服务器
1 2 3 4 5 6 7 8 9 10 11 12 13 14 15 16 17 18 19 20 21 22 23 package com.study.controller;import org.springframework.web.bind.annotation.RequestMapping;import org.springframework.web.bind.annotation.RestController;@RestController @RequestMapping("hello") public class HelloController { @RequestMapping("test") public String test () { System.out.println("Hello SpringBoot!" ); return "Hi SpringBoot!" ; } }
测试结果:
控制台输出:Hello SpringBoot!
10.管理工厂对象的创建 10.0回顾spring工厂创建对象
10.1springboot创建对象
10.1 .1创建单个对象
在springboot中管理单个对象可以直接使用原始spring框架中注解形式创建 。
@Component 通用的对象创建注解
@Controller 用来创建控制器对象,直接写在控制器类上
@Service 用来创建业务层对象,一般写在Service接口的对应实现类上
@Repository 用来创建DAO层对象,此注解一般很少用,DAO接口的实现类在mapper映射文件中实现
以上注解都有value属性,value属性用来指定工厂中对象名称,默认名称为类名首字母小写,使用其它的名称时需重新设定,单个属性时可省略value,直接在“”中写对象名称。
1 2 3 4 @Service public class DemoServiceImpl implements UserService { }
通过工厂创建之后 可以在使用处注入 该对象:
1 2 3 4 5 6 7 @Controller @RequestMapping("hello") public class HelloController { @Autowired private DemoService demoService; //doing... }
10.1.2 创建多个对象
如何在springboot中像spring框架一样通过xml创建多个对象?在SpringBoot中也提供了相同注解如**@Configuration + @Bean注解进行创建**
(1)管理复杂对象的创建
注:抽象类不能直接实例化,一般通过抽象类内部提供的静态方法实例化
不交给工厂自己用
1 2 Calendar instance = Calendar.getInstance();System.out.println("当前日期:" +instance.getTime());
交给工厂要建个包config放
1 2 3 4 5 6 7 8 9 10 11 12 13 @Configuration public class Beans { @Bean public Calendar calendar () { return Calendar.getInstance(); } }
(2)使用复杂对象
1 2 3 4 5 6 7 8 @Controller @RequestMapping("hello") public class HelloController { @Autowired private Calendar calendar; ...... }
注意:
1.@Configuration 用来在工厂中一次性创建多个对象,可同时创建简单对象和复杂对象
2.@Component 用来创建单个对象,一般在各层对应的类上使用
10.2 测试
开发BeanConfig
1 2 3 4 5 6 7 8 9 10 11 12 13 14 15 16 17 18 19 20 21 22 23 24 25 26 27 28 package com.study.config;import org.springframework.context.annotation.Bean;import org.springframework.context.annotation.Configuration;import java.util.Calendar;@Configuration public class BeanConfig { @Bean public Calendar calendar () { return Calendar.getInstance(); } }
开发Service
1 2 3 4 5 6 7 8 9 10 11 12 package com.study.service; public interface DemoService { void demo () ; }
编写Service实现类
1 2 3 4 5 6 7 8 9 10 11 12 13 14 15 16 17 18 19 20 21 22 23 24 package com.study.service; import org.springframework.stereotype.Service; @Service(value = "demoService") public class DemoServiceImpl implements DemoService { @Override public void demo () { System.out.println("DemoService is Ok" ); } }
开发Controller
1 2 3 4 5 6 7 8 9 10 11 12 13 14 15 16 17 18 19 20 21 22 23 24 25 26 27 28 29 30 31 32 33 34 35 36 37 38 39 40 41 42 43 package com.study.controller; import com.study.service.DemoService; import org.springframework.beans.factory.annotation.Autowired; import org.springframework.beans.factory.annotation.Qualifier; import org.springframework.web.bind.annotation.RequestMapping; import org.springframework.web.bind.annotation.RestController; import java.util.Calendar; @RestController @RequestMapping("demo") public class DemoController { @Autowired private DemoService demoService; @Autowired @Qualifier(value = "demoService") private DemoService demoService1; @Autowired @Qualifier(value = "calendar") private Calendar calendar; @RequestMapping("test") public String test () { System.out.println("demo ok" ); demoService.demo(); demoService1.demo(); System.out.println("demoService==demoService1 : " + (demoService==demoService1)); System.out.println("工厂中获取日历对象,当前时间为" + calendar.getTime()); return "Demo Ok!" ; } }
启动项目访问测试路径进行测试: http://localhost:8888/[spring-boot](https://so.csdn.net/so/search?q=spring-boot&spm=1001.2101.3001.7020)-02/demo/test
控制台输出结果:
demo ok
11.对象注入 语法:需要谁就把谁声明为成员变量,并加入相应的注入注解
1 2 3 4 5 6 7 8 9 10 11 12 13 14 15 16 17 18 19 20 21 22 23 24 25 26 27 package com.study.config;import org.springframework.context.annotation.Bean;import org.springframework.context.annotation.Configuration;import java.util.Calendar;@Configuration public class BeanConfig { @Bean public Calendar calendar () { return Calendar.getInstance(); } }
开发Service
1 2 3 4 5 6 7 8 9 10 11 12 package com.study.service; public interface DemoService { void demo () ; }
编写Service实现类
1 2 3 4 5 6 7 8 9 10 11 12 13 14 15 16 17 18 19 20 21 22 23 24 package com.study.service; import org.springframework.stereotype.Service; @Service(value = "demoService") public class DemoServiceImpl implements DemoService { @Override public void demo () { System.out.println("DemoService is Ok" ); } }
开发Controller
1 2 3 4 5 6 7 8 9 10 11 12 13 14 15 16 17 18 19 20 21 22 23 24 25 26 27 28 29 30 31 32 33 34 35 36 37 38 39 40 41 42 43 package com.study.controller; import com.study.service.DemoService; import org.springframework.beans.factory.annotation.Autowired; import org.springframework.beans.factory.annotation.Qualifier; import org.springframework.web.bind.annotation.RequestMapping; import org.springframework.web.bind.annotation.RestController; import java.util.Calendar; @RestController @RequestMapping("demo") public class DemoController { @Autowired private DemoService demoService; @Autowired @Qualifier(value = "demoService") private DemoService demoService1; @Autowired @Qualifier(value = "calendar") private Calendar calendar; @RequestMapping("test") public String test () { System.out.println("demo ok" ); demoService.demo(); demoService1.demo(); System.out.println("demoService==demoService1 : " + (demoService==demoService1)); System.out.println("工厂中获取日历对象,当前时间为" + calendar.getTime()); return "Demo Ok!" ; } }
启动项目访问测试路径进行测试:http://localhost:8888/spring-boot-02/demo/test
控制台输出结果:
1 2 3 4 5 demo ok DemoService is Ok DemoService is Ok demoService==demoService1 : true 工厂中获取日历对象,当前时间为Fri Apr 29 12:20:00 CST 2022
12.属性注入 12.1 SpringBoot与spring属性注入方式对比 spring两种属性注入方式:引用类型:标签或者注解
基本.. :标签或者注解
springboot两种属性注入方式:八种基本类型+String+日期+数组+set list map:注解@Value
注入我们的对象:注解@Autowired
12.2基本属性注入 application.yml中给属性赋值,控制器中使用@Value注解完成属性注入
语法:需要谁就把谁声明为成员变量,并加入相应的注入注解
application.yml
1 2 3 4 5 6 7 8 9 10 11 12 13 14 # 声明基本属性注入值 # 1. String+8 种基本数据类型 name: 茶白 age: 26 weight: 144.60 birthday: 2012 /12 /12 12 :12 :12 # 注意:默认的日期格式为 yyyy/mm/dd HH:MM:ss sex: true # 2. 数组 arrays: 1 ,2 ,3 ,4 ,5 # 注意:注入数组元素的时候,多个元素间使用“,”进行分割 # 3. 集合 lists: pig,dog,cat,tiger,bee # 规则同数组一致 maps: "{'a':'熊大','b':'熊二','c':'光头强'}" # 注意:注入map集合要使用json形式进行注入,使用 @Value 注入时必须加入 "#{${属性}}" 进行注入
InjectionController
1 2 3 4 5 6 7 8 9 10 11 12 13 14 15 16 17 18 19 20 21 22 23 24 25 26 27 28 29 30 31 32 33 34 35 36 37 38 39 40 41 42 43 44 45 46 47 48 49 50 51 52 53 54 55 56 57 58 59 60 61 62 63 64 65 66 67 68 package com.study.controller; import org.springframework.beans.factory.annotation.Value; import org.springframework.validation.annotation.Validated; import org.springframework.web.bind.annotation.RequestMapping; import org.springframework.web.bind.annotation.RestController; import java.util.Date; import java.util.List; import java.util.Map; @RestController @RequestMapping("inject") public class InjectionController { @Value("${name}") private String name; @Value("${age}" //@Value("xxx")可以不需要配置文件,直接赋值,但这种方法把值写死了不利于代码维护 还是推荐写到配置文件里 //使用spring el表达式去引用配置文件的值,这要就可以把配置文件的值注入属性中,实现属性和配置的解耦 private Integer age; @Value("${weight}") private Double weight; @Value("${birthday}") private Date birthday; @Value("${sex}") private Boolean sex; //2.测试数组 @Value("${arrays}") private String[] arrays; //3.测试集合 @Value("${lists}") private List<String> lists; @Value("#{${maps}}") //注意:在注入map集合时,配置文件中要使用json格式,使用时必须使用"#{${xxx}}"进行获取 private Map<String,String> maps; //测试路径:http://localhost:8888/spring-boot-02/inject/test @RequestMapping("test") public String test(){ System.out.println("inject ok"); System.out.println("name = " + name); System.out.println("age = " + age); System.out.println("weight = " + weight); System.out.println("birthday = " + birthday); System.out.println("sex = " + sex); for (String array : arrays) { System.out.println("array = " + array); } for (String list : lists) { System.out.println("list = " + list); } maps.forEach((k,v)-> System.out.println("k = " + k + ", v = " + v)); return "Inject Ok"; } }
启动服务测试,访问路径:http://localhost:8888/spring-boot-02/inject/test
控制台输出结果:
1 2 3 4 5 6 7 8 9 10 11 12 13 14 15 16 17 18 19 inject ok name = 茶白 age = 26 weight = 144.6 birthday = Wed Dec 12 12:12:12 CST 2012 sex = true array = 1 array = 2 array = 3 array = 4 array = 5 list = pig list = dog list = cat list = tiger list = bee k = a, v = 熊大 k = b, v = 熊二 k = c, v = 光头强
12.3属性的对象方式注入(一次注入多个属性) application.yml中给属性赋值,控制器中使用 @ConfigurationProperties(prefix=”前缀”) 注解完成属性注入,注意此种方式必须提供set方法
语法:需要谁就把谁声明为成员变量,并加入相应的注入注解
pom.xml中引入自定义注入元数据依赖
1 2 3 4 5 6 7 <dependency > <groupId > org.springframework.boot</groupId > <artifactId > spring-boot-configuration-processor</artifactId > <optional > true</optional > </dependency >
解决导入依赖后仍无提示的方法:
1.忘记刷新maven,重新刷新一下
2.重新build一下项目
3.clean一下maven
4.重启idea
application.yml
1 2 3 4 5 # 声明对象方式注入 orders: id: 10 name: 红烧肉 price: 35.38
InjectionObjectController.java
1 2 3 4 5 6 7 8 9 10 11 12 13 14 15 16 17 18 19 20 21 22 23 24 25 26 27 28 29 30 31 32 33 34 35 36 37 38 39 40 41 42 43 44 45 46 47 48 49 package com.study.controller; import org.springframework.boot.context.properties.ConfigurationProperties; import org.springframework.web.bind.annotation.RequestMapping; import org.springframework.web.bind.annotation.RestController; @RestController @RequestMapping("injectObject") @ConfigurationProperties(prefix = "orders") public class InjectionObjectController { private Integer id; private String name; private Double price; public void setId (Integer id) { this .id = id; } public void setName (String name) { this .name = name; } public void setPrice (Double price) { this .price = price; } @RequestMapping("test") public String test () { System.out.println("injectObject ok" ); System.out.println("id = " + id); System.out.println("name = " + name); System.out.println("price = " + price); return "injectObject ok" ; } }
启动项目进行测试,访问路径:http://localhost:8888/spring-boot-02/injectObject/test
控制台输出结果:
1 2 3 4 injectObject ok id = 10 name = 红烧肉 price = 35.38
13.JSP模板集成
在SpringBoot框架中默认模板推荐使用Thymeleaf模板,这里我们优先讲与JSP模板进行集成。
13.1pom.xml中引入jsp的集成jar包
1 2 3 4 5 6 7 8 9 10 11 12 <dependency > <groupId > jstl</groupId > <artifactId > jstl</artifactId > <version > 1.2</version > </dependency > <dependency > <groupId > org.apache.tomcat.embed</groupId > <artifactId > tomcat-embed-jasper</artifactId > </dependency >
13.2pom.xml引入jsp运行插件
(注意:使用springboot 2.6.7新建项目时已导入此插件,无需导入)
1 2 3 4 5 6 7 8 9 10 11 12 13 14 <build > <plugins > <plugin > <groupId > org.springframework.boot</groupId > <artifactId > spring-boot-maven-plugin</artifactId > </plugin > </plugins > </build >
13.3开发jsp页面(==在main目录下新建webapp文件夹==,添加index.jsp)
1 2 3 4 5 6 7 8 9 10 11 12 13 14 <%@page pageEncoding="utf-8" contentType="text/html; UTF-8" isELIgnored="false" %> <!doctype html> <html lang="en" > <head> <meta charset="UTF-8" > <meta name="viewport" content="width=device-width, user-scalable=no, initial-scale=1.0, maximum-scale=1.0, minimum-scale=1.0" > <meta http-equiv="X-UA-Compatible" content="ie=edge" > <title>springboot</title> </head> <body> <h1>Hello, SpringBoot!</h1> </body> </html>
注意: 如果新建的jsp页面为空白页面,可使用!+Tab进行模板补全
13.4 application.yml配置视图解析器
1 2 3 4 5 6 spring: mvc: view: prefix: / suffix: .jsp
13.5开发控制器
1 2 3 4 5 6 7 8 9 10 11 12 13 14 15 16 17 18 19 20 21 22 package com.study.controller;import org.springframework.stereotype.Controller;import org.springframework.web.bind.annotation.RequestMapping;@Controller @RequestMapping("jsp") public class JspController { @RequestMapping("test") public String test () { System.out.println("jsp ok" ); return "index" ; } }
启动服务进行测试,访问路径: http://localhost:8888/spring-boot-02/jsp/test,若找不到jsp页面,需要在idea中进行配置来启动jsp页面,下面有两种解决办法。
注意:使用springboot 2.6.7可以正常加载jsp页面,无需进行下面配置。
13.6idea中配置jsp页面
方式1:使用插件启动访问JSP页面 插件在13.2 不能再在main函数启动了 用插件启动
方式2:在idea中指定工作目录启动访问JSP
启动项目测试,访问路径:http://localhost:8888/spring-boot-02/index.jsp
13.7配置jsp页面修改后无需重启项目即可自动更新
application.yml
1 2 3 4 5 6 7 8 # 公共配置 server: port: 8888 # 修改内置tomcat服务器的服务端口 servlet: context-path: /spring-boot-02 jsp: init-parameters: development: true # 开启jsp页面开发模式,修改jsp页面无需重启springboot应用即可更新页面
14.整合Mybatis框架 1 2 3 4 5 6 7 8 9 10 11 12 13 14 15 16 17 18 19 20 21 22 23 24 25 26 27 28 29 30 31 32 33 34 35 36 37 38 39 40 41 42 43 44 45 46 47 48 49 50 51 52 53 54 55 56 57 58 59 60 springboot 微框架 = spring 工厂 + springmvc 控制器 微:快速开发框架 通过遵守默认约定 简化项目中样板化配置 数据库访问框架: hibernate jpa mybatis(框架) 回顾: spring框架如何整合mybatis? 1.引入依赖 spring 相关 mysql 相关 驱动 数据源 mybatis 相关 mybatis核心jar mybatis和spring框架整合 2.spring.xml a.开启注解扫描 b.创建数据源对象 注入 指定使用那种数据源类型 注入dirverClassName 注入url 注入username password c.创建sqlSessionFactory 注入 数据源 注入mapper配置文件位置 注入实体别名包 d.创建Dao对象 注入SqlSessionFactory 以及Dao接口所在包 e.创建事务管理器 DataSourceTranacationManager 注入 数据源对象 f.在业务层组件上加入事务注解 @Transacational <tx:annotation-driven transaction-manager="transactionManager"/> 3.测试 1).建表 2).开发实体类 3).开发DAO接口 4).开发Mapper配置文件 5).开发Service接口 6).开发ServiceImpl实现类 7).测试ServiceImpl =========================================================================== springboot框架中如何整合mybatis框架? 1.引入依赖 spring-boot-stater-web mysql相关 mysql驱动 druid数据源 mybatis相关的 (mybatis-spring-boot-stater) 依赖 (mybatis mybatis-spring) 2.书写配置 a.开启注解扫描 @SpringBootApplication @ComponentScan 省略 b.创建数据源 1.指定数据源类型 2.指定数据库驱动 3.指定url 4.指定username 5.指定password c.创建SqlSessionFactory 1.指定mapper配置文件位置 2.指定实体所在包位置 起别名 d.创建DAO 1.指定DAO接口所在包 并不在配置文件配置在入口类加注解即可 e.创建事务管理器 开启注解式事务生效 省略 3.测试 1).建表 2).开发实体类 3).开发DAO接口 4).开发Mapper映射文件 5).开发Service接口 6).开发ServiceImpl实现类 7).测试ServiceImpl
14.1 pom.xml中引入依赖
注意:springboot和java版本和mybatis和MySQL版本对应关系
1 2 3 4 5 6 7 8 9 10 11 12 13 14 15 16 17 18 19 20 21 22 23 24 25 26 27 28 29 30 31 32 33 34 <parent > <groupId > org.springframework.boot</groupId > <artifactId > spring-boot-starter-parent</artifactId > <version > 2.5.0</version > </parent > <dependencies > <dependency > <groupId > org.springframework.boot</groupId > <artifactId > spring-boot-starter-web</artifactId > </dependency > </dependencies > <dependency > <groupId > com.alibaba</groupId > <artifactId > druid</artifactId > <version > 1.2.4</version > </dependency > <dependency > <groupId > mysql</groupId > <artifactId > mysql-connector-java</artifactId > <version > 5.1.38</version > </dependency > <dependency > <groupId > org.mybatis.spring.boot</groupId > <artifactId > mybatis-spring-boot-starter</artifactId > <version > 2.1.4</version > </dependency >
14.2 application.yml编写相关配置
1 2 3 4 5 6 7 8 9 10 11 12 13 14 15 16 17 18 19 20 # 公共配置 server: port: 8888 # 修改内置tomcat端口号 servlet: context-path: /spring-boot-day03 #指定应用名称 # 整合mybatis数据源相关配置 spring: datasource: type: com.alibaba.druid.pool.DruidDataSource # 指定连接池类型 driver-class-name: com.mysql.jdbc.Driver # mysql 5.x版本驱动 # driver-class-name: com.mysql.cj.jdbc.Driver # mysql 8.x版本驱动 url: jdbc:mysql://localhost:3306/bootssm?characterEncoding=UTF-8 # 指定url username: root # 指定用户名和密码 password: 123456 # 指定密码 # mybatis相关配置 mybatis: mapper-locations: classpath:com/study/mapper/*.xml # 指定mapper配置文件位置 当mapper接口和mapper接口对应的配置文件在 命名上相同 所在的路径相同可不配置 type-aliases-package: com.study.entity # 指定实体类的包名,默认别名:类名或类名首字母小写两种
14.3 启动类中添加注解扫描DAO接口所在包
1 2 3 4 5 6 7 8 9 10 11 12 13 14 15 16 17 18 19 20 21 22 23 24 25 26 package com.study; import org.apache.ibatis.annotations.Mapper; import org.mybatis.spring.annotation.MapperScan; import org.springframework.boot.SpringApplication; import org.springframework.boot.autoconfigure.SpringBootApplication; @SpringBootApplication @MapperScan("com.study.dao") public class SpringBootDay03Application { public static void main (String[] args) { SpringApplication.run(SpringBootDay03Application.class, args); } }
————————————————-到这里springboot整合mybatis环境搭建就完成了,下边就是测试了———————————————
14.4 建表
1 2 3 4 5 6 7 8 9 CREATE DATABASE IF NOT EXISTS bootssm; USER bootssm; CREATE TABLE IF NOT EXISTS t_user( id INT(11) NOT NULL AUTO_INCREMENT COMMENT '主键id', name VARCHAR(40) COMMENT '姓名', birthday TIMESTAMP COMMENT '生日', salary DOUBLE(10,2) COMMENT '工资', PRIMARY KEY(id) )ENGINE=INNODB DEFAULT CHARSET=utf8mb4;
14.5开发实体类
User
1 2 3 4 5 6 7 8 9 10 11 12 13 14 15 16 17 18 19 20 21 22 23 24 25 26 27 28 29 30 31 32 33 34 35 36 37 38 39 40 41 42 43 44 45 46 47 48 49 50 51 52 53 54 55 56 57 58 59 60 61 62 63 64 65 66 67 68 69 package com.study.entity;import java.util.Date;public class User { private Integer id; private String name; private Date birthday; private Double salary; public User () { } public User (Integer id, String name, Date birthday, Double salary) { this .id = id; this .name = name; this .birthday = birthday; this .salary = salary; } @Override public String toString () { return "User{" + "id=" + id + ", name='" + name + '\'' + ", birthday=" + birthday + ", salary=" + salary + '}' ; } public Integer getId () { return id; } public void setId (Integer id) { this .id = id; } public String getName () { return name; } public void setName (String name) { this .name = name; } public Date getBirthday () { return birthday; } public void setBirthday (Date birthday) { this .birthday = birthday; } public Double getSalary () { return salary; } public void setSalary (Double salary) { this .salary = salary; } }
14.6 开发DAO接口以及Mapper映射文件
UserDAO mybatis只写接口实现是由mapper配置文件代替的
1 2 3 4 5 6 7 8 9 10 11 12 13 14 15 16 17 18 19 20 21 22 23 24 25 26 27 28 29 30 31 32 package com.study.dao; import com.study.entity.User; import java.util.List; public interface UserDAO { List<User> findAll () ; void save (User user) ; }
UserDAOMapper(resources:com/study/mapper) 位置要注意 到这里dao就写好了
1 2 3 4 5 6 7 8 9 10 11 12 13 14 15 16 17 18 19 <?xml version="1.0" encoding="UTF-8" ?> <!DOCTYPE mapper PUBLIC "-//mybatis.org//DTD Mapper 3.0//EN" "http://mybatis.org/dtd/mybatis-3-mapper.dtd" > <mapper namespace ="com.study.dao.UserDAO" > <select id ="findAll" resultType ="User" > select id,name,birthday,salary from t_user </select > <insert id ="save" parameterType ="User" useGeneratedKeys ="true" keyProperty ="id" > insert into t_user values(#{id},#{name},#{birthday},#{salary}) </insert > </mapper >
14.7 开发Service以及实现类
1 2 3 4 5 6 7 8 9 10 11 12 13 14 15 16 17 18 19 20 21 22 23 24 25 26 27 28 29 30 31 32 package com.study.service;import com.study.entity.User;import java.util.List;public interface UserService { List<User> findAll () ; void save (User user) ; }
UserServiceImpl 到这里业务层就写了
1 2 3 4 5 6 7 8 9 10 11 12 13 14 15 16 17 18 19 20 21 22 23 24 25 26 27 28 29 30 31 32 33 34 35 36 37 38 39 40 41 42 43 44 45 package com.study.service; import com.study.dao.UserDAO; import com.study.entity.User; import org.springframework.beans.factory.annotation.Autowired; import org.springframework.stereotype.Service; import org.springframework.transaction.annotation.Propagation; import org.springframework.transaction.annotation.Transactional; import java.util.List; @Service("userService") @Transactional public class UserServiceImpl implements UserService { private UserDAO userDAO; @Autowired public UserServiceImpl (UserDAO userDAO) { this .userDAO = userDAO; } @Override @Transactional(propagation = Propagation.SUPPORTS) public List<User> findAll () { return userDAO.findAll(); } @Override public void save (User user) { userDAO.save(user); } }
14.8 开发Controller 测试一下整合是否成功
UserController
1 2 3 4 5 6 7 8 9 10 11 12 13 14 15 16 17 18 19 20 21 22 23 24 25 26 27 28 29 30 31 32 33 34 35 36 37 38 39 40 41 42 43 44 45 46 47 48 49 50 51 package com.study.controller; import com.study.entity.User; import com.study.service.UserService; import org.springframework.beans.factory.annotation.Autowired; import org.springframework.web.bind.annotation.RequestMapping; import org.springframework.web.bind.annotation.RestController; import java.util.List; @RestController @RequestMapping("user") public class UserController { private UserService userService; @Autowired public UserController (UserService userService) { this .userService = userService; } @RequestMapping("findAll") public List<User> findAll () { return userService.findAll(); } @RequestMapping("save") public void save (User user) { userService.save(user); } }
14.9 启动项目访问测试
查询所有用户访问地址:http://localhost:8888/spring-boot-day03/user/findAll
添加用户信息访问地址:http://localhost:8888/spring-boot-day03/user/save?name=赵六&birthday=2013/08/04&salary=2000
14.10 @MapperScan和@Mapper注解区别
1 2 3 4 5 6 7 8 9 10 11 /** * @Mapper 注解 * 修饰范围:只能放在DAO接口上,每个接口都需要放置 * 作用:用来在工厂中创建DAO对象 只能创建单个Dao对象 */ /** * @MapperScan 注解 推荐使用 * 修饰范围:用在类上,可以一次性扫描所有DAO接口所在包中的接口 * 作用:用来扫描DAO接口所在包,同时将所有DAO接口在工厂中创建对象 */
15.本地测试 本地测试:即再不启动springboot应用(SpringbootApplication)的情况下,如何测试service和dao
建议:在开发中推荐分层测试,先去测试dao,dao没问题的话再去测试业务逻辑,业务逻辑没问题的话再去启动应用通过controller测试
往往在开发过程中业务代码课程非常复杂频繁启动服务器测试,非常麻烦!这个时候使用本地测试就是一个很好的解决方案,springboot也提供了本地测试解决方案!
1 2 3 4 5 6 7 8 9 10 11 12 13 14 15 16 17 18 19 20 21 22 spring中本地测试 1.启动工厂 ApplicationContext context = new ClassPathXmlApplicationContext("spring.xml"); 2.从工厂中获取指定对象 UserDao userDao = context.getBean("userDao"); 3.调用方法 userDao.xxx(参数); springboot框架中完成本地测试? springboot = spring + springmvc 1.引入结合junit和springboot依赖 <dependency> <groupId>org.springframework.boot</groupId> <artifactId>spring-boot-starter-test</artifactId> <!--只能在测试时可用--> <scope>test</scope> </dependency> 2.启动springboot应用才能spring工厂启动,注入测试对象 @SpringBootTest 修饰范围: 用在类上 作用: 在这个类实例化过程中启动springboot应用
15.1 引入测试依赖
1 2 3 4 5 6 <dependency > <groupId > org.springframework.boot</groupId > <artifactId > spring-boot-starter-test</artifactId > <scope > test</scope > </dependency >
15.2 编写测试类(名字最好望文生义)
@SpringBootTest
修饰范围:用在类上
作用:用来启动本地Spring环境
项目自带的测试类XxxApplication(通过SpringInitializr创建的项目)
1 2 3 4 5 6 7 8 9 10 11 12 13 package com.study; import org.junit.jupiter.api.Test; import org.springframework.boot.test.context.SpringBootTest; @SpringBootTest class SpringBootDay03ApplicationTests { @Test void contextLoads () { } }
实际应用时一般都是通过子测试类继承基本测试类(父测试类)来进行测试,具体如下:
父测试类:BasicTests 这样就不用每次都写@SpringBootTest注解了
1 2 3 4 5 6 7 8 9 10 11 12 13 14 package com.study; import org.springframework.boot.test.context.SpringBootTest; @SpringBootTest public class BasicTests { }
子测试类:UserDAOTests
1 2 3 4 5 6 7 8 9 10 11 12 13 14 15 16 17 18 19 20 21 22 23 24 25 26 27 28 package com.study; import com.study.dao.UserDAO; import org.junit.jupiter.api.Test; import org.springframework.beans.factory.annotation.Autowired; public class UserDAOTests extends BasicTests { @Autowired private UserDAO userDAO; @Test public void testFindAll () { userDAO.findAll().forEach(user -> System.out.println("user = " + user)); } }
子测试类:UserServiceTests
1 2 3 4 5 6 7 8 9 10 11 12 13 14 15 16 17 18 19 20 21 22 23 24 25 26 package com.study; import com.study.entity.User; import com.study.service.UserService; import org.junit.jupiter.api.Test; import org.springframework.beans.factory.annotation.Autowired; public class UserServiceTests extends BasicTests { @Autowired private UserService userService; @Test public void testFindAll () { for (User user : userService.findAll()) { System.out.println("user = " + user); } } }
16.热部署工具 为了进一步提高开发效率,springboot为我们提供了全局项目热部署,日后在开发过程中如果修改了部分代码以及相关配置文件后,不需要每次重启项目使修改生效,在项目中如果开启了springboot全局热部署之后,只需要在修改之后等待几秒即可使修改生效【底层通过强制刷新生成新的.class文件,jvm通过对比旧class与新class进行替换,运行新的class文件,并没有重启整个springboot】。16.1 pom.xml中引入依赖 (每次搭建项目后都需要引入)
1 2 3 4 5 6 7 8 9 <dependency > <groupId > org.springframework.boot</groupId > <artifactId > spring-boot-devtools</artifactId > <optional > true</optional > </dependency >
添加依赖后记得刷新Maven,否则热部署不能生效!!!
16.2 设置idea中支持自动编译(只需要设置一次)
1.开启自动编译(只要不换电脑或者重新安装idea,此操作只进行一次即可)
实现:
(1)视频中操作:Preferences | Build, Execution, Deployment | Compiler -> 勾选上 Build project automatically 这个选项
(2)实际操作:File—Setting—Build,Execution,Deployment—Compiler—勾选上Build project automatically选项—Apply—OK
2.开启允许在运行过程中修改文件
实现:
低版本
任意空白位置—Ctrl+Alt+Shift+/—选择1.Registry…—勾选compiler.automake.allow.when.app.running选项
高版本
16.3 启动项目检测热部署是否生效
修改内容后进行保存,等待项目自动进行编译,日志中由main变为restartedMain表示热部署生效
1 2 3 4 5 6 7 8 9 10 11 12 13 2022-05-16 16:15:49.676 INFO 6128 --- [ restartedMain] com.study.SpringBootDay03Application : Starting SpringBootDay03Application using Java 1.8.0_131 on cjn-PC with PID 6128 (D:\Software_Development\IDEA_code\SpringBoot\spring-boot-day03\target\classes started by cjn in D:\Software_Development\IDEA_code\SpringBoot\spring-boot-day03) 2022-05-16 16:15:49.676 INFO 6128 --- [ restartedMain] com.study.SpringBootDay03Application : No active profile set, falling back to default profiles: default 2022-05-16 16:15:49.825 INFO 6128 --- [ restartedMain] o.s.b.w.embedded.tomcat.TomcatWebServer : Tomcat initialized with port(s): 8888 (http) 2022-05-16 16:15:49.826 INFO 6128 --- [ restartedMain] o.apache.catalina.core.StandardService : Starting service [Tomcat] 2022-05-16 16:15:49.826 INFO 6128 --- [ restartedMain] org.apache.catalina.core.StandardEngine : Starting Servlet engine: [Apache Tomcat/9.0.46] 2022-05-16 16:15:49.843 INFO 6128 --- [ restartedMain] o.a.c.c.C.[.[.[/spring-boot-day03] : Initializing Spring embedded WebApplicationContext 2022-05-16 16:15:49.843 INFO 6128 --- [ restartedMain] w.s.c.ServletWebServerApplicationContext : Root WebApplicationContext: initialization completed in 165 ms 2022-05-16 16:15:49.949 INFO 6128 --- [ restartedMain] o.s.b.d.a.OptionalLiveReloadServer : LiveReload server is running on port 35729 2022-05-16 16:15:49.959 INFO 6128 --- [ restartedMain] o.s.b.w.embedded.tomcat.TomcatWebServer : Tomcat started on port(s): 8888 (http) with context path '/spring-boot-day03' 2022-05-16 16:15:49.962 INFO 6128 --- [ restartedMain] com.study.SpringBootDay03Application : Started SpringBootDay03Application in 0.306 seconds (JVM running for 259.773) 2022-05-16 16:15:49.963 INFO 6128 --- [ restartedMain] o.s.b.a.ApplicationAvailabilityBean : Application availability state LivenessState changed to CORRECT 2022-05-16 16:15:49.964 INFO 6128 --- [ restartedMain] .ConditionEvaluationDeltaLoggingListener : Condition evaluation unchanged 2022-05-16 16:15:49.964 INFO 6128 --- [ restartedMain] o.s.b.a.ApplicationAvailabilityBean : Application availability state ReadinessState changed to ACCEPTING_TRAFFIC
注意:日志出现restartedMain代表已经生效,在使用热部署时如果遇到修改之后不能生效,请重试重启项目再试
17.日志处理 17.1 引言
springboot框架集成了logback 日志, Logback是由log4j创始人设计的又一个开源日志组件。目前,logback分为三个模块:logback-core,logback-classic和logback-access,logback-core是其它两个模块的基础模块;logback-classic是log4j的一个改良版本。此外logback-classic完整实现SLF4J API使你可以很方便地更换成其它日志系统如log4j或JDK14 Logging;logback-access访问模块与Servlet容器集成提供通过Http来访问日志的功能。该日志是对log4j日志展示进一步改进!即: logback 也是一个开源日志组件,和 log4j作用一致,都是用来生成日志,两者相比logback更加轻量!
17.2日志的级别
级别从下到上依次提高,级别越高,输出的信息越详细:
级别从高到低依次为: All < Trace < DEBUG < INFO < WARN < ERROR < Fatal < OFF
OFF | 关闭:最高级别,不打印日志。
FATAL | 致命:指明非常严重的可能会导致应用终止执行错误事件。
ERROR | 错误:指明错误事件,但应用可能还能继续运行。
WARN | 警告:指明可能潜在的危险状况。
INFO | 信息:指明描述信息,从粗粒度上描述了应用运行过程。
DEBUG | 调试:指明细致的事件信息,对调试应用最有用。
TRACE | 跟踪:指明程序运行轨迹,比DEBUG级别的粒度更细。
ALL | 所有:所有日志级别,包括定制级别。
日志级别由低到高: 日志级别越高输出的日志信息越多
17.3 项目中日志分类
一种是rootLogger(根全局日志) : 用来监听项目中所有的运行日志,包括引入依赖jar中的日志
一种是logger(指定包级别日志) : 用来监听项目中指定包中的日志信息
17.4配置日志
注意:SpringBoot框架中默认根日志为INFO级别
logging:
17.5 项目中使用日志
1 2 3 4 5 6 7 8 9 10 11 12 13 14 15 @Controller public class HelloController { private static final Logger log = LoggerFactory.getLogger(HelloController.class); @RequestMapping("/hello") @ResponseBody public String hello () { System.out.println("======hello world=======" ); log.debug("DEBUG,{}" ,"信息" ); log.info("INFO,{}" ,"信息" ); log.warn("WARN,{}" ,"信息" ); log.error("ERROR,{}" ,"信息" ); return "hello" ; } }
17.6具体实现
新建项目spring-boot-day4,新建包、类
a.导入依赖
1 2 3 4 5 6 7 8 9 10 11 12 13 14 15 16 17 18 19 20 <dependency > <groupId > com.alibaba</groupId > <artifactId > druid</artifactId > <version > 1.2.4</version > </dependency > <dependency > <groupId > mysql</groupId > <artifactId > mysql-connector-java</artifactId > <version > 5.1.38</version > </dependency > <dependency > <groupId > org.mybatis.spring.boot</groupId > <artifactId > mybatis-spring-boot-starter</artifactId > <version > 2.1.4</version > </dependency >
b.修改application.properties为application.yml,配置参数
1 2 3 4 5 6 7 8 9 10 11 12 13 14 15 16 17 18 19 20 21 22 23 24 25 26 27 28 29 30 # 公共配置 server: port: 8888 servlet: context-path: /spring-boot-day4 # 整合Mybatis # 数据库配置 spring: datasource: type: com.alibaba.druid.pool.DruidDataSource driver-class-name: com.mysql.jdbc.Driver url: jdbc:mysql://localhost:3306/bootssm?characterEncoding=UTF-8&useSSL=true username: root password: 123456 # 别名配置 mybatis: mapper-locations: classpath:com/study/mapper/*.xml type-aliases-package: com.study.entity # 配置日志 logging: level: root: info # 默认根日志级别为info com.study.dao: debug # 指定某个包的输出日志级别 com.study.service: debug file: name: run.log # 指定生成日志文件的名称 path: ./ # 将日志文件保存在当前项目目录下
c.新建实体类
1 2 3 4 5 6 7 8 9 10 11 12 13 14 15 16 17 18 19 20 21 22 23 24 25 26 27 28 29 30 31 32 33 34 35 36 37 38 39 40 41 42 43 44 45 46 47 48 49 50 51 52 53 54 55 56 57 58 59 60 61 62 63 64 65 66 67 68 69 70 71 package com.study.entity;import javafx.beans.binding.DoubleExpression;import java.util.Date;public class User { private Integer id; private String name; private Date birthday; private Double salary; public User () { } public User (Integer id, String name, Date birthday, Double salary) { this .id = id; this .name = name; this .birthday = birthday; this .salary = salary; } @Override public String toString () { return "User{" + "id=" + id + ", name='" + name + '\'' + ", birthday=" + birthday + ", salary=" + salary + '}' ; } public Integer getId () { return id; } public void setId (Integer id) { this .id = id; } public String getName () { return name; } public void setName (String name) { this .name = name; } public Date getBirthday () { return birthday; } public void setBirthday (Date birthday) { this .birthday = birthday; } public Double getSalary () { return salary; } public void setSalary (Double salary) { this .salary = salary; } }
d.新建DAO接口
1 2 3 4 5 6 7 8 9 10 11 12 13 14 15 16 17 18 19 20 21 22 23 24 25 26 27 28 29 30 31 32 33 package com.study.dao; import com.study.entity.User; import java.util.List; public interface UserDAO { List<User> findAll () ; void save (User user) ; }
e.新建Mapper文件
1 2 3 4 5 6 7 8 9 10 11 12 13 14 15 16 <?xml version="1.0" encoding="UTF-8" ?> <!DOCTYPE mapper PUBLIC "-//mybatis.org//DTD Mapper 3.0//EN" "http://mybatis.org/dtd/mybatis-3-mapper.dtd" > <mapper namespace ="com.study.dao.UserDAO" > <select id ="findAll" resultType ="User" > select id,name,birthday,salary from t_user </select > <insert id ="save" useGeneratedKeys ="true" keyProperty ="id" > insert into t_user values (#{id},#{name},#{birthday},#{salary}) </insert > </mapper >
f.新建Service
1 2 3 4 5 6 7 8 9 10 11 12 13 14 15 16 17 18 19 20 21 22 23 24 25 26 27 28 29 30 31 32 33 package com.study.service; import com.study.entity.User; import java.util.List; public interface UserService { List<User> findAll () ; void save (User user) ; }
h.新建ServiceImpl
1 2 3 4 5 6 7 8 9 10 11 12 13 14 15 16 17 18 19 20 21 22 23 24 25 26 27 28 29 30 31 32 33 34 35 36 37 38 39 package com.study.service; import com.study.dao.UserDAO; import com.study.entity.User; import org.springframework.beans.factory.annotation.Autowired; import org.springframework.stereotype.Service; import org.springframework.transaction.annotation.Propagation; import org.springframework.transaction.annotation.Transactional; import java.util.List; @Service("userService") @Transactional public class UserServiceImpl implements UserService { private UserDAO userDAO; @Autowired public UserServiceImpl (UserDAO userDAO) { this .userDAO = userDAO; } @Override @Transactional(propagation = Propagation.SUPPORTS) public List<User> findAll () { return userDAO.findAll(); } @Override public void save (User user) { userDAO.save(user); } }
i.新建Controller
1 2 3 4 5 6 7 8 9 10 11 12 13 14 15 16 17 18 19 20 21 22 23 24 25 26 27 28 29 30 31 32 33 34 35 36 37 38 package com.study.controller; import com.study.service.UserService; import org.slf4j.Logger; import org.slf4j.LoggerFactory; import org.springframework.beans.factory.annotation.Autowired; import org.springframework.web.bind.annotation.RequestMapping; import org.springframework.web.bind.annotation.RestController; @RestController @RequestMapping("user") public class UserController { private static final Logger log = LoggerFactory.getLogger(UserController.class); private UserService userService; @Autowired public UserController (UserService userService) { this .userService = userService; } @RequestMapping("test") public String test () { log.debug("debug,{}" ,"信息1" ); log.info("info,{}" ,"信息2" ); log.warn("warn,{}" ,"信息3" ); log.error("error,{}" ,"信息4" ); return "Ok" ; } }
17.7IDEA安装Log Support 2插件
方法1:在Settings的Plungins中搜索插件安装,安装后重启IDEA
方法2:搜索不到时,下载插件进行离线安装(idea 2020版本好像不兼容Log Support 2 2021版本)
idea官网下载离线安装:JetBrains Marketplace
下载压缩包后不用解压,通过Install Plugin from Disk选择下载好的压缩包即可,之后重启idea。
安装好插件后,重启idea,还需进行如下配置:
(1)选择slf4j
(2)取消AndroidLog
之后就可以使用了,比如键入logi就会出现log.info(“”);并且自动添加private static final Logger log = LoggerFactory.getLogger(UserController.class);其中,logd 代表log.debug、logw 代表log.warn…以此类推。
注意:以后切换工作空间或者打开一个新的项目,都需要在设置中的Log Support中制定一下需要使用的日志框架
18.面向切面编程(AOP) 18.1引言
springboot是对原有项目中spring框架和springmvc的进一步封装,因此在springboot中同样支持spring框架中AOP切面编程,不过在springboot中为了快速开发仅仅提供了注解方式的切面编程。
18.2 项目环境搭建
新建项目spring-boot-day5
1.修改application.properties为application.yml,添加配置信息
1 2 3 4 server: port: 8888 servlet: context-path: /spring-boot-day5
2.引入依赖
1 2 3 4 <dependency > <groupId > org.springframework.boot</groupId > <artifactId > spring-boot-starter-aop</artifactId > </dependency >
3.编写Service及其实现类Impl
UserService
1 2 3 4 5 6 7 8 9 10 11 12 13 14 15 package com.study.service; public interface UserService { void insert (String name) ; void delete (Integer id) ; void update (String name) ; String select (String name) ; }
UserServiceImpl
1 2 3 4 5 6 7 8 9 10 11 12 13 14 15 16 17 18 19 20 21 22 23 24 25 26 27 28 29 30 31 32 33 34 35 36 package com.study.service; import com.study.annotations.MyAdvice; import org.springframework.stereotype.Service; @Service public class UserServiceImpl implements UserService { @Override public void insert (String name) { System.out.println("处理insert核心业务逻辑,调用DAO~~" ); } @Override public void delete (Integer id) { System.out.println("处理delete核心业务逻辑,调用DAO~~" ); } @Override public void update (String name) { System.out.println("处理update核心业务逻辑,调用DAO~~" ); } @Override @MyAdvice public String select (String name) { System.out.println("处理select核心业务逻辑,调用DAO~~" ); return name; } }
18.3切面使用
1 2 3 4 5 6 7 8 9 10 # 切面注解 - @Aspect 用来类上,代表这个类是一个切面 Aspect 切面 = Advice 附加操作 + Pointcut 切入点 - @Before 用在方法上代表这个方法是一个前置通知方法 - @After 用在方法上代表这个方法是一个后置通知方法 - @Around 用在方法上代表这个方法是一个环绕的方法 # 切入点表达式: 1.execution 方法级别切入点表达式 save update 运行效率越低 2.within 类级别切入点表达式: 控制越粗 运行效率越高 3.基于注解的切入点表达式 @annotation(com.baizhi.annotations.Xxx),需要自定义通知Xxx,且需要YyyServiceImpl业务逻辑方法上添加@Xxx注解,均配置后才可使用
切面配置类
1 2 3 4 5 6 7 8 9 10 11 12 13 14 15 16 17 18 19 20 21 22 23 24 25 26 27 28 29 30 31 32 33 34 35 36 37 38 39 40 41 42 43 44 45 46 47 48 49 50 51 52 53 54 55 56 57 58 59 60 61 62 63 64 65 66 67 68 69 70 71 72 73 74 package com.study.config; import org.aspectj.lang.JoinPoint; import org.aspectj.lang.ProceedingJoinPoint; import org.aspectj.lang.annotation.After; import org.aspectj.lang.annotation.Around; import org.aspectj.lang.annotation.Aspect; import org.aspectj.lang.annotation.Before; import org.springframework.context.annotation.Configuration; @Configuration @Aspect public class MyAspectConfig { @Around("@annotation(com.study.annotations.MyAdvice)") public Object around (ProceedingJoinPoint proceedingJoinPoint) throws Throwable { System.out.println("环绕前置附加操作" ); System.out.println("当前执行目标类:" + proceedingJoinPoint.getTarget()); System.out.println("当前执行目标类中方法:" + proceedingJoinPoint.getSignature().getName()); System.out.println("当前执行目标类中方法参数:" + proceedingJoinPoint.getArgs()); Object proceed = proceedingJoinPoint.proceed(); System.out.println("proceed = " + proceed); System.out.println("环绕后置附加操作" ); return proceed; } }
自定义通知注解
1 2 3 4 5 6 7 8 9 10 11 12 13 14 15 16 17 18 19 package com.study.annotations; import java.lang.annotation.ElementType; import java.lang.annotation.Retention; import java.lang.annotation.RetentionPolicy; import java.lang.annotation.Target; @Retention(RetentionPolicy.RUNTIME) @Target(ElementType.METHOD) public @interface MyAdvice { }
注意:
1.前置通知和后置通知都没有返回值,方法参数都为JointPoint
2.环绕通知有返回值,方法参数为ProceedingJoinPoint,需要抛出异常。一旦执行放行必须将目标方法的返回值返回,否则调用者无法接收返回数据
18.4 测试
BasciTests
1 2 3 4 5 6 7 8 9 10 11 12 13 14 package com.study; import org.springframework.boot.test.context.SpringBootTest; @SpringBootTest public class BasicTests { }
UserServiceImpl
1 2 3 4 5 6 7 8 9 10 11 12 13 14 15 16 17 18 19 20 21 22 23 24 25 26 27 28 29 30 31 32 33 34 35 36 37 38 39 package com.study; import com.study.service.UserService; import org.junit.jupiter.api.Test; import org.springframework.beans.factory.annotation.Autowired; public class UserServiceTest extends BasicTests { @Autowired private UserService userService; @Test public void testInsert () { userService.insert("茶白" ); } @Test public void testDelete () { userService.delete(1 ); } @Test public void testUpdate () { userService.update("加油" ); } @Test public void testSelect () { String name = userService.select("越努力,越幸运" ); System.out.println(name); } }
18.5 总结
1 2 3 4 5 6 7 8 9 10 11 12 13 14 15 16 17 18 19 20 21 22 23 24 25 26 27 28 29 30 31 32 33 34 35 36 37 38 39 40 41 42 43 44 45 46 47 48 49 50 51 52 53 54 55 56 57 58 59 60 61 62 63 64 65 66 67 68 69 70 71 72 73 74 75 76 77 78 79 80 81 82 83 84 85 86 87 88 89 90 91 92 93 94 95 96 97 98 99 100 101 102 103 104 105 ===================保存用户业务逻辑================= 用户业务 UserService void save(User user) void delete(Integer id); User queryById(Integer id); .... UserServiceImpl implement UserService void save(User user){ sout("=============");//业务功能-1 sout("*************");//业务功能-2 ... userDao.save(user); } void delete(Integer id){ sout("=============");//业务功能-1 sout("*************");//业务功能-2 ...... userDao.delete(id); } User queryById(Integer id){ sout("=============");//业务功能-1 sout("*************");//业务功能-2 ..... return userDao.queryById(id) } =================保存用户业务逻辑================== 加入新的功能: 保存用户之前: 打印输出一句话 "===========" ================用户业务逻辑====================== 加入新的功能: 保存|删除|修改|查询用户之前: 打印输出一句话 "===========" 保存|删除|修改|查询用户之前: 打印输出一句话 "***********" ================================================ 问题: 1.现有业务层开发存在问题 a.-->额外功能代码存在大量冗余? b.-->每个方法都需要书写一遍额外功能代码不利于后续项目维护? Spring 框架 AOP: Aspect(切面) Oriented(面向) Programmaing 面向切面编程 Aspect (切面) = Advice(通知) + 切入点(Pointcut) Advice 通知: 业务逻辑中一些附加操作称之为通知 前置 后置 环绕 Pointcut 切入点: 配置通知应用于项目中那些业务操作 Aspect 切面 = 附加操作(Advice) + 切入点(Pointcut)(配置) 1.类 implement xxAdvice接口 2.XML进行配置 <aop:config> <aop:pointcut id="pc" expresssion="execution(* 包.类.方法名(方法参数))|within(类级别)|@annotation(注解类型)"> <aop:advisor advice-ref="通知类" pointcut-ref="pc"/> </aop:config> SpringBoot框架 现有spring框架 进一步封装 1.无xml配置 一切皆java配置 AOP: 面向切面编程 Aspect 切面 = Advice(通知) + 切入点 1.开发附加操作 Advice 2.配置切入点&组装切面 面向切面编程步骤: 1.引入aop切面编程依赖 <dependency> <groupId>org.springframework.boot</groupId> <artifactId>spring-boot-starter-aop</artifactId> </dependency> 2.在springboot项目中新建config(配置)包 @Configuration //修饰范围: 只能用在类上 作用: 代表这是一个spring的配置类 spring.xml @Aspect //修饰范围: 只能用在类上 作用:代表这个类是一个切面类 <aop:config> MyAspectConfig(自定义切面类) 配置类{ //@Before: 代表这个方法是一个前置附加操作 //@After : 代表这个方法是一个后置附加操作 注意: 使用@Before 和 @After注解声明方法上加入一个参数 定义一个参数 JointPoint 连接点 //@Around: 代表这个方法是一个环绕附加操作 value属性: 用来书写切入点表达式 注意: 使用@Around注解 在方法定义时声明一个参数: ProceedingJoinPoint 处理过程中连接点 @Before("execution(* com.baizhi.service.*.*(..))") public void before(){ sout("===========") } }
19.文件上传 文件上传: 用户访问当前系统,将自己本地计算机中文件通过浏览器上传到当前系统所在的服务器或文件服务器(OSS阿里云对象存储、mino对象存储、七牛云文件存储)的过程
19.1 思路
1 2 3 4 a.提供一张上传页面 (此处以jsp页面为例) 提交方式必须:post enctype属性必须为 multipart/form-data(文本类型、二进制类型文件均可做编码),默认的application/x-www-form-urlencoded只能对文本类型(字符串)进行编码 b.开发上传controller
19.2 准备上传页面
upload.jsp
1 2 3 4 5 6 7 8 9 10 11 12 13 14 15 16 17 18 <%@page pageEncoding="UTF-8" contentType="text/html; UTF-8" isELIgnored="false" %> <!doctype html> <html lang="en" > <head> <meta charset="UTF-8" > <meta name="viewport" content="width=device-width, user-scalable=no, initial-scale=1.0, maximum-scale=1.0, minimum-scale=1.0" > <meta http-equiv="X-UA-Compatible" content="ie=edge" > <title>文件上传</title> </head> <body> <h1>测试文件上传</h1> <form action="${pageContext.request.contextPath}/file/uploadByJarDeploy" method="post" enctype="multipart/form-data" > <input type="file" name="file" > <input type="submit" value="上传文件" > </form> </body> </html>
success.jsp
1 2 3 4 5 6 7 8 9 10 11 12 13 14 15 <%@page pageEncoding="UTF-8" contentType="text/html; UTF-8" isELIgnored="false" %> <!doctype html> <html lang="en" > <head> <meta charset="UTF-8" > <meta name="viewport" content="width=device-width, user-scalable=no, initial-scale=1.0, maximum-scale=1.0, minimum-scale=1.0" > <meta http-equiv="X-UA-Compatible" content="ie=edge" > <title>文件上传成功</title> </head> <body> <h1>恭喜您,文件上传成功!</h1> </body> </html>
19.3导入依赖
1 2 3 4 5 <!--解析jsp模板依赖--> <dependency> <groupId>org.apache.tomcat.embed</groupId> <artifactId>tomcat-embed-jasper</artifactId> </dependency>
19.4编写配置文件
application.yml
1 2 3 4 5 6 7 8 9 10 11 12 13 14 15 16 17 18 19 20 21 22 23 24 25 26 server: port: 8888 servlet: context-path: /spring-boot-day5 jsp: init-parameters: development: true spring: mvc: view: prefix: / suffix: .jsp servlet: multipart: max-request-size: 120MB max-file-size: 120MB profiles: active: local logging: level: root: info com.study: debug
application-local.yml 第二种上传方式配置 主配置文件一定要激活这个配置文件
1 2 3 4 file: upload: dir: D:\Software_Development\IDEA_code\SpringBoot\spring-boot-day5\src\main\webapp\upload\local
application-prod.yml
1 2 3 4 file: upload: dir: D:\Software_Development\IDEA_code\SpringBoot\spring-boot-day5\src\main\webapp\upload\prod
19.5编写控制器
1 2 3 4 5 6 7 8 9 10 11 12 13 14 15 16 17 18 19 20 21 22 23 24 25 26 27 28 29 30 31 32 33 34 35 36 37 38 39 40 41 42 43 44 45 46 47 48 49 50 51 52 53 54 55 56 57 58 59 60 61 62 63 64 65 66 67 68 69 70 71 72 73 74 75 76 77 78 79 80 81 82 83 84 85 86 87 88 89 90 91 92 93 94 95 96 97 98 package com.study.controller; import org.slf4j.Logger; import org.slf4j.LoggerFactory; import org.springframework.beans.factory.annotation.Value; import org.springframework.stereotype.Controller; import org.springframework.web.bind.annotation.RequestMapping; import org.springframework.web.multipart.MultipartFile; import javax.servlet.ServletContext; import javax.servlet.http.HttpServletRequest; import java.io.File; import java.io.IOException; import java.text.SimpleDateFormat; import java.util.Date; @Controller @RequestMapping("file") public class FileController { private static final Logger log = LoggerFactory.getLogger(FileController.class); @RequestMapping("upload") public String upload (MultipartFile file, HttpServletRequest request) throws IOException { String originalFilename = file.getOriginalFilename(); log.debug("文件名:{}" , originalFilename); log.debug("文件大小:{}" ,file.getSize()); log.debug("文件类型:{}" ,file.getContentType()); String realPath = request.getSession().getServletContext().getRealPath("/upload" ); log.debug("获取绝对路径:{}" ,realPath); String ext = originalFilename.substring(originalFilename.lastIndexOf("." )); String newFileName = new SimpleDateFormat ("yyyyMMddHHmmssSSS" ).format(new Date ()) + ext; System.out.println("新文件名:" + newFileName); file.transferTo(new File (realPath, newFileName)); return "redirect:/success.jsp" ; } @Value("${file.upload.dir}") private String realPath; @RequestMapping("uploadByJarDeploy") public String uploadByJarDeploy (MultipartFile file) throws IOException { String originalFilename = file.getOriginalFilename(); log.debug("文件名:{}" ,originalFilename); log.debug("文件大小:{}" ,file.getSize()); log.debug("文件类型:{}" ,file.getContentType()); String ext = originalFilename.substring(originalFilename.lastIndexOf("." )); String newFileName = new SimpleDateFormat ("yyyyMMddHHmmssSSS" ).format(new Date ()) + ext; file.transferTo(new File (realPath,newFileName)); return "redirect:/success.jsp" ; } }
注意:
1 2 3 4 5 6 7 8 9 10 11 #上传时出现如下异常: 上传文件的大小超出默认配置 默认10M nested exception is java.lang.IllegalStateException: org.apache.tomcat.util.http.fileupload.FileUploadBase$SizeLimitExceededException: the request was rejected because its size (38443713) exceeds the configured maximum (10485760) #修改上传文件大小: spring: http: multipart: max-request-size: 209715200 #用来控制文件上传大小的限制 max-file-size: 209715200 #用来指定服务端最大文件大小,可以直接使用MB spring.servlet.multipart.max-file-size=500MB spring.servlet.multipart.max-request-size=500MB
19.6 项目目录结构
20.文件下载 文件下载: 将服务器某个资源文件下载到用户本地计算机过程
20.1思路
1 2 3 4 5 6 7 8 9 10 11 12 13 14 a.确定项目中哪些资源可以被下载 aa.txt 用户须知.doc ..... b.将可以被下载资源放入自己服务器指定位置(以这个演示)、文件上传服务器fastdfs(dfs 分布式文件存储系统 1000个节点 冗余备份)、上传到OSS对象存储七牛云(方便但是贵啊)...... /home/download 自己服务器磁盘有限 aa.txt 用户须知.doc ..... /Users/chenyn/Desktop/线上课/项目阶段/01springboot/codes/springboot_day6/download 目录下放可被下载文件 c.项目中开发一个下载页面download.jsp 提供下载文件链接 d.开发下载控制器controller
20.2新建项目,导入依赖
1 2 3 4 5 6 7 <dependency > <groupId > org.apache.tomcat.embed</groupId > <artifactId > tomcat-embed-jasper</artifactId > <scope > provided</scope > </dependency >
20.3添加配置信息
1 2 3 4 5 6 7 8 9 10 11 12 13 14 15 16 17 18 19 20 21 22 23 24 server: port: 8888 servlet: context-path: /spring-boot-day6 jsp: init-parameters: development: true spring: mvc: view: prefix: / suffix: .jsp file: download: dir: D:\Software_Development\IDEA_code\SpringBoot\spring-boot-day6\download logging: level: root: info com.study: debug
20.4开发jsp页面 新建webapp目录新建jsp页面
1 2 3 4 5 6 7 8 9 10 11 12 13 14 15 16 17 18 <%@page pageEncoding="UTF-8" contentType="text/html; UTF-8" isELIgnored="false" %> <!doctype html > <html lang ="en" > <head > <meta charset ="UTF-8" > <meta name ="viewport" content ="width=device-width, user-scalable=no, initial-scale=1.0, maximum-scale=1.0, minimum-scale=1.0" > <meta http-equiv ="X-UA-Compatible" content ="ie=edge" > <title > 测试文件下载</title > </head > <body > <h1 > 文件下载页面</h1 > <a href ="${pageContext.request.contextPath}/file/download?fileName=HELP.md" > HELP.md</a > <a href ="${pageContext.request.contextPath}/file/download?fileName=readme.txt" > readme.txt</a > <a href ="${pageContext.request.contextPath}/file/download?fileName=说明.doc" > 说明.doc</a > <a href ="${pageContext.request.contextPath}/file/download?fileName=图片.jpg" > 图片.jpg</a > </body > </html >
20.5开发Controller
1 2 3 4 5 6 7 8 9 10 11 12 13 14 15 16 17 18 19 20 21 22 23 24 25 26 27 28 29 30 31 32 33 34 35 36 37 38 39 40 41 42 43 44 45 46 47 48 49 50 51 52 53 54 55 56 57 58 59 60 61 62 63 64 65 66 67 68 69 70 71 72 73 74 package com.study.controller; import org.slf4j.Logger; import org.slf4j.LoggerFactory; import org.springframework.beans.factory.annotation.Value; import org.springframework.stereotype.Controller; import org.springframework.util.FileCopyUtils; import org.springframework.web.bind.annotation.RequestMapping; import javax.servlet.ServletOutputStream; import javax.servlet.http.HttpServletResponse; import java.io.*; import java.net.URLEncoder; @Controller @RequestMapping("file") public class FileController { private static final Logger logger = LoggerFactory.getLogger(FileController.class); @Value("${file.download.dir}") private String realPath; @RequestMapping("download") public void download (String fileName, HttpServletResponse response) throws IOException { logger.debug("当前下载文件名为:{}" ,fileName); logger.debug("当前下载文件路径为为:{}" ,realPath); File file = new File (realPath, fileName); FileInputStream fis = new FileInputStream (file); response.setHeader("content-disposition" ,"attachment;filename=" + URLEncoder.encode(fileName,"UTF-8" )); ServletOutputStream sos = response.getOutputStream(); FileCopyUtils.copy(fis,sos); } }
20.6项目目录结构
21.拦截器 21.1拦截器介绍 interceptor
1 2 3 4 5 6 7 8 9 10 11 12 13 14 15 16 17 18 19 20 21 22 23 24 25 filter 过滤器: 过滤器可以拦截javaweb中请求,进行放行、中断等功能 强大之处: 可以拦截一切资源 .jsp、.html、.css、.img ..... 1.定义: 拦截器类似于javaweb中filter功能,但只能拦截controller相关的请求 2.作用: 将controller中共有代码放入到拦截器中执行,减少controller中代码冗余 3.拦截器特性: 1).拦截器只能拦截controller相关请求 2).拦截器可以中断请求轨迹 3).请求之前如果该请求配置了拦截器,请求会先经过拦截器,拦截器放行之后执行请求的controller,controller执行完成之后会回到拦截器继续执行拦截器中的代码 4.拦截器开发 a.类 implement HandlerInterceptor接口 实现接口的类有默认实现的preHandler、postHandler、afterCompetition方法 可选配置 preHandler 预先处理方法: 最先执行方法,返回值布尔类型 true:放行请求、fals:中断(后续不再执行) 返回结果为true时执行controller中内容 postHandler 过程中处理: controller返回之后回到postHandler这个方法执行,执行完成这个方法开始响应浏览器 afterCompletion 最后完成: 当响应结束之后会执行拦截器中这个方法内容 b.配置拦截器 springmvc配置方式:mvc:interceptors springmvc.xml springboot 提供了springmvc配置类: WebMvcConfigurer 类 implement WebMvcConfigurer接口{ //覆盖配置拦截器方法 1.使用哪个拦截器 2.拦截器拦截请求 3.排除那些请求 }
21.2开发拦截器 新建目录interceptors放我们的拦截器
MyInterceptor1
1 2 3 4 5 6 7 8 9 10 11 12 13 14 15 16 17 18 19 20 21 22 23 24 25 26 27 28 29 30 31 32 33 34 35 36 37 38 39 40 41 42 43 44 45 46 47 48 49 50 51 52 53 54 55 56 57 58 59 60 61 62 63 64 65 66 67 68 69 70 71 72 package com.study.interceptors; import org.slf4j.Logger; import org.slf4j.LoggerFactory; import org.springframework.web.servlet.HandlerInterceptor; import org.springframework.web.servlet.ModelAndView; import javax.servlet.http.HttpServletRequest; import javax.servlet.http.HttpServletResponse; public class MyInterceptor1 implements HandlerInterceptor { private static final Logger logger = LoggerFactory.getLogger(MyInterceptor1.class); @Override public boolean preHandle (HttpServletRequest request, HttpServletResponse response, Object handler) throws Exception { logger.debug("1" ); return true ; } @Override public void postHandle (HttpServletRequest request, HttpServletResponse response, Object handler, ModelAndView modelAndView) throws Exception { logger.debug("2" ); } @Override public void afterCompletion (HttpServletRequest request, HttpServletResponse response, Object handler, Exception ex) throws Exception { logger.debug("3" ); } }
MyInterceptor2
1 2 3 4 5 6 7 8 9 10 11 12 13 14 15 16 17 18 19 20 21 22 23 24 25 26 27 28 29 30 31 32 33 34 35 36 37 38 39 40 41 42 43 44 45 46 47 48 49 50 51 52 53 54 55 56 57 58 59 60 61 62 63 64 65 66 67 68 69 70 71 package com.study.interceptors; import org.slf4j.Logger; import org.slf4j.LoggerFactory; import org.springframework.web.servlet.HandlerInterceptor; import org.springframework.web.servlet.ModelAndView; import javax.servlet.http.HttpServletRequest; import javax.servlet.http.HttpServletResponse; public class MyInterceptor2 implements HandlerInterceptor { private static final Logger logger = LoggerFactory.getLogger(MyInterceptor2.class); @Override public boolean preHandle (HttpServletRequest request, HttpServletResponse response, Object handler) throws Exception { logger.debug("4" ); return true ; } @Override public void postHandle (HttpServletRequest request, HttpServletResponse response, Object handler, ModelAndView modelAndView) throws Exception { logger.debug("5" ); } @Override public void afterCompletion (HttpServletRequest request, HttpServletResponse response, Object handler, Exception ex) throws Exception { logger.debug("6" ); } }
21.3配置拦截器 新建config放我们的配置类
1 2 3 4 5 6 7 8 9 10 11 12 13 14 15 16 17 18 19 20 21 22 23 24 25 26 27 28 29 30 31 32 33 34 35 36 package com.study.config;import com.study.interceptors.MyInterceptor1;import com.study.interceptors.MyInterceptor2;import org.springframework.context.annotation.Configuration;import org.springframework.web.servlet.config.annotation.InterceptorRegistry;import org.springframework.web.servlet.config.annotation.WebMvcConfigurer;@Configuration public class MvcConfig implements WebMvcConfigurer { @Override public void addInterceptors (InterceptorRegistry registry) { registry.addInterceptor(new MyInterceptor1 ()) .addPathPatterns("/**" ) .excludePathPatterns("/file/**" ) .order(1 ); registry.addInterceptor(new MyInterceptor2 ()) .addPathPatterns("/**" ) .excludePathPatterns("/file/**" ) .order(2 ); } }
注意:order用来指定多个拦截器的执行顺序,order书写是自然数,按照自然数从小到大顺序执行
21.4开发控制器
1 2 3 4 5 6 7 8 9 10 11 12 13 14 15 16 17 18 19 20 21 22 23 24 25 26 package com.study.controller; import org.slf4j.Logger; import org.slf4j.LoggerFactory; import org.springframework.stereotype.Controller; import org.springframework.web.bind.annotation.RequestMapping; @Controller @RequestMapping("interceptor") public class InterceptorController { private static final Logger logger = LoggerFactory.getLogger(InterceptorController.class); @RequestMapping("test") public String test () { logger.debug("test is ok!" ); return "success" ; } }
21.5项目目录结构
22.war包部署 22.1 思路
1 2 3 4 5 6 7 8 9 10 11 12 13 14 15 16 17 18 19 20 21 22 23 24 25 26 27 28 29 30 31 32 33 34 35 36 37 38 39 40 41 42 43 44 45 46 47 48 49 50 51 52 53 54 55 56 a.执行项目打包的方式为 "war",但默认创建springboot项目打包都是jar 因此需要修改项目的pom.xml: 添加:<packaging > <packaging > b.去除springboot项目内嵌tomcat依赖 <!--tomcat解析jsp--> <dependency> <groupId>org.apache.tomcat.embed</groupId> <artifactId>tomcat-embed-jasper</artifactId> <!--provided当前idea环境可用,打包不参与打包--> <scope>provided</scope> </dependency> <!--去掉内嵌的tomcat依赖--> <dependency> <groupId>org.springframework.boot</groupId> <artifactId>spring-boot-starter-tomcat</artifactId> <scope>provided</scope> </dependency> c.在pom.xml的插件(plugins)中配置入口类 <build> <plugins> <plugin> <groupId>org.springframework.boot</groupId> <artifactId>spring-boot-maven-plugin</artifactId> <!--配置springboot入口类--> <configuration> <fork>true</fork> <!--增加jvm参数--> <jvmArguments>-Dfile.encoding=UTF-8</jvmArguments> <!--指定入口类--> <mainClass>com.baizhi.SpringbootDay6Application</mainClass> </configuration> </plugin> </plugins> </build> d.启动类添加配置 //1.继承SpringBootServletInitializer 不再使用内嵌容器启动,使用外部tomcat容器启动 //2.覆盖configure方法 public class Application extends SpringBootServletInitializer{ public static void main(String[] args) { SpringApplication.run(Application.class,args); } //配置入口类是谁 @Override protected SpringApplicationBuilder configure(SpringApplicationBuilder builder) { return builder.sources(Application.class); } } e.安装jdk、安装tomcat、安装数据库、将打包好的war复制到tomcat webapps目录下 ./startup.sh启动
注:一旦使用外部的tomcat部署application对内嵌服务器做的配置就失效了
22.2 打包部署具体配置
pom.xml设置打包方式为war:
1 2 3 4 5 6 7 8 9 10 <groupId > com.study</groupId > <artifactId > spring-boot-day6</artifactId > <version > 0.0.1-SNAPSHOT</version > <name > spring-boot-day6</name > <packaging > war</packaging > <description > Demo project for Spring Boot</description > <properties > <java.version > 1.8</java.version > </properties >
在pom.xml的插件(plugin)中指定入口类:
1 2 3 4 5 6 7 8 9 10 11 12 13 14 15 16 <build > <plugins > <plugin > <groupId > org.springframework.boot</groupId > <artifactId > spring-boot-maven-plugin</artifactId > <configuration > <fork > true</fork > <jvmArguments > -Dfile.encoding=UTF-8</jvmArguments > <mainClass > com.study.SpringBootDay6Application</mainClass > </configuration > </plugin > </plugins > </build >
排除内嵌的tomcat:pom.xml中修改依赖
1 2 3 4 5 6 7 8 9 10 11 12 13 14 15 <dependency > <groupId > org.apache.tomcat.embed</groupId > <artifactId > tomcat-embed-jasper</artifactId > <scope > provided</scope > </dependency > <dependency > <groupId > org.springframework.boot</groupId > <artifactId > spring-boot-starter-tomcat</artifactId > <scope > provided</scope > </dependency >
配置入口类XxxApplication
1 2 3 4 5 6 7 8 9 10 11 12 13 14 15 @SpringBootApplication public class SpringBootDay6Application extends SpringBootServletInitializer { public static void main (String[] args) { SpringApplication.run(SpringBootDay6Application.class, args); } @Override protected SpringApplicationBuilder configure (SpringApplicationBuilder builder) { return builder.sources(SpringBootDay6Application.class); } }
22.3 打包测试
1 2 3 # 一旦使用war部署注意: - 1. application.yml中配置的port context-path失效- 2. 访问时使用打成war包的名字和外部tomcat端口号进行访问项目
打包顺序如下:
打包报错:
1 2 3 4 5 6 7 8 9 10 11 12 13 14 15 16 17 18 19 20 21 22 23 24 D:\Software_Development\JDK\bin\java.exe -Dmaven.multiModuleProjectDirectory=D:\Software_Development\IDEA_code\SpringBoot\spring-boot-day6 "-Dmaven.home=C:\Program Files\JetBrains\IntelliJ IDEA 2020.1\plugins\maven\lib\maven3" "-Dclassworlds.conf=C:\Program Files\JetBrains\IntelliJ IDEA 2020.1\plugins\maven\lib\maven3\bin\m2.conf" "-Dmaven.ext.class.path=C:\Program Files\JetBrains\IntelliJ IDEA 2020.1\plugins\maven\lib\maven-event-listener.jar" "-javaagent:C:\Program Files\JetBrains\IntelliJ IDEA 2020.1\lib\idea_rt.jar=56634:C:\Program Files\JetBrains\IntelliJ IDEA 2020.1\bin" -Dfile.encoding=UTF-8 -classpath "C:\Program Files\JetBrains\IntelliJ IDEA 2020.1\plugins\maven\lib\maven3\boot\plexus-classworlds-2.6.0.jar" org.codehaus.classworlds.Launcher -Didea.version2020.1 -DskipTests=true package [INFO] Scanning for projects... [INFO] [INFO] ---------------------< com.study:spring-boot-day6 >--------------------- [INFO] Building spring-boot-day6 0.0.1-SNAPSHOT [INFO] --------------------------------[ war ]--------------------------------- [INFO] [INFO] --- maven-resources-plugin:3.2.0:resources (default-resources) @ spring-boot-day6 --- [INFO] Using 'UTF-8' encoding to copy filtered resources. [INFO] Using 'UTF-8' encoding to copy filtered properties files. [INFO] Copying 1 resource [INFO] ------------------------------------------------------------------------ [INFO] BUILD FAILURE [INFO] ------------------------------------------------------------------------ [INFO] Total time: 1.681 s [INFO] Finished at: 2022-06-04T17:29:55+08:00 [INFO] ------------------------------------------------------------------------ [ERROR] Failed to execute goal org.apache.maven.plugins:maven-resources-plugin:3.2.0:resources (default-resources) on project spring-boot-day6: Input length = 1 -> [Help 1] [ERROR] [ERROR] To see the full stack trace of the errors, re-run Maven with the -e switch. [ERROR] Re-run Maven using the -X switch to enable full debug logging. [ERROR] [ERROR] For more information about the errors and possible solutions, please read the following articles: [ERROR] [Help 1] http://cwiki.apache.org/confluence/display/MAVEN/MojoExecutionExceptio
通过上面报错信息可以发现可能是版本问题(3.2.0),解决办法参考链接:Failed to execute goal org.apache.maven.plugins:maven-resour_二炮的博客-CSDN博客,修改版本如下:
1 2 3 4 5 6 7 8 9 10 11 12 13 14 15 16 17 <build > <plugins > <plugin > <groupId > org.springframework.boot</groupId > <artifactId > spring-boot-maven-plugin</artifactId > </plugin > <plugin > <groupId > org.apache.maven.plugins</groupId > <artifactId > maven-resources-plugin</artifactId > <version > 2.4.3</version > </plugin > </plugins > </build >
重新打包,编译信息如下:
1 2 3 4 5 6 7 8 9 10 11 12 13 14 15 16 17 18 19 20 21 22 23 24 25 26 27 28 29 30 31 32 33 34 35 36 37 38 39 40 41 42 D:\Software_Development\JDK\bin\java.exe -Dmaven.multiModuleProjectDirectory=D:\Software_Development\IDEA_code\SpringBoot\spring-boot-day6 "-Dmaven.home=C:\Program Files\JetBrains\IntelliJ IDEA 2020.1\plugins\maven\lib\maven3" "-Dclassworlds.conf=C:\Program Files\JetBrains\IntelliJ IDEA 2020.1\plugins\maven\lib\maven3\bin\m2.conf" "-Dmaven.ext.class.path=C:\Program Files\JetBrains\IntelliJ IDEA 2020.1\plugins\maven\lib\maven-event-listener.jar" "-javaagent:C:\Program Files\JetBrains\IntelliJ IDEA 2020.1\lib\idea_rt.jar=57250:C:\Program Files\JetBrains\IntelliJ IDEA 2020.1\bin" -Dfile.encoding=UTF-8 -classpath "C:\Program Files\JetBrains\IntelliJ IDEA 2020.1\plugins\maven\lib\maven3\boot\plexus-classworlds-2.6.0.jar" org.codehaus.classworlds.Launcher -Didea.version2020.1 -DskipTests=true package [INFO] Scanning for projects... [INFO] [INFO] ---------------------< com.study:spring-boot-day6 >--------------------- [INFO] Building spring-boot-day6 0.0.1-SNAPSHOT [INFO] --------------------------------[ war ]--------------------------------- [INFO] [INFO] --- maven-resources-plugin:2.4.3:resources (default-resources) @ spring-boot-day6 --- [INFO] Using 'UTF-8' encoding to copy filtered resources. [INFO] Copying 1 resource [INFO] Copying 0 resource [INFO] [INFO] --- maven-compiler-plugin:3.10.1:compile (default-compile) @ spring-boot-day6 --- [INFO] Changes detected - recompiling the module! [INFO] Compiling 6 source files to D:\Software_Development\IDEA_code\SpringBoot\spring-boot-day6\target\classes [INFO] [INFO] --- maven-resources-plugin:2.4.3:testResources (default-testResources) @ spring-boot-day6 --- [INFO] Using 'UTF-8' encoding to copy filtered resources. [INFO] skip non existing resourceDirectory D:\Software_Development\IDEA_code\SpringBoot\spring-boot-day6\src\test\resources [INFO] [INFO] --- maven-compiler-plugin:3.10.1:testCompile (default-testCompile) @ spring-boot-day6 --- [INFO] Changes detected - recompiling the module! [INFO] Compiling 1 source file to D:\Software_Development\IDEA_code\SpringBoot\spring-boot-day6\target\test-classes [INFO] [INFO] --- maven-surefire-plugin:2.22.2:test (default-test) @ spring-boot-day6 --- [INFO] Tests are skipped. [INFO] [INFO] --- maven-war-plugin:3.3.2:war (default-war) @ spring-boot-day6 --- [INFO] Packaging webapp [INFO] Assembling webapp [spring-boot-day6] in [D:\Software_Development\IDEA_code\SpringBoot\spring-boot-day6\target\spring-boot-day6-0.0.1-SNAPSHOT] [INFO] Processing war project [INFO] Copying webapp resources [D:\Software_Development\IDEA_code\SpringBoot\spring-boot-day6\src\main\webapp] [INFO] Building war: D:\Software_Development\IDEA_code\SpringBoot\spring-boot-day6\target\spring-boot-day6-0.0.1-SNAPSHOT.war [INFO] [INFO] --- spring-boot-maven-plugin:2.7.0:repackage (repackage) @ spring-boot-day6 --- [INFO] Replacing main artifact with repackaged archive [INFO] ------------------------------------------------------------------------ [INFO] BUILD SUCCESS [INFO] ------------------------------------------------------------------------ [INFO] Total time: 16.423 s [INFO] Finished at: 2022-06-04T17:58:56+08:00 [INFO] -----------------------------------------------------------------------
出现上述提示信息,表示项目打包成功,生成的war包如下:
22.4 部署
1.Linux
2.Windows
此处以Windows为例进行说明(没有连接数据库):
(1)将打包好的war包重命名为springboot.war,复制到tomcat/webapps目录下
(2)双击bin目录下的startup.bat运行项目
出现上面错误是因为8080端口被占用,解决方案参考链接: Tomcat 8080 端口被占用解决方案_Wbbp的博客-CSDN博客_tomcat8080端口被占用怎么解决 ,可以在conf/server.xml中修改端口号:
保存修改后,继续双击startup.bat启动
出现上述提示,表示项目启动成功。
打开浏览器,访问地址:http://127.0.0.1:8888/springboot/interceptor/test
或者 http://127.0.0.1:8888/springboot/download.jsp 可以访问成功,表示项目部署成功!
23.jar包部署 23.1思路
1 2 3 4 5 6 7 8 9 10 11 12 13 14 15 16 17 18 19 20 21 22 23 24 25 26 27 28 29 30 31 32 33 34 35 36 37 38 39 40 41 42 43 a.<packaging > </packaging > b.在target目录中获取对应打包好的jar文件 c.安装jdk 数据库 d.启动jar包 java -jar 对应jar文件名字 nohup &(其中,nohup &表示后台直接启动,不要日志) e.注意事项: 1.springboot项目在使用jsp模板时,jar包部署默认无法找到jsp页面,解决办法:修改插件版本为1.4.2,注意只有这唯一一个版本可用 <plugins> <!--版本必须为1.4.2版本--> <plugin> <groupId>org.springframework.boot</groupId> <artifactId>spring-boot-maven-plugin</artifactId> <version>1.4.2.RELEASE</version> </plugin> </plugins> 2.指定jsp文件打包位置 <!--执行jsp文件打包位置--> <resources> <!-- 打包时将jsp文件拷贝到META-INF目录下--> <resource> <!-- 指定resources插件处理哪个目录下的资源文件 --> <directory>src/main/webapp</directory> <!--指定必须要放在此目录下才能被访问到--> <targetPath>META-INF/resources</targetPath> <includes> <include>**/**</include> </includes> </resource> <resource> <directory>src/main/resources</directory> <includes> <include>**/**</include> </includes> <filtering>false</filtering> </resource> </resources> f.重新打包测试
23.2打包部署具体配置
a.pom.xml设置打包方式为jar
1 2 3 4 5 6 7 8 9 10 <groupId > com.study</groupId > <artifactId > spring-boot-day5</artifactId > <version > 0.0.1-SNAPSHOT</version > <name > spring-boot-day5</name > <packaging > jar</packaging > <description > Demo project for Spring Boot</description > <properties > <java.version > 1.8</java.version > </properties >
注意:默认方式也是jar
b.执行打包
d.控制台命令窗口运行项目
e.测试访问:http://localhost:8888/spring-boot-day5/upload.jsp
f.修改插件版本:在项目的pom.xml配置文件中build标签中修改
1 2 3 4 5 6 7 8 9 10 11 12 13 14 15 16 17 <build > <plugins > <plugin > <groupId > org.springframework.boot</groupId > <artifactId > spring-boot-maven-plugin</artifactId > <version > 1.4.2.RELEASE</version > </plugin > <plugin > <groupId > org.apache.maven.plugins</groupId > <artifactId > maven-resources-plugin</artifactId > <version > 2.4.3</version > </plugin > </plugins > </build >
h.指定jsp打包配置:在项目的pom.xml配置文件中build标签中加入resources配置
1 2 3 4 5 6 7 8 9 10 11 12 13 14 15 16 17 18 19 20 21 22 23 24 25 26 27 28 29 30 31 32 33 34 35 36 37 <build > <plugins > <plugin > <groupId > org.springframework.boot</groupId > <artifactId > spring-boot-maven-plugin</artifactId > <version > 1.4.2.RELEASE</version > </plugin > <plugin > <groupId > org.apache.maven.plugins</groupId > <artifactId > maven-resources-plugin</artifactId > <version > 2.4.3</version > </plugin > </plugins > <resources > <resource > <directory > src/main/webapp</directory > <targetPath > META-INF/resources</targetPath > <includes > <include > **/**</include > </includes > </resource > <resource > <directory > src/main/resources</directory > <includes > <include > **/**</include > </includes > <filtering > false</filtering > </resource > </resources > </build >
重新打包部署测试即可!
重新clean报错:
Failed to execute goal org.apache.maven.plugins:maven-clean-plugin:3.2.0:clean (default-clean) on project spring-boot-day5: Failed to clean project: Failed to delete D:\Software_Development\IDEA_code\SpringBoot\spring-boot-day5\target\spring-boot-day5-0.0.1-SNAPSHOT.jar原因: jar包正在被占用,无法使用,需要在资源任务管理器关闭Java(TM) Platform SE binary,再重新clean即可
安装jdk 数据库
Windows控制台部署运行:
打开浏览器访问路径: http://localhost:8888/spring-boot-day5/upload.jsp
上传文件后:
以上均测试成功,表示项目部署成功!
24.Thymeleaf
Thymeleaf是一个用于web和独立环境的现代服务器端Java模板引擎。Jsp也是Java模板引擎,Thymeleaf完全可以用来替代Jsp,在使用时Jsp和Thymeleaf不要混用-摘自官网Thymeleaf
Thymeleaf 是跟Velocity、FreeMarker类似的模板引擎,它可以完全替代JSP,相较与其他的模板引擎相比, Thymeleaf在有网络和无网络的环境下皆可运行,即它可以让美工在浏览器查看页面的静态效果,也可以让程序员在服务器查看带数据的动态页面效果。
注意 :Thymeleaf使用时必须要经过controller跳转,不能直接访问,直接访问不能进行动态数据渲染。
24.1集成Thymeleaf模板
pom.xml引入依赖
1 2 3 4 5 <dependency > <groupId > org.springframework.boot</groupId > <artifactId > spring-boot-starter-thymeleaf</artifactId > </dependency >
application.yml编写配置
1 2 3 4 5 6 7 8 9 10 11 12 13 server: port: 8888 servlet: context-path: /spring-boot-day7 spring: thymeleaf: prefix: classpath:/templates/ suffix: .html cache: true
在templates目录中定义模板index.html
1 2 3 4 5 6 7 8 9 10 <!DOCTYPE html > <html lang ="en" > <head > <meta charset ="UTF-8" > <title > 测试SpringBoot与Thymeleaf的集成</title > </head > <body > <h1 > Hello,Thymeleaf!</h1 > </body > </html >
测试路径:直接访问根路径默认定位到templates/index.html 但我们不建议这么做 建议经过控制器
http://localhost:8888/spring-boot-day7/
直接访问http://localhost:8888/spring-boot-day7/index.html则不行
编写控制器测试
1 2 3 4 5 6 7 8 9 10 11 12 13 14 15 16 17 18 19 20 21 22 package com.study.controller; import org.springframework.stereotype.Controller; import org.springframework.web.bind.annotation.RequestMapping; @Controller @RequestMapping("hello") public class HelloController { @RequestMapping("hello") public String hello () { System.out.println("测试springboot与Thymeleaf的集成" ); return "index" ; } }
http://localhost:8888/spring-boot-day7/hello/hello
24.2模板基本语法
html使用Thymeleaf相关语法必须导入thymeleaf的头
使用Thymeleaf时必须在html页面中加入唯一的命名空间(namespace)才能使用相关语法:Thymeleaf简写th,在xmlns:名字处写th
<html lang="en" xmlns:th="http://www.thymeleaf.org">
注意: 有的插件可以导入/提示命名空间!
初始的demo.html页面 用于页面展示
1 2 3 4 5 6 7 8 9 10 <!DOCTYPE html > <html lang ="en" xmlns:th ="http://www.thymeleaf.org" > <head > <meta charset ="UTF-8" > <title > 用来测试Thymeleaf语法</title > </head > <body > <h1 > 测试Thymeleaf语法基本使用</h1 > </body > </html >
新建控制器DemoController
1 2 3 4 5 6 7 8 9 10 11 12 13 14 15 16 17 18 19 20 21 22 23 24 25 package com.study.controller; import org.springframework.stereotype.Controller; import org.springframework.ui.Model; import org.springframework.web.bind.annotation.RequestMapping; import javax.servlet.http.HttpServletRequest; import javax.servlet.http.HttpSession; @Controller @RequestMapping("demo") public class DemoController { @RequestMapping("demo") public String demo (HttpServletRequest request, Model model, HttpSession session) { System.out.println("demo ok!" ); return "demo" ; } }
测试路径:http://localhost:8888/spring-boot-day7/demo/demo
24.3获取单个类型数据 String Integer
DemoController
1 2 3 4 5 6 7 8 9 10 11 12 13 14 15 16 17 18 19 20 21 22 23 24 25 26 27 28 29 30 31 32 33 34 35 package com.study.controller; import org.springframework.stereotype.Controller; import org.springframework.ui.Model; import org.springframework.web.bind.annotation.RequestMapping; import javax.servlet.http.HttpServletRequest; import javax.servlet.http.HttpSession; @Controller @RequestMapping("demo") public class DemoController { @RequestMapping("demo") public String demo (HttpServletRequest request, Model model, HttpSession session) { System.out.println("demo ok!" ); String name = "茶白" ; request.setAttribute("name" ,name); Integer age = 27 ; model.addAttribute("age" ,age); String content = "<a href='http://www.baidu.com'>百度一下</a>" ; model.addAttribute("content" ,content); return "demo" ; } }
demo.html
1 2 3 4 5 6 7 8 9 10 11 <h2 > 1.获取单个数据</h2 > <h3 > String类型数据:<span th:text ="${name}" /> </h3 > <h3 > Integer类型数据:<span th:text ="${age}" /> </h3 > <h3 > 超链接:<span th:utext ="${content}" /> </h3 > <h3 > 输入框:</h3 > <input type ="text" name ="username" th:value ="${name}" > <input type ="text" name ="age" th:value ="${age}" >
注:th:text=可以放在任何html标签,但注意位置 。 th除了可以加在th:text|th:utext还可以加在html标签的任意属性上代表在这个属性去使用Thymeleaf语法
24.4获取对象类型数据
新建对象User
1
2
3
4
5
6
7
8
9
10
11
12
13
14
15
16
17
18
19
20
21
22
23
24
25
26
27
28
29
30
31
32
33
34
35
36
37
38
39
40
41
42
43
44
45
46
47
48
49
50
51
52
53
54
55
56
57
58
59
60
61
62
63
64
65
66
67
68
69
package com.study.entity; import java.util.Date; public class User { private Integer id; private String name; private Double salary; private Date birthday; public User () { } public User (Integer id, String name, Double salary, Date birthday) { this .id = id; this .name = name; this .salary = salary; this .birthday = birthday; } @Override public String toString () { return "User{" + "id=" + id + ", name='" + name + '\'' + ", salary=" + salary + ", birthday=" + birthday + '}' ; } public Integer getId () { return id; } public void setId (Integer id) { this .id = id; } public String getName () { return name; } public void setName (String name) { this .name = name; } public Double getSalary () { return salary; } public void setSalary (Double salary) { this .salary = salary; } public Date getBirthday () { return birthday; } public void setBirthday (Date birthday) { this .birthday = birthday; } }
DemoController
1 2 3 4 5 6 7 8 9 10 11 12 13 14 15 16 17 18 19 20 21 22 23 24 25 26 27 28 29 30 31 32 33 34 35 package com.study.controller; import com.study.entity.User; import org.springframework.stereotype.Controller; import org.springframework.ui.Model; import org.springframework.web.bind.annotation.RequestMapping; import javax.servlet.http.HttpServletRequest; import javax.servlet.http.HttpSession; import java.util.Arrays; import java.util.Date; import java.util.List; @Controller @RequestMapping("demo") public class DemoController { @RequestMapping("demo") public String demo (HttpServletRequest request, Model model, HttpSession session) { System.out.println("demo ok!" ); User user = new User (1 ,"茶白" ,1234.56 ,new Date ()); model.addAttribute("user" ,user); return "demo" ; } }
demo.html
1 2 3 4 5 6 7 8 <h2 > 2.获取对象类型数据</h2 > <h3 > user.id:<span th:text ="${user.id}" /> <br > user.name:<span th:text ="${user.name}" /> <br > user.salary:<span th:text ="${user.salary}" /> <br > user.birthday:<span th:text ="${#dates.format(user.birthday,'yyyy-MM-dd HH:mm:ss')}" /> </h3 >
注:设置的键才是我们作用域放入的名字
24.5获取集合类型数据
DemoController
1 2 3 4 5 6 7 8 9 10 11 12 13 14 15 16 17 18 19 20 21 22 23 24 25 26 27 28 29 30 31 32 33 34 35 36 37 38 39 package com.study.controller;import com.study.entity.User;import org.springframework.stereotype.Controller;import org.springframework.ui.Model;import org.springframework.web.bind.annotation.RequestMapping;import javax.servlet.http.HttpServletRequest;import javax.servlet.http.HttpSession;import java.util.Arrays;import java.util.Date;import java.util.List;@Controller @RequestMapping("demo") public class DemoController { @RequestMapping("demo") public String demo (HttpServletRequest request, Model model, HttpSession session) { System.out.println("demo ok!" ); List<User> users = Arrays.asList( new User (11 ,"熊大" ,1111.11 ,new Date ()), new User (22 ,"熊二" ,2222.22 ,new Date ()), new User (33 ,"光头强" ,3333.33 ,new Date ()) ); model.addAttribute("users" ,users); return "demo" ; } }
demo.html
1 2 3 4 5 6 7 8 9 10 11 12 13 14 <h2 > 3.获取集合类型数据</h2 > <ul > <li th:each ="user,state:${users}" > state count: <span th:text ="${state.count}" > </span > state odd: <span th:text ="${state.odd}" > </span > state even: <span th:text ="${state.even}" > </span > state size: <span th:text ="${state.size}" > </span > id: <span th:text ="${user.id}" > </span > name: <span th:text ="${user.name}" > </span > salary: <span th:text ="${user.salary}" > </span > birthday: <span th:text ="${#dates.format(user.birthday,'yyyy年MM月dd日')}" > </span > </li > </ul >
补充:展示多条数据
直接遍历集合
1 2 3 4 5 6 7 <ul th:each ="user:${users}" > <li th:text ="${user.id}" > </li > <li th:text ="${user.name}" > </li > <li th:text ="${user.age}" > </li > <li th:text ="${#dates.format(user.bir,'yyyy-MM-dd')}" > </li > </ul >
遍历时获取遍历状态
1 2 3 4 5 6 7 <ul th:each ="user,userStat:${users}" > <li > <span th:text ="${userStat.count}" /> -<span th:text ="${user.id}" /> </li > 获取遍历次数 count 从1开始 index 从0开始 <li > <span th:text ="${userStat.odd}" /> -<span th:text ="${user.name}" /> </li > 获取当前遍历是否是奇数行 <li > <span th:text ="${userStat.even}" /> -<span th:text ="${user.age}" /> </li > 获取当前遍历是否是偶数行 <li > <span th:text ="${userStat.size}" /> -<span th:text ="${user.bir}" /> </li > 获取当前集合的总条数 </ul >
24.6有条件的显示数据 判断
demo.html
1 2 3 4 5 6 7 8 <h2 > 4.有条件的展示数据</h2 > <div style ="width: 100px;height: 100px;background: red" th:if ="${age>25}" > 我是小红 </div > <div style ="width: 100px;height: 100px;background: blue" th:if ="${age<=25}" > 我是小蓝 </div >
补充运算符:
1 2 3 4 5 6 7 gt: great than(大于) > ge: great equal(大于等于) >= eq: equal(等于) == lt: less than(小于) < le: less equal(小于等于) <= ne: not equal(不等于) != ————————————————
上边是forward作用域传递数据
24.7重定向传递session作用域数据 1 2 3 # 传递数据和跳转方式有关 - forward跳转: request | model 作用域- redirect跳转: session作用域传递数据
DemoControlleer
1 2 3 4 5 6 7 8 9 10 11 12 13 14 15 16 17 18 19 20 21 22 23 24 25 26 27 28 29 30 31 32 33 34 package com.study.controller;import com.study.entity.User;import org.springframework.stereotype.Controller;import org.springframework.ui.Model;import org.springframework.web.bind.annotation.RequestMapping;import javax.servlet.http.HttpServletRequest;import javax.servlet.http.HttpSession;import java.util.Arrays;import java.util.Date;import java.util.List;@Controller @RequestMapping("demo") public class DemoController { @RequestMapping("demo") public String demo (HttpServletRequest request, Model model, HttpSession session) { System.out.println("demo ok!" ); session.setAttribute("username" ,"猪猪侠" ); return "demo" ; } }
demo.html
1 2 <h2 > 5.获取session作用域数据 session.key application.key</h2 > <span th:text ="${session.username}" > </span >
访问路径:http://localhost:8888/spring-boot-day7/demo/demo
1 2 3 4 # 总结 1.使用 th:text="${属性名}" 获取对应数据,获取数据时会将对应标签中数据清空,因此最好是空标签 2.使用 th:utext="${属性名}" 获取对应的数据,可以将数据中html先解析在渲染到页面 3.使用 th:value="${属性名}" 获取数据直接作为表单元素value属性
24.8引入静态资源 使用thymeleaf模板时项目中的静态资源默认放在resources路径下的static目录中
demo.css
1 2 3 h2 { background : yellow; }
demo.js
1 2 3 function test() { alert('test'); }
demo.html
1 2 3 4 5 6 7 8 9 10 11 12 13 14 15 16 17 18 19 20 21 22 23 24 25 26 27 28 29 30 31 32 33 34 35 36 37 38 39 40 41 42 43 44 45 46 47 48 49 50 51 52 53 54 55 56 57 58 59 60 61 62 63 64 65 66 67 68 69 70 71 72 73 <!DOCTYPE html > <html lang ="en" xmlns:th ="http://www.thymeleaf.org" > <head > <meta charset ="UTF-8" > <title > 用来测试Thymeleaf语法</title > <link rel ="stylesheet" th:href ="@{/demo.css}" > <script th:src ="@{/demo.js}" > </script > <script > test (); let contentPath = "[[@{/}]]" ; console .log ("项目名" ,contentPath); </script > </head > <body > <h1 > 测试Thymeleaf语法基本使用</h1 > <h2 > 1.获取单个数据</h2 > String类型数据:<span th:text ="${name}" /> <br > Integer类型数据:<span th:text ="${age}" /> <br > 超链接:<span th:utext ="${content}" /> <br > 输入框:<br > <input type ="text" name ="username" th:value ="${name}" > <br > <input type ="text" name ="age" th:value ="${age}" > <h2 > 2.获取对象类型数据</h2 > user.id:<span th:text ="${user.id}" /> <br > user.name:<span th:text ="${user.name}" /> <br > user.salary:<span th:text ="${user.salary}" /> <br > user.birthday:<span th:text ="${#dates.format(user.birthday,'yyyy-MM-dd HH:mm:ss')}" /> <h2 > 3.获取集合类型数据</h2 > <ul > <li th:each ="user,state:${users}" > state count: <span th:text ="${state.count}" > </span > state odd: <span th:text ="${state.odd}" > </span > state even: <span th:text ="${state.even}" > </span > state size: <span th:text ="${state.size}" > </span > id: <span th:text ="${user.id}" > </span > name: <span th:text ="${user.name}" > </span > salary: <span th:text ="${user.salary}" > </span > birthday: <span th:text ="${#dates.format(user.birthday,'yyyy年MM月dd日')}" > </span > </li > </ul > <h2 > 4.有条件的展示数据</h2 > <div style ="width: 100px;height: 100px;background: red" th:if ="${age>25}" > 我是小红 </div > <div style ="width: 100px;height: 100px;background: blue" th:if ="${age<=25}" > 我是小蓝 </div > <h2 > 5.获取session作用域数据</h2 > <span th:text ="${session.username}" > </span > </body > </html >
或者
1 2 <link rel ="stylesheet" th:href ="@{/css/index.css}" > <script th:src ="@{/js/jquery-min.js}" > </script >
注意: @{/}代表通过thymeleaf语法动态获取应用名
在js代码中获取项目名:
1 2 3 <script> const ctx = '[[@{/}]]' ; </script>
注意: [[书写thymeleaf语法]],这里[[ ]]是thymeleaf内嵌表达式。
最终效果:
24.9最终项目结构
25.Thymeleaf测试案例 25.1开发流程
1 2 3 4 5 6 7 8 9 10 11 12 13 14 15 16 17 18 19 20 21 22 23 24 25 26 27 28 29 30 31 32 33 34 35 36 37 38 39 40 41 42 43 44 45 46 47 48 49 50 51 需求分析: 分析这个项目含有哪些功能模块 用户模块: 注册 登录 验证码 安全退出 真实用户 员工模块: 添加员工+上传头像 展示员工列表+展示员工头像 删除员工信息+删除员工头像 更新员工信息+更新员工头像 库表设计(概要设计): 1.分析系统有哪些表 2.分析表与表关系 3.确定表中字段(显性字段 隐性字段(业务字段)) 2张表 1.用户表 user id username realname password gender 2.员工表 employee id name salary birthday photo 创建一个库: ems-thymeleaf 详细设计: 验证库表正确性 省略 编码(环境搭建+业务代码开发) 1.创建一个springboot项目 项目名字: ems-thymeleaf 2.修改配置文件为 application.yml pom.xml 2.5.0 3.修改端口 8888 项目名: ems-thymeleaf 4.springboot整合thymeleaf使用 a.引入依赖:thymeleaf b.配置文件中指定thymeleaf相关配置 c.编写控制器测试 5.springboot整合mybatis a.引入依赖:mysql、druid、mybatis-springboot-stater b.配置文件中 6.导入项目页面 static 存放静态资源 templates 目录 存放模板文件 测试 上线部署 维护 发版 ====================================================================== 用户相关: 1.登录 2.注册 3.验证码 1.验证码工具类
25.2 springboot整合thymeleaf
pom.xml引入thymeleaf依赖
1 2 3 4 5 6 <dependency > <groupId > org.springframework.boot</groupId > <artifactId > spring-boot-starter-thymeleaf</artifactId > <version > 2.7.0</version > </dependency >
修改application.properties为application.yml,添加如下配置:
1 2 3 4 5 6 7 8 9 10 11 12 server: port: 8888 servlet: context-path: /ems-thymeleaf spring: thymeleaf: cache: false prefix: classpath:/templates/ suffix: .html
新建demo.html
1 2 3 4 5 6 7 8 9 10 11 <!DOCTYPE html > <html lang ="en" xmlns ="http://www.thymeleaf.org" > <head > <meta charset ="UTF-8" > <title > 测试Thymeleaf</title > </head > <body > <h1 > 测试Thymeleaf</h1 > <h4 > 获取数据:<span th:text ="${msg}" > </span > </h4 > </body > </html >
DemoController
1 2 3 4 5 6 7 8 9 10 11 12 13 14 15 16 17 18 19 20 21 22 23 24 25 26 27 package com.study.controller; import org.slf4j.Logger; import org.slf4j.LoggerFactory; import org.springframework.stereotype.Controller; import org.springframework.ui.Model; import org.springframework.web.bind.annotation.RequestMapping; @Controller @RequestMapping("demo") public class DemoController { private static final Logger log = LoggerFactory.getLogger(DemoController.class); @RequestMapping("demo") public String demo (Model model) { log.debug("demo ok" ); model.addAttribute("msg" ,"hello,Thymeleaf!" ); return "demo" ; } }
启动项目,访问路径:http://localhost:8888/ems-thymeleaf/demo/demo
25.3 springboot整合mybatis
pom.xml引入依赖:mysql、druid、mybatis-spring-boot-starter
1 2 3 4 5 6 7 8 9 10 11 12 13 14 15 16 17 18 19 20 <dependency > <groupId > mysql</groupId > <artifactId > mysql-connector-java</artifactId > <version > 5.1.38</version > </dependency > <dependency > <groupId > com.alibaba</groupId > <artifactId > druid</artifactId > <version > 1.2.4</version > </dependency > <dependency > <groupId > org.mybatis.spring.boot</groupId > <artifactId > mybatis-spring-boot-starter</artifactId > <version > 2.2.0</version > </dependency >
application.yml引入配置
1 2 3 4 5 6 7 8 9 10 11 12 13 14 15 16 17 18 19 20 21 22 23 24 25 26 27 28 29 30 31 server: port: 8888 servlet: context-path: /ems-thymeleaf spring: thymeleaf: cache: false prefix: classpath:/templates/ suffix: .html datasource: type: com.alibaba.druid.pool.DruidDataSource driver-class-name: com.mysql.jdbc.Driver url: jdbc:mysql://localhost:3306/ems-thymeleaf?characterEncoding=UTF-8 username: root password: 123456 mybatis: mapper-locations: classpath:com/study/mapper/*.xml type-aliases-package: com.study.entity logging: level: root: info com.study: debug
启动类添加注解扫描
1
2
3
4
5
6
7
8
9
10
11
12
13
14
package com.study; import org.mybatis.spring.annotation.MapperScan; import org.springframework.boot.SpringApplication; import org.springframework.boot.autoconfigure.SpringBootApplication; @SpringBootApplication @MapperScan("com.study.dao") public class EmsThymeleafApplication { public static void main (String[] args) { SpringApplication.run(EmsThymeleafApplication.class, args); } }
重新启动一下项目,运行不报错即可。
25.4 导入项目页面(静态资源)
在static目录下导入css、img、js等静态资源,导入之后Rebuild一下项目
新建MVC配置类:不用单独开发controller来访问html页面
1 2 3 4 5 6 7 8 9 10 11 12 13 14 15 16 17 18 19 20 21 22 23 package com.study.config; import org.springframework.context.annotation.Configuration; import org.springframework.web.servlet.config.annotation.ViewControllerRegistry; import org.springframework.web.servlet.config.annotation.WebMvcConfigurer; @Configuration public class MvcConfig implements WebMvcConfigurer { @Override public void addViewControllers (ViewControllerRegistry registry) { registry.addViewController("login" ).setViewName("login" ); registry.addViewController("register" ).setViewName("regist" ); } }
启动项目,访问页面:
(1)注册页面:http://localhost:8888/ems-thymeleaf/register
(2)登录页面:http://localhost:8888/ems-thymeleaf/login
25.5 验证码
验证码工具类
1 2 3 4 5 6 7 8 9 10 11 12 13 14 15 16 17 18 19 20 21 22 23 24 25 26 27 28 29 30 31 32 33 34 35 36 37 38 39 40 41 42 43 44 45 46 47 48 49 50 51 52 53 54 55 56 57 58 59 60 61 62 63 64 65 66 67 68 69 70 71 72 73 74 75 76 77 78 79 80 81 82 83 84 85 86 87 88 89 90 91 92 93 94 95 96 97 98 99 100 101 102 103 104 105 106 107 108 109 110 111 112 113 114 115 116 117 118 119 120 121 122 123 124 125 126 127 128 129 130 131 132 133 134 135 136 137 138 139 140 141 142 143 144 145 146 147 148 149 150 151 152 153 154 155 156 157 158 159 160 161 162 163 164 165 166 167 168 169 170 171 172 173 174 175 176 177 178 179 180 181 182 183 184 185 186 187 188 189 190 191 192 193 194 195 196 197 198 199 200 201 202 203 204 205 206 207 208 209 210 211 212 213 214 215 216 217 218 219 220 221 222 223 224 225 226 227 228 229 230 231 232 233 234 235 236 237 238 239 240 241 242 243 244 package com.study.utils; import javax.imageio.ImageIO; import java.awt.*; import java.awt.geom.AffineTransform; import java.awt.image.BufferedImage; import java.io.File; import java.io.FileOutputStream; import java.io.IOException; import java.io.OutputStream; import java.util.Arrays; import java.util.Random; public class VerifyCodeUtils { public static final String VERIFY_CODES = "23456789ABCDEFGHJKLMNPQRSTUVWXYZ" ; private static Random random = new Random (); public static String generateVerifyCode (int verifySize) { return generateVerifyCode(verifySize, VERIFY_CODES); } public static String generateVerifyCode (int verifySize, String sources) { if (sources == null || sources.length() == 0 ){ sources = VERIFY_CODES; } int codesLen = sources.length(); Random rand = new Random (System.currentTimeMillis()); StringBuilder verifyCode = new StringBuilder (verifySize); for (int i = 0 ; i < verifySize; i++){ verifyCode.append(sources.charAt(rand.nextInt(codesLen-1 ))); } return verifyCode.toString(); } public static String outputVerifyImage (int w, int h, File outputFile, int verifySize) throws IOException{ String verifyCode = generateVerifyCode(verifySize); outputImage(w, h, outputFile, verifyCode); return verifyCode; } public static String outputVerifyImage (int w, int h, OutputStream os, int verifySize) throws IOException{ String verifyCode = generateVerifyCode(verifySize); outputImage(w, h, os, verifyCode); return verifyCode; } public static void outputImage (int w, int h, File outputFile, String code) throws IOException{ if (outputFile == null ){ return ; } File dir = outputFile.getParentFile(); if (!dir.exists()){ dir.mkdirs(); } try { outputFile.createNewFile(); FileOutputStream fos = new FileOutputStream (outputFile); outputImage(w, h, fos, code); fos.close(); } catch (IOException e){ throw e; } } public static void outputImage (int w, int h, OutputStream os, String code) throws IOException{ int verifySize = code.length(); BufferedImage image = new BufferedImage (w, h, BufferedImage.TYPE_INT_RGB); Random rand = new Random (); Graphics2D g2 = image.createGraphics(); g2.setRenderingHint(RenderingHints.KEY_ANTIALIASING,RenderingHints.VALUE_ANTIALIAS_ON); Color[] colors = new Color [5 ]; Color[] colorSpaces = new Color [] { Color.WHITE, Color.CYAN, Color.GRAY, Color.LIGHT_GRAY, Color.MAGENTA, Color.ORANGE, Color.PINK, Color.YELLOW }; float [] fractions = new float [colors.length]; for (int i = 0 ; i < colors.length; i++){ colors[i] = colorSpaces[rand.nextInt(colorSpaces.length)]; fractions[i] = rand.nextFloat(); } Arrays.sort(fractions); g2.setColor(Color.GRAY); g2.fillRect(0 , 0 , w, h); Color c = getRandColor(200 , 250 ); g2.setColor(c); g2.fillRect(0 , 2 , w, h-4 ); Random random = new Random (); g2.setColor(getRandColor(160 , 200 )); for (int i = 0 ; i < 20 ; i++) { int x = random.nextInt(w - 1 ); int y = random.nextInt(h - 1 ); int xl = random.nextInt(6 ) + 1 ; int yl = random.nextInt(12 ) + 1 ; g2.drawLine(x, y, x + xl + 40 , y + yl + 20 ); } float yawpRate = 0.05f ; int area = (int ) (yawpRate * w * h); for (int i = 0 ; i < area; i++) { int x = random.nextInt(w); int y = random.nextInt(h); int rgb = getRandomIntColor(); image.setRGB(x, y, rgb); } shear(g2, w, h, c); g2.setColor(getRandColor(100 , 160 )); int fontSize = h-4 ; Font font = new Font ("Algerian" , Font.ITALIC, fontSize); g2.setFont(font); char [] chars = code.toCharArray(); for (int i = 0 ; i < verifySize; i++){ AffineTransform affine = new AffineTransform (); affine.setToRotation(Math.PI / 4 * rand.nextDouble() * (rand.nextBoolean() ? 1 : -1 ), (w / verifySize) * i + fontSize/2 , h/2 ); g2.setTransform(affine); g2.drawChars(chars, i, 1 , ((w-10 ) / verifySize) * i + 5 , h/2 + fontSize/2 - 10 ); } g2.dispose(); ImageIO.write(image, "jpg" , os); } private static Color getRandColor (int fc, int bc) { if (fc > 255 ) fc = 255 ; if (bc > 255 ) bc = 255 ; int r = fc + random.nextInt(bc - fc); int g = fc + random.nextInt(bc - fc); int b = fc + random.nextInt(bc - fc); return new Color (r, g, b); } private static int getRandomIntColor () { int [] rgb = getRandomRgb(); int color = 0 ; for (int c : rgb) { color = color << 8 ; color = color | c; } return color; } private static int [] getRandomRgb() { int [] rgb = new int [3 ]; for (int i = 0 ; i < 3 ; i++) { rgb[i] = random.nextInt(255 ); } return rgb; } private static void shear (Graphics g, int w1, int h1, Color color) { shearX(g, w1, h1, color); shearY(g, w1, h1, color); } private static void shearX (Graphics g, int w1, int h1, Color color) { int period = random.nextInt(2 ); boolean borderGap = true ; int frames = 1 ; int phase = random.nextInt(2 ); for (int i = 0 ; i < h1; i++) { double d = (double ) (period >> 1 ) * Math.sin((double ) i / (double ) period + (6.2831853071795862D * (double ) phase) / (double ) frames); g.copyArea(0 , i, w1, 1 , (int ) d, 0 ); if (borderGap) { g.setColor(color); g.drawLine((int ) d, i, 0 , i); g.drawLine((int ) d + w1, i, w1, i); } } } private static void shearY (Graphics g, int w1, int h1, Color color) { int period = random.nextInt(40 ) + 10 ; boolean borderGap = true ; int frames = 20 ; int phase = 7 ; for (int i = 0 ; i < w1; i++) { double d = (double ) (period >> 1 ) * Math.sin((double ) i / (double ) period + (6.2831853071795862D * (double ) phase) / (double ) frames); g.copyArea(i, 0 , 1 , h1, 0 , (int ) d); if (borderGap) { g.setColor(color); g.drawLine(i, (int ) d, i, 0 ); g.drawLine(i, (int ) d + h1, i, h1); } } } }
添加控制器UserController
1 2 3 4 5 6 7 8 9 10 11 12 13 14 15 16 17 18 19 20 21 22 23 24 25 26 27 28 29 30 31 32 33 34 35 36 37 38 39 40 41 42 43 44 package com.study.controller; import com.study.utils.VerifyCodeUtils; import com.sun.deploy.net.HttpResponse; import org.springframework.stereotype.Controller; import org.springframework.web.bind.annotation.RequestMapping; import javax.servlet.ServletOutputStream; import javax.servlet.http.HttpServletResponse; import javax.servlet.http.HttpSession; import java.io.IOException; @Controller @RequestMapping("user") public class UserController { @RequestMapping("generateImageCode") public void generateImageCode (HttpSession session, HttpServletResponse response) throws IOException { String code = VerifyCodeUtils.generateVerifyCode(4 ); session.setAttribute("code" ,code); response.setContentType("image/png" ); ServletOutputStream sos = response.getOutputStream(); VerifyCodeUtils.outputImage(220 ,60 ,sos,code); } }
register.html
1 2 3 4 5 6 7 8 9 10 11 12 13 14 15 16 17 18 19 20 21 22 23 24 25 26 27 28 29 30 31 32 33 34 35 36 37 38 39 40 41 42 43 44 45 46 47 48 49 50 51 52 53 54 55 56 57 58 59 60 61 62 63 64 65 66 67 68 69 70 71 72 73 74 75 76 77 78 79 80 81 82 83 84 85 86 87 88 89 90 91 92 93 94 95 96 97 98 99 100 101 102 <!DOCTYPE html PUBLIC "-//W3C//DTD HTML 4.01 Transitional//EN" "http://www.w3.org/TR/html4/loose.dtd" > <html xmlns:th ="http://www.thymeleaf.org" > <head > <title > regist</title > <meta http-equiv ="Content-Type" content ="text/html; charset=UTF-8" > <link rel ="stylesheet" type ="text/css" th:href ="@{/css/style.css}" /> </head > <body > <div id ="wrap" > <div id ="top_content" > <div id ="header" > <div id ="rightheader" > <p > 2009/11/20 <br /> </p > </div > <div id ="topheader" > <h1 id ="title" > <a href ="#" > main</a > </h1 > </div > <div id ="navigation" > </div > </div > <div id ="content" > <p id ="whereami" > </p > <h1 > 注册 </h1 > <form th:action ="@{/user/register}" method ="post" > <table cellpadding ="0" cellspacing ="0" border ="0" class ="form_table" > <tr > <td valign ="middle" align ="right" > 用户名: </td > <td valign ="middle" align ="left" > <input type ="text" class ="inputgri" name ="username" /> </td > </tr > <tr > <td valign ="middle" align ="right" > 真实姓名: </td > <td valign ="middle" align ="left" > <input type ="text" class ="inputgri" name ="realname" /> </td > </tr > <tr > <td valign ="middle" align ="right" > 密码: </td > <td valign ="middle" align ="left" > <input type ="password" class ="inputgri" name ="password" /> </td > </tr > <tr > <td valign ="middle" align ="right" > 性别: </td > <td valign ="middle" align ="left" > 男 <input type ="radio" class ="inputgri" name ="gender" value ="1" checked ="checked" /> 女 <input type ="radio" class ="inputgri" name ="gender" value ="0" /> </td > </tr > <tr > <td valign ="middle" align ="right" > 验证码: <img id ="num" th:src ="@{/user/generateImageCode}" /> <a href ="javascript:;" οnclick ="changeImageCode()" > 换一张</a > <script > function changeImageCode ( document .getElementById ('num' ).src = '[[@{/user/generateImageCode}]]?' +(new Date ()).getTime () } </script > </td > <td valign ="middle" align ="left" > <input type ="text" class ="inputgri" name ="code" /> </td > </tr > </table > <p > <input type ="submit" class ="button" value ="立即注册 » " /> <a href ="login.html" > 已有账号,返回登录</a > </p > </form > </div > </div > <div id ="footer" > <div id ="footer_bg" > ABC@126.com </div > </div > </div > </body > </html >
测试路径
(1)http://localhost:8888/ems-thymeleaf/user/generateImageCode
(2)http://localhost:8888/ems-thymeleaf/register
25.6 用户注册
创建数据库ems-thymeleaf、表user
1 2 3 4 5 6 7 8 9 10 create database if not exists `ems-thymeleaf`; use `ems-thymeleaf`; create table if not exists `user`( id int(20) not null auto_increment comment '用户ID', username varchar(100) not null comment '用户名', realname varchar(100) comment '真实姓名', password varchar(100) comment '密码', gender boolean comment '性别', primary key(id) )engine=innodb charset=utf8;
新建实体类User
1 2 3 4 5 6 7 8 9 10 11 12 13 14 15 16 17 18 19 20 21 22 23 24 25 26 27 28 29 30 31 32 33 34 35 36 37 38 39 40 41 42 43 44 45 46 47 48 49 50 51 52 53 54 55 56 57 58 59 60 61 62 63 64 65 66 67 68 69 70 71 72 73 74 75 76 77 78 79 package com.study.entity;public class User { private Integer id; private String username; private String realname; private String password; private Boolean gender; public User () { } public User (Integer id, String username, String realname, String password, Boolean gender) { this .id = id; this .username = username; this .realname = realname; this .password = password; this .gender = gender; } @Override public String toString () { return "User{" + "id=" + id + ", username='" + username + '\'' + ", realname='" + realname + '\'' + ", password='" + password + '\'' + ", gender=" + gender + '}' ; } public Integer getId () { return id; } public void setId (Integer id) { this .id = id; } public String getUsername () { return username; } public void setUsername (String username) { this .username = username; } public String getRealname () { return realname; } public void setRealname (String realname) { this .realname = realname; } public String getPassword () { return password; } public void setPassword (String password) { this .password = password; } public Boolean getGender () { return gender; } public void setGender (Boolean gender) { this .gender = gender; } }
创建UserDAO
1 2 3 4 5 6 7 8 9 10 11 12 13 14 15 16 17 18 19 20 21 22 23 24 25 26 27 28 29 30 31 package com.study.dao; import com.study.entity.User; public interface UserDAO { User findByUserName (String username) ; void register (User user) ; }
创建UserDAOMapper
1 2 3 4 5 6 7 8 9 10 11 12 13 14 15 16 17 18 19 20 21 <?xml version="1.0" encoding="UTF-8" ?> <!DOCTYPE mapper PUBLIC "-//mybatis.org//DTD Mapper 3.0//EN" "http://mybatis.org/dtd/mybatis-3-mapper.dtd" > <mapper namespace ="com.study.dao.UserDAO" > <select id ="findByUserName" parameterType ="String" resultType ="User" > select id,username,realname,password,gender from `user` where username=#{username} </select > <insert id ="register" parameterType ="User" useGeneratedKeys ="true" keyProperty ="id" > insert into `user` values(#{id},#{username},#{realname},#{password},#{gender}) </insert > </mapper >
创建UserService
1 2 3 4 5 6 7 8 9 10 11 12 13 14 15 16 17 18 19 20 21 package com.study.service;import com.study.entity.User;public interface UserService { void register (User user) ; }
创建UserServiceImpl
1 2 3 4 5 6 7 8 9 10 11 12 13 14 15 16 17 18 19 20 21 22 23 24 25 26 27 28 29 30 31 32 33 34 35 36 37 38 39 40 41 42 43 44 45 46 47 48 49 package com.study.service;import com.study.dao.UserDAO;import com.study.entity.User;import org.springframework.beans.factory.annotation.Autowired;import org.springframework.stereotype.Service;import org.springframework.transaction.annotation.Transactional;import org.springframework.util.DigestUtils;import org.springframework.util.ObjectUtils;import java.nio.charset.StandardCharsets;@Service @Transactional public class UserServiceImpl implements UserService { private UserDAO userDAO; @Autowired public UserServiceImpl (UserDAO userDAO) { this .userDAO = userDAO; } @Override public void register (User user) { User userDB = userDAO.findByUserName(user.getUsername()); if (!ObjectUtils.isEmpty(userDB)) throw new RuntimeException ("当前用户已被注册!" ); String newPassword = DigestUtils.md5DigestAsHex(user.getPassword().getBytes(StandardCharsets.UTF_8)); user.setPassword(newPassword); userDAO.register(user); } }
新建UserController
1 2 3 4 5 6 7 8 9 10 11 12 13 14 15 16 17 18 19 20 21 22 23 24 25 26 27 28 29 30 31 32 33 34 35 36 37 38 39 40 41 42 43 44 45 46 47 48 49 50 51 52 53 54 55 56 57 58 59 60 61 62 63 64 65 66 67 68 69 70 71 72 73 74 75 76 77 78 79 80 81 82 83 84 85 86 package com.study.controller;import com.study.entity.User;import com.study.service.UserService;import com.study.utils.VerifyCodeUtils;import org.slf4j.Logger;import org.slf4j.LoggerFactory;import org.springframework.beans.factory.annotation.Autowired;import org.springframework.stereotype.Controller;import org.springframework.web.bind.annotation.RequestMapping;import javax.servlet.ServletOutputStream;import javax.servlet.http.HttpServletResponse;import javax.servlet.http.HttpSession;import java.io.IOException;@Controller @RequestMapping("user") public class UserController { private static final Logger log = LoggerFactory.getLogger(UserController.class); @RequestMapping("generateImageCode") public void generateImageCode (HttpSession session, HttpServletResponse response) throws IOException { String code = VerifyCodeUtils.generateVerifyCode(4 ); session.setAttribute("code" ,code); response.setContentType("image/png" ); ServletOutputStream sos = response.getOutputStream(); VerifyCodeUtils.outputImage(220 ,60 ,sos,code); } private UserService userService; @Autowired public UserController (UserService userService) { this .userService = userService; } @RequestMapping("register") public String register (User user,String code,HttpSession session) { log.debug("用户名:{},真实姓名:{},密码:{},性别:{}" , user.getUsername(),user.getRealname(),user.getPassword(),user.getGender()); log.debug("用户输入的验证码: {}" ,code); try { String sessionCode = session.getAttribute("code" ).toString(); if (!sessionCode.equalsIgnoreCase(code)) throw new RuntimeException ("验证码输入错误!" ); userService.register(user); } catch (RuntimeException e) { e.printStackTrace(); return "redirect:/register" ; } return "redirect:/login" ; } }
访问路径:http://localhost:8888/ems-thymeleaf/register,进行注册,成功跳转到登录页面,失败回到注册页面!
25.7 用户登录
在UserService添加登录方法
1 2 3 4 5 6 7 8 9 10 User login (String username,String password) ;
在UserServiceImpl实现登录方法
1 2 3 4 5 6 7 8 9 10 11 12 13 14 15 16 17 18 19 20 21 22 23 @Override public User login (String username, String password) { User user = userDAO.findByUserName(username); if (ObjectUtils.isEmpty(user)) throw new RuntimeException ("用户名不存在!" ); String passwordSecret = DigestUtils.md5DigestAsHex(password.getBytes(StandardCharsets.UTF_8)); if (!user.getPassword().equals(passwordSecret)) throw new RuntimeException ("密码错误!" ); return user; }
UserController添加登录方法
1 2 3 4 5 6 7 8 9 10 11 12 13 14 15 16 17 18 19 20 21 22 23 24 25 @RequestMapping("login") public String login (String username,String password,HttpSession session) { log.debug("本次登录的用户名为:{}" ,username); log.debug("本次登录的密码为:{}" ,password); try { User user = userService.login(username, password); session.setAttribute("user" ,user); } catch (Exception e) { e.printStackTrace(); return "redirect:/login" ; } return "redirect:/employee/lists" ; }
添加EmpployeeController
1 2 3 4 5 6 7 8 9 10 11 12 13 14 15 16 17 18 19 20 21 22 23 24 25 26 27 package com.study.controller; import org.slf4j.Logger; import org.slf4j.LoggerFactory; import org.springframework.stereotype.Controller; import org.springframework.ui.Model; import org.springframework.web.bind.annotation.RequestMapping; @Controller @RequestMapping("employee") public class EmployeeController { private static final Logger log = LoggerFactory.getLogger(EmployeeController.class); @RequestMapping("lists") public String list (Model model) { log.debug("查询所有员工信息" ); return "emplist" ; } }
login.html
1 2 3 4 5 6 7 8 9 10 11 12 13 14 15 16 17 18 19 20 21 22 23 24 25 26 27 28 29 30 31 32 33 34 35 36 37 38 39 40 41 42 43 44 45 46 47 48 49 50 51 52 53 54 55 56 57 58 59 60 61 62 63 64 65 66 67 68 69 <!DOCTYPE html PUBLIC "-//W3C//DTD HTML 4.01 Transitional//EN" "http://www.w3.org/TR/html4/loose.dtd" > <html xmlns:th ="http://www.thymeleaf.org" > <head > <title > login</title > <meta http-equiv ="Content-Type" content ="text/html; charset=UTF-8" > <link rel ="stylesheet" type ="text/css" href ="css/style.css" /> </head > <body > <div id ="wrap" > <div id ="top_content" > <div id ="header" > <div id ="rightheader" > <p > 2009/11/20 <br /> </p > </div > <div id ="topheader" > <h1 id ="title" > <a href ="#" > main</a > </h1 > </div > <div id ="navigation" > </div > </div > <div id ="content" > <p id ="whereami" > </p > <h1 > 欢迎进入,请登录! </h1 > <form th:action ="@{/user/login}" method ="post" > <table cellpadding ="0" cellspacing ="0" border ="0" class ="form_table" > <tr > <td valign ="middle" align ="right" > 用户名: </td > <td valign ="middle" align ="left" > <input type ="text" class ="inputgri" name ="username" /> </td > </tr > <tr > <td valign ="middle" align ="right" > 密码: </td > <td valign ="middle" align ="left" > <input type ="password" class ="inputgri" name ="password" /> </td > </tr > </table > <p > <input type ="submit" class ="button" value ="点我登录 » " /> <a href ="regist.html" > 还没有账号,立即注册</a > </p > </form > </div > </div > <div id ="footer" > <div id ="footer_bg" > ABC@126.com </div > </div > </div > </body > </html >
emplists.html
1 2 3 4 5 6 7 8 9 10 11 12 13 14 15 16 17 18 19 20 21 22 23 24 25 26 27 28 29 30 31 32 33 34 35 36 37 38 39 40 41 42 43 44 45 46 47 48 49 50 51 52 53 54 55 56 57 58 59 60 61 62 63 64 65 66 67 68 69 70 71 72 73 74 75 76 77 78 79 80 81 82 83 84 85 86 87 88 89 90 91 92 93 94 95 96 97 98 99 100 101 102 103 104 105 106 <!DOCTYPE html PUBLIC "-//W3C//DTD HTML 4.01 Transitional//EN" "http://www.w3.org/TR/html4/loose.dtd" > <html xmlns:th ="http://www.thymeleaf.org" > <head > <title > emplist</title > <meta http-equiv ="Content-Type" content ="text/html; charset=UTF-8" > <link rel ="stylesheet" type ="text/css" th:href ="@{/css/style.css}" /> </head > <body > <div id ="wrap" > <div id ="top_content" > <div id ="header" > <div id ="rightheader" > <p > 2009/11/20 <br /> <a th:if ="${session.user!=null}" th:href ="@{/user/logout}" > 安全退出</a > <a th:if ="${session.user==null}" th:href ="@{/login}" > 点我登录</a > </p > </div > <div id ="topheader" > <h1 id ="title" > <a href ="#" > main</a > </h1 > </div > <div id ="navigation" > </div > </div > <div id ="content" > <p id ="whereami" > </p > <h1 > 欢迎 <span th:if ="${session.user!=null}" th:text ="${session.user.username}" > </span > <span th:if ="${session.user==null}" > 游客</span > ! </h1 > <table class ="table" > <tr class ="table_header" > <td > 编号 </td > <td > 姓名 </td > <td > 头像 </td > <td > 工资 </td > <td > 生日 </td > <td > 操作 </td > </tr > <tr th:each ="employee,state:${employeeList}" th:class ="${state.odd?'row1':'row2'}" > <td > <span th:text ="${employee.id}" > </span > </td > <td > <span th:text ="${employee.name}" > </span > </td > <td > <img th:src ="@{/}+${employee.photo}" width ="60" > </td > <td > <span th:text ="${employee.salary}" > </span > </td > <td > <span th:text ="${#dates.format(employee.birthday,'yyyy/MM/dd')}" > </span > </td > <td > <a href ="javascript:;" th:οnclick ="'deleteEmployee('+${employee.id}+')'" > 删除</a > <a th:href ="@{/employee/detail(id=${employee.id})}" > 更新</a > </td > </tr > <script > function deleteEmployee (id ){ console .log (id); if (window .confirm ('确定要删除这条记录吗?' )){ location.href ='[[@{/employee/delete?id=}]]' +id; } } </script > </table > <p > <input type ="button" class ="button" value ="添加" οnclick ="addEmp()" /> <script > function addEmp ( location.href = '[[@{/addEmp}]]' ; } </script > </p > </div > </div > <div id ="footer" > <div id ="footer_bg" > ABC@126.com </div > </div > </div > </body > </html >
测试路径:http://localhost:8888/ems-thymeleaf/login,登录成功跳转到员工列表页面,登录失败回到登录页面
25.8 员工列表
创建employee表
1 2 3 4 5 6 7 8 create table if not exists `employee`( id int(20) not null auto_increment comment '员工ID', name varchar(100) not null comment '姓名', salary double not null comment '工资', birthday datetime not null comment '生日', photo varchar(100) not null comment '头像', primary key(id) )engine=innodb charset=utf8;
新建实体类Employee
1 2 3 4 5 6 7 8 9 10 11 12 13 14 15 16 17 18 19 20 21 22 23 24 25 26 27 28 29 30 31 32 33 34 35 36 37 38 39 40 41 42 43 44 45 46 47 48 49 50 51 52 53 54 55 56 57 58 59 60 61 62 63 64 65 66 67 68 69 70 71 72 73 74 75 76 77 78 79 80 81 package com.study.entity; import java.util.Date; public class Employee { private Integer id; private String name; private Double salary; private Date birthday; private String photo; public Employee () { } public Employee (Integer id, String name, Double salary, Date birthday, String photo) { this .id = id; this .name = name; this .salary = salary; this .birthday = birthday; this .photo = photo; } public Integer getId () { return id; } public void setId (Integer id) { this .id = id; } public String getName () { return name; } public void setName (String name) { this .name = name; } public Double getSalary () { return salary; } public void setSalary (Double salary) { this .salary = salary; } public Date getBirthday () { return birthday; } public void setBirthday (Date birthday) { this .birthday = birthday; } public String getPhoto () { return photo; } public void setPhoto (String photo) { this .photo = photo; } @Override public String toString () { return "Employee{" + "id=" + id + ", name='" + name + '\'' + ", salary=" + salary + ", birthday=" + birthday + ", photo='" + photo + '\'' + '}' ; } } ————————————————
新建EmployeeDAO
1 2 3 4 5 6 7 8 9 10 11 12 13 14 15 16 17 18 19 20 21 22 23 package com.study.dao;import com.study.entity.Employee;import java.util.List;public interface EmployeeDAO { List<Employee> lists () ; }
新建EmployeeDAOMapper
1 2 3 4 5 6 7 8 9 10 11 12 13 <?xml version="1.0" encoding="UTF-8" ?> <!DOCTYPE mapper PUBLIC "-//mybatis.org//DTD Mapper 3.0//EN" "http://mybatis.org/dtd/mybatis-3-mapper.dtd" > <mapper namespace ="com.study.dao.EmployeeDAO" > <select id ="lists" resultType ="Employee" > select id,name,salary,birthday,photo from employee </select > </mapper >
新建EmployeeService
1 2 3 4 5 6 7 8 9 10 11 12 13 14 15 16 17 18 19 20 21 22 23 package com.study.service;import com.study.entity.Employee;import java.util.List;public interface EmployeeService { List<Employee> lists () ; }
新建EmployeeServiceImpl
1
2
3
4
5
6
7
8
9
10
11
12
13
14
15
16
17
18
19
20
21
22
23
24
25
26
27
28
29
30
31
32
33
34
35
36
37
38
39
package com.study.service;import com.study.dao.EmployeeDAO;import com.study.entity.Employee;import org.springframework.beans.factory.annotation.Autowired;import org.springframework.stereotype.Service;import org.springframework.transaction.annotation.Transactional;import java.util.List;@Service @Transactional public class EmployeeServiceImpl implements EmployeeService { private EmployeeDAO employeeDAO; @Autowired public EmployeeServiceImpl (EmployeeDAO employeeDAO) { this .employeeDAO = employeeDAO; } @Override public List<Employee> lists () { return employeeDAO.lists(); } }
完善EmployeeController
1 2 3 4 5 6 7 8 9 10 11 12 13 14 15 16 17 18 19 20 21 22 23 24 25 26 27 28 29 30 31 32 33 34 35 36 37 38 39 40 41 42 43 44 45 46 47 48 49 package com.study.controller;import com.study.entity.Employee;import com.study.service.EmployeeService;import org.slf4j.Logger;import org.slf4j.LoggerFactory;import org.springframework.beans.factory.annotation.Autowired;import org.springframework.stereotype.Controller;import org.springframework.ui.Model;import org.springframework.web.bind.annotation.RequestMapping;import java.util.List;@Controller @RequestMapping("employee") public class EmployeeController { private static final Logger log = LoggerFactory.getLogger(EmployeeController.class); private EmployeeService employeeService; @Autowired public EmployeeController (EmployeeService employeeService) { this .employeeService = employeeService; } @RequestMapping("lists") public String list (Model model) { log.debug("查询所有员工信息" ); List<Employee> employeeList = employeeService.lists(); model.addAttribute("employeeList" ,employeeList); return "emplist" ; } }
测试路径:http://localhost:8888/ems-thymeleaf/employee/lists
25.9 添加员工
完善EmployeDAO
1 2 3 4 5 6 7 8 void addEmp (Employee employee) ;
完善EmpDAOMapper
1 2 3 4 <!--addEmp--> <insert id="addEmp" parameterType="Employee" useGeneratedKeys="true" keyProperty="id" > insert into employee values (#{id},#{name},#{salary},#{birthday},#{photo}) </insert>
完善EmployeeService
1 2 3 4 5 6 7 8 void addEmp (Employee employee) ;
完善EmpEmployeeServiceImpl
1 2 3 4 5 6 7 8 9 10 11 @Override public void addEmp (Employee employee) { employeeDAO.addEmp(employee); }
EmployeeController
1 2 3 4 5 6 7 8 9 10 11 12 13 14 15 16 17 18 19 20 21 22 23 24 25 26 27 28 29 30 31 32 33 34 35 36 37 38 39 40 41 42 43 44 45 46 @Value("${photo.file.dir}") private String realpath; private String uploadPhoto (MultipartFile img,String originalFileName) throws IOException { String fileNamePrefix = new SimpleDateFormat ("yyyyMMddHHmmssSSS" ).format(new Date ()); String fileNameSuffix = originalFileName.substring(originalFileName.lastIndexOf("." )); String newFileName = fileNamePrefix + fileNameSuffix; img.transferTo(new File (realpath,newFileName)); return newFileName; } @RequestMapping("addEmp") public String addEmp (Employee employee, MultipartFile img) throws IOException { log.debug("姓名:{},工资:{},生日:{}" ,employee.getName(),employee.getSalary(),employee.getBirthday()); String originalFilename = img.getOriginalFilename(); log.debug("头像名称:{}" ,originalFilename); log.debug("头像大小:{}" ,img.getSize()); log.debug("上传路径:{}" ,realpath); String newFileName = uploadPhoto(img, originalFilename); employee.setPhoto(newFileName); employeeService.addEmp(employee); return "redirect:/employee/lists" ; }
application.yml添加文件上传配置
1 2 3 4 5 6 7 8 9 10 11 12 13 14 15 16 17 18 19 20 21 22 23 24 25 26 27 28 29 30 31 32 33 34 35 36 37 38 39 40 server: port: 8888 servlet: context-path: /ems-thymeleaf spring: thymeleaf: cache: false prefix: classpath:/templates/ suffix: .html datasource: type: com.alibaba.druid.pool.DruidDataSource driver-class-name: com.mysql.jdbc.Driver url: jdbc:mysql://localhost:3306/ems-thymeleaf?characterEncoding=UTF-8 username: root password: 123456 web: resources: static-locations: classpath:/static/,file:${photo.file.dir} mybatis: mapper-locations: classpath:com/study/mapper/*.xml type-aliases-package: com.study.entity logging: level: root: info com.study: debug photo: file: dir: D:\Software_Development\IDEA_code\SpringBoot\ems-thymeleaf\photos
完善MvcConfig
1 2 3 4 5 6 7 8 9 10 11 @Configuration public class MvcConfig implements WebMvcConfigurer { @Override public void addViewControllers (ViewControllerRegistry registry) { registry.addViewController("login" ).setViewName("login" ); registry.addViewController("register" ).setViewName("regist" ); registry.addViewController("addEmp" ).setViewName("addEmp" ); } }
addEmp.html
1 2 3 4 5 6 7 8 9 10 11 12 13 14 15 16 17 18 19 20 21 22 23 24 25 26 27 28 29 30 31 32 33 34 35 36 37 38 39 40 41 42 43 44 45 46 47 48 49 50 51 52 53 54 55 56 57 58 59 60 61 62 63 64 65 66 67 68 69 70 71 72 73 74 75 76 77 78 79 80 81 82 83 84 <!DOCTYPE html PUBLIC "-//W3C//DTD HTML 4.01 Transitional//EN" "http://www.w3.org/TR/html4/loose.dtd" > <html xmlns:th ="http://www.thymealf.org" > <head > <title > 添加员工信息</title > <meta http-equiv ="Content-Type" content ="text/html; charset=UTF-8" > <link rel ="stylesheet" type ="text/css" href ="css/style.css" /> </head > <body > <div id ="wrap" > <div id ="top_content" > <div id ="header" > <div id ="rightheader" > <p > 2009/11/20 <br /> </p > </div > <div id ="topheader" > <h1 id ="title" > <a href ="#" > main</a > </h1 > </div > <div id ="navigation" > </div > </div > <div id ="content" > <p id ="whereami" > </p > <h1 > 添加员工信息: </h1 > <form th:action ="@{/employee/addEmp}" method ="post" enctype ="multipart/form-data" > <table cellpadding ="0" cellspacing ="0" border ="0" class ="form_table" > <tr > <td valign ="middle" align ="right" > 姓名: </td > <td valign ="middle" align ="left" > <input type ="text" class ="inputgri" name ="name" /> </td > </tr > <tr > <td valign ="middle" align ="right" > 头像: </td > <td valign ="middle" align ="left" > <input type ="file" width ="" name ="img" /> </td > </tr > <tr > <td valign ="middle" align ="right" > 工资: </td > <td valign ="middle" align ="left" > <input type ="text" class ="inputgri" name ="salary" /> </td > </tr > <tr > <td valign ="middle" align ="right" > 生日: </td > <td valign ="middle" align ="left" > <input type ="text" class ="inputgri" name ="birthday" /> </td > </tr > </table > <p > <input type ="submit" class ="button" value ="确认添加" /> <input type ="submit" class ="button" value ="返回列表" /> </p > </form > </div > </div > <div id ="footer" > <div id ="footer_bg" > ABC@126.com </div > </div > </div > </body > </html >
访问路径:http://localhost:8888/ems-thymeleaf/employee/lists,添加员工信息
25.10 更新员工信息
完善EmployeeController
1 2 3 4 5 6 7 8 9 10 11 12 13 14 15 16 17 18 19 20 21 22 23 24 25 26 27 28 29 30 31 32 33 34 35 36 37 38 39 40 41 42 43 44 45 46 47 48 49 50 @RequestMapping("detail") public String detail (Integer id,Model model) { log.debug("当前查询员工id:{}" ,id); Employee employee = employeeService.findById(id); model.addAttribute("employee" ,employee); return "updateEmp" ; } @RequestMapping("updateEmp") public String updateEmp (Employee employee,MultipartFile img) throws IOException { boolean notEmpty = !img.isEmpty(); log.debug("是否更新了头像:{}" ,notEmpty); if (notEmpty){ String oldPhoto = employeeService.findById(employee.getId()).getPhoto(); File file = new File (realpath,oldPhoto); if (file.exists()) file.delete(); String originalFilename = img.getOriginalFilename(); String newFileName = uploadPhoto(img, originalFilename); employee.setPhoto(newFileName); } employeeService.updateEmp(employee); return "redirect:/employee/lists" ; }
完善updateEmp.html
1 2 3 4 5 6 7 8 9 10 11 12 13 14 15 16 17 18 19 20 21 22 23 24 25 26 27 28 29 30 31 32 33 34 35 36 37 38 39 40 41 42 43 44 45 46 47 48 49 50 51 52 53 54 55 56 57 58 59 60 61 62 63 64 65 66 67 68 69 70 71 72 73 74 75 76 77 78 79 80 81 82 83 84 85 86 87 88 89 90 91 92 93 94 95 96 97 98 99 100 101 102 <!DOCTYPE html PUBLIC "-//W3C//DTD HTML 4.01 Transitional//EN" "http://www.w3.org/TR/html4/loose.dtd" > <html xmlns:th ="http://www.thymeleaf.org" > <head > <title > 更新员工信息</title > <meta http-equiv ="Content-Type" content ="text/html; charset=UTF-8" > <link rel ="stylesheet" type ="text/css" th:href ="@{/css/style.css}" /> </head > <body > <div id ="wrap" > <div id ="top_content" > <div id ="header" > <div id ="rightheader" > <p > 2009/11/20 <br /> </p > </div > <div id ="topheader" > <h1 id ="title" > <a href ="#" > main</a > </h1 > </div > <div id ="navigation" > </div > </div > <div id ="content" > <p id ="whereami" > </p > <h1 > 更新员工信息: </h1 > <form th:action ="@{/employee/updateEmp}" method ="post" enctype ="multipart/form-data" > <table cellpadding ="0" cellspacing ="0" border ="0" class ="form_table" > <tr > <td valign ="middle" align ="right" > 编号: </td > <td valign ="middle" align ="left" > <span th:text ="${employee.id}" > </span > <input type ="hidden" name ="id" th:value ="${employee.id}" > </td > </tr > <tr > <td valign ="middle" align ="right" > 姓名: </td > <td valign ="middle" align ="left" > <input type ="text" class ="inputgri" name ="name" th:value ="${employee.name}" /> </td > </tr > <tr > <td valign ="middle" align ="right" > 当前头像: </td > <td valign ="middle" align ="left" > <img th:src ="@{/}+${employee.photo}" width ="60" > <input type ="hidden" th:value ="${employee.photo}" name ="photo" > </td > </tr > <tr > <td valign ="middle" align ="right" > 选择新头像: </td > <td valign ="middle" align ="left" > <input type ="file" name ="img" /> </td > </tr > <tr > <td valign ="middle" align ="right" > 工资: </td > <td valign ="middle" align ="left" > <input type ="text" class ="inputgri" name ="salary" th:value ="${employee.salary}" /> </td > </tr > <tr > <td valign ="middle" align ="right" > 生日: </td > <td valign ="middle" align ="left" > <input type ="text" class ="inputgri" name ="birthday" th:value ="${#dates.format(employee.birthday,'yyyy/MM/dd')}" /> </td > </tr > </table > <p > <input type ="submit" class ="button" value ="更新" /> <input type ="button" class ="button" value ="返回列表" /> </p > </form > </div > </div > <div id ="footer" > <div id ="footer_bg" > ABC@126.com </div > </div > </div > </body > </html >
完善EmployeeService
1 2 3 4 5 6 7 8 9 10 11 12 13 14 15 16 17 18 Employee findById (Integer id) ; void updateEmp (Employee employee) ;
完善EmployeeServiceImpl
1 2 3 4 5 6 7 8 9 10 11 12 13 14 15 16 17 18 19 20 21 22 23 24 @Override public Employee findById (Integer id) { return employeeDAO.findById(id); } @Override public void updateEmp (Employee employee) { employeeDAO.updateEmp(employee); }
完善EmployeeDAO
1 2 3 4 5 6 7 8 9 10 11 12 13 14 15 16 17 18 Employee findById (Integer id) ; void updateEmp (Employee employee) ;
完善EmployeeDAOMapper
1 2 3 4 5 6 7 8 9 10 11 12 13 14 <!--findById--> <select id="findById" parameterType="Integer" resultType="Employee" > select id,name,salary,birthday,photo from employee where id=#{id} </select> <!--updateEmp--> <update id="updateEmp" parameterType="Employee" > update employee set name=#{name},salary=#{salary},birthday=#{birthday},photo=#{photo} where id=#{id} </update>
测试路径:http://localhost:8888/ems-thymeleaf/employee/lists
(1)点击更新,进行员工信息更新
(2)填写要修改的员工信息,修改完成后,点击更新
(3)更新后的员工信息
25.11 删除员工信息
完善EmpController
1 2 3 4 5 6 7 8 9 10 11 12 13 14 15 16 17 18 19 20 @RequestMapping("deleteEmp") public String deleteEmp (Integer id) { log.debug("删除的员工id:{}" ,id); String photo = employeeService.findById(id).getPhoto(); employeeService.deleteEmp(id); File file = new File (realpath,photo); if (file.exists()) file.delete(); return "redirect:/employee/lists" ; }
完善emplist.html
1 2 3 4 5 6 7 8 9 10 11 12 13 14 15 16 17 18 19 20 21 22 23 24 25 26 27 28 29 30 31 32 33 34 35 36 37 38 39 40 41 42 43 44 45 46 47 48 49 50 51 52 53 54 55 56 57 58 59 60 61 62 63 64 65 66 67 68 69 70 71 72 73 74 75 76 77 78 79 80 81 82 83 84 85 86 87 88 89 90 91 92 93 94 95 96 97 98 99 100 101 102 103 104 105 106 <!DOCTYPE html PUBLIC "-//W3C//DTD HTML 4.01 Transitional//EN" "http://www.w3.org/TR/html4/loose.dtd" > <html xmlns:th ="http://www.thymeleaf.org" > <head > <title > emplist</title > <meta http-equiv ="Content-Type" content ="text/html; charset=UTF-8" > <link rel ="stylesheet" type ="text/css" th:href ="@{/css/style.css}" /> </head > <body > <div id ="wrap" > <div id ="top_content" > <div id ="header" > <div id ="rightheader" > <p > 2009/11/20 <br /> <a th:if ="${session.user!=null}" th:href ="@{/user/logout}" > 安全退出</a > <a th:if ="${session.user==null}" th:href ="@{/login}" > 点我登录</a > </p > </div > <div id ="topheader" > <h1 id ="title" > <a href ="#" > main</a > </h1 > </div > <div id ="navigation" > </div > </div > <div id ="content" > <p id ="whereami" > </p > <h1 > 欢迎 <span th:if ="${session.user!=null}" th:text ="${session.user.username}" > </span > <span th:if ="${session.user==null}" > 游客</span > ! </h1 > <table class ="table" > <tr class ="table_header" > <td > 编号 </td > <td > 姓名 </td > <td > 头像 </td > <td > 工资 </td > <td > 生日 </td > <td > 操作 </td > </tr > <tr th:each ="employee,state:${employeeList}" th:class ="${state.odd?'row1':'row2'}" > <td > <span th:text ="${employee.id}" > </span > </td > <td > <span th:text ="${employee.name}" > </span > </td > <td > <img th:src ="@{/}+${employee.photo}" width ="60" > </td > <td > <span th:text ="${employee.salary}" > </span > </td > <td > <span th:text ="${#dates.format(employee.birthday,'yyyy/MM/dd')}" > </span > </td > <td > <a href ="javascript:;" th:οnclick ="'deleteEmployee('+${employee.id}+')'" > 删除</a > <a th:href ="@{/employee/detail(id=${employee.id})}" > 更新</a > </td > </tr > <script > function deleteEmployee (id ){ console .log (id); if (window .confirm ('确定要删除这条记录吗?' )){ location.href ='[[@{/employee/deleteEmp?id=}]]' +id; } } </script > </table > <p > <input type ="button" class ="button" value ="添加" οnclick ="addEmp()" /> <script > function addEmp ( location.href = '[[@{/addEmp}]]' ; } </script > </p > </div > </div > <div id ="footer" > <div id ="footer_bg" > ABC@126.com </div > </div > </div > </body > </html >
完善EmpService
1 2 3 4 5 6 7 8 void deleteEmp (Integer id) ;
完善EmpServiceImpl
1 2 3 4 5 6 7 8 9 10 11 @Override public void deleteEmp (Integer id) { employeeDAO.deleteEmp(id); }
完善EmployeeDAO
1 2 3 4 5 6 7 8 void deleteEmp (Integer id) ;
完善EmployeeDAOMapper
1 2 3 4 <!--deleteEmp--> <delete id="deleteEmp" parameterType="Integer" > delete from employee where id=#{id} </delete>
测试路径:http://localhost:8888/ems-thymeleaf/employee/lists,点击删除的同时,员工信息删除且photos中的头像图片也删除。
25.12 安全退出
完善UserController
1 2 3 4 5 6 7 8 9 10 11 12 @RequestMapping("logout") public String logout (HttpSession session) { session.invalidate(); return "redirect:/login" ; }
完善emplist.html
1 2 3 4 5 6 7 8 9 10 11 12 13 14 15 16 17 18 19 20 21 22 23 24 25 26 27 28 29 30 31 32 33 34 35 36 37 38 39 40 41 42 43 44 45 46 47 48 49 50 51 52 53 54 55 56 57 58 59 60 61 62 63 64 65 66 67 68 69 70 71 72 73 74 75 76 77 78 79 80 81 82 83 84 85 86 87 88 89 90 91 92 93 94 95 96 97 98 99 100 101 102 103 104 105 106 <!DOCTYPE html PUBLIC "-//W3C//DTD HTML 4.01 Transitional//EN" "http://www.w3.org/TR/html4/loose.dtd" > <html xmlns:th ="http://www.thymeleaf.org" > <head > <title > emplist</title > <meta http-equiv ="Content-Type" content ="text/html; charset=UTF-8" > <link rel ="stylesheet" type ="text/css" th:href ="@{/css/style.css}" /> </head > <body > <div id ="wrap" > <div id ="top_content" > <div id ="header" > <div id ="rightheader" > <p > 2009/11/20 <br /> <a th:if ="${session.user!=null}" th:href ="@{/user/logout}" > 安全退出</a > <a th:if ="${session.user==null}" th:href ="@{/login}" > 点我登录</a > </p > </div > <div id ="topheader" > <h1 id ="title" > <a href ="#" > main</a > </h1 > </div > <div id ="navigation" > </div > </div > <div id ="content" > <p id ="whereami" > </p > <h1 > 欢迎 <span th:if ="${session.user!=null}" th:text ="${session.user.username}" > </span > <span th:if ="${session.user==null}" > 游客</span > ! </h1 > <table class ="table" > <tr class ="table_header" > <td > 编号 </td > <td > 姓名 </td > <td > 头像 </td > <td > 工资 </td > <td > 生日 </td > <td > 操作 </td > </tr > <tr th:each ="employee,state:${employeeList}" th:class ="${state.odd?'row1':'row2'}" > <td > <span th:text ="${employee.id}" > </span > </td > <td > <span th:text ="${employee.name}" > </span > </td > <td > <img th:src ="@{/}+${employee.photo}" width ="60" > </td > <td > <span th:text ="${employee.salary}" > </span > </td > <td > <span th:text ="${#dates.format(employee.birthday,'yyyy/MM/dd')}" > </span > </td > <td > <a href ="javascript:;" th:οnclick ="'deleteEmployee('+${employee.id}+')'" > 删除</a > <a th:href ="@{/employee/detail(id=${employee.id})}" > 更新</a > </td > </tr > <script > function deleteEmployee (id ){ console .log (id); if (window .confirm ('确定要删除这条记录吗?' )){ location.href ='[[@{/employee/deleteEmp?id=}]]' +id; } } </script > </table > <p > <input type ="button" class ="button" value ="添加" οnclick ="addEmp()" /> <script > function addEmp ( location.href = '[[@{/addEmp}]]' ; } </script > </p > </div > </div > <div id ="footer" > <div id ="footer_bg" > ABC@126.com </div > </div > </div > </body > </html >
测试路径:http://localhost:8888/ems-thymeleaf/employee/lists
(1)未登录
(2)登录后
(3)安全登出后,需要重新登录
25.13 完整项目结构
26.RestFul 26.1 引言
REST全称是**(Resources) Representational State Transfer**,中文意思是表述(编者注:通常译为表征)性状态转移。 它首次出现在2000年Roy Fielding的博士论文中,Roy Fielding是HTTP规范的主要编写者之一。 他在论文中提到:”我这篇文章的写作目的,就是想在符合架构原理的前提下,理解和评估以网络为基础的应用软件的架构设计,得到一个功能强、性能好、适宜通信的架构。REST指的是一组架构约束条件和原则(Rest不是标准 规范)。” 如果一个架构符合REST的约束条件和原则,我们就称它为RESTful架构。
REST本身并没有创造新的技术、组件或服务,而隐藏在RESTful背后的理念就是使用Web的现有特征和能力, 更好地使用现有Web标准中的一些准则和约束。虽然REST本身受Web技术的影响很深, 但是理论上REST架构风格并不是绑定在HTTP上,只不过目前HTTP是唯一与REST相关的实例。 所以我们这里描述的REST也是通过HTTP实现的REST。
传统web开发:基于javaweb开发,实现所有功能
有了Restful:软件设计风格|标准、简洁、层次、优雅
基于rest设计原则和约束的架构被称之为restFul。
总结:
Rest 词:没有更新的技术、组件、服务,但能让web请求能够利用web中的标准和能力更好的描述架构。
RestFul: 是一种以网络为基础构架的一种架构风格, 符合Rest设计原则和约束的架构被称为RestFul。
Restful 一种软件架构风格、设计风格,而不是标准,只是提供了一组设计原则和约束条件。它主要用于客户端和服务器交互类的软件。基于这个风格设计的软件可以更简洁,更有层次,更易于实现缓存等机制。
26.2URL定义
资源:互联网所有的事物都可以被抽象为资源
资源操作:使用POST(添加)、DELETE(删除)、PUT(修改)、GET(查询),使用不同请求方法对资源进行操作。
26.3传统方式操作资源
http://127.0.0.1/item/queryUser.action?id=1 查询,GET
http://127.0.0.1/item/saveUser.action 新增,POST
http://127.0.0.1/item/updateUser.action 更新,PUT
http://127.0.0.1/item/deleteUser.action?id=1 删除,DELETE注意: 传统的操作是没有问题的,但大神认为是有问题的,有什么问题呢?你每次请求的接口或者地址,都在做描述,例如查询的时候用了queryUser,新增的时候用了saveUser,修改的时候用了updateUser,其实完全没有这个必要,我使用了get请求就是查询、使用post请求就是新增的请求、PUT就是修改、delete就是删除,我的意图很明显,完全没有必要做描述,这就是为什么有了restful。
26.4使用RESTful操作资源
【GET】 /users # 查询用户信息列表
【GET】 /users/1001 # 查看某个用户信息
【POST】 /users # 新建用户信息
【PUT】 /users/1001 # 更新用户信息(全部字段)
【PATCH】 /users/1001 # 更新用户信息(部分字段)
【DELETE】 /users/1001 # 删除用户信息
26.5Rest API设计风格原则
1 2 3 4 5 6 7 8 9 10 11 12 13 14 15 16 17 18 19 20 21 22 23 24 25 26 27 28 29 30 31 32 33 34 35 36 37 38 39 40 41 42 43 44 45 46 47 48 49 50 51 52 53 54 55 56 57 58 59 60 61 62 63 64 65 66 67 68 69 70 71 72 73 74 75 76 77 78 79 80 81 82 83 84 # 1.使用名词而不是动词 - 不要使用: 如: /getAllUsers get /users 、 get /users/002 /createNewUser post /users /deleteAllUser delete /users 、delete /users/001 /updateUser put|patch /users 、patch /users/001 # 2.Get方法和查询参数不应该涉及状态改变 - 使用PUT,POST和DELETE方法 而不是GET方法来改变状态,不要使用GET进行状态改变# 3.使用复数名词 - 不要混淆名词单数和复数,为了保持简单,只对所有资源使用复数,如: /cars 而不是 /car /users 而不是 /user /products 而不是 /product /settings 而不是 /setting /orders 而不是 /order # 4. 使用子资源表达关系 - 如果一个资源与另外一个资源有关系,使用子资源,如: GET /cars/711/drivers/ 返回 car 711的所有司机 GET /cars/711/drivers/4 返回 car 711的4号司机 GET /users/11/pets 返回 user 11的所有宠物 GET /users/11/pets/2 返回 user 11的2号宠物 # 5.使用Http头声明序列化格式 - http有请求有响应,发请求到控制器是请求,响应回来会有一个响应- 在客户端和服务端双方都要知道通讯的格式,格式在HTTP-Header中指定,如: Content-Type:定义请求格式 Accept:定义系列可接受的响应格式 # 6.为集合提供过滤排序选择和分页等功能 - Filtering过滤:使用唯一的查询参数进行 GET /cars?color=red 返回红色的cars GET /cars?seats<=2 返回小于两座位的cars集合 - Sorting排序:允许针对多个字段排序 GET /cars?sort=-manufactorer,+model 这是返回根据生产者降序和模型升序排列的car集合 - Field selection 移动端能够显示其中一些字段,它们其实不需要一个资源的所有字段,给API消费者一个选择字段的能力,这会降低网络流量,提高API可用性。 GET /cars?fields=manufacturer,model,id,color - Paging分页 使用limit和offset.实现分页,缺省时,limit=20和offset=0; GET /cars?offset=10&limit=5 为了将总数发给客户端,使用订制的HTTP头: X-Total-Count. 链接到下一页或上一页可以在HTTP头的link规定,遵循Link规定: Link: <https://blog.mwaysolutions.com/sample/api/v1/cars?offset=15&limit=5>; rel="next",<https://blog.mwaysolutions.com/sample/api/v1/cars?offset=50&limit=3>; rel="last",<https://blog.mwaysolutions.com/sample/api/v1/cars?offset=0&limit=5>; rel="first",<https://blog.mwaysolutions.com/sample/api/v1/cars?offset=5&limit=5>; rel="prev", # 7.版本化你的API 支付宝 v1 v2 v3 - 使得API版本变得强制性,不要发布无版本的API,使用简单数字,避免小数点,如:2.5. 一般在Url后面使用?v,如:/blog/api/v1 # 8. 使用Http状态码处理错误 - 如果你的API没有错误处理是很难的,只是返回500和出错堆栈不一定有用- Http状态码提供70个出错,我们只要使用10个左右: `200 – OK – 一切正常 `201 – OK – 新的资源已经成功创建 `204 – OK – 资源已经成功删除 `304 – Not Modified – 客户端使用缓存数据 `400 – Bad Request – 请求无效,需要附加细节解释如 "JSON无效" `401 – Unauthorized – 请求需要用户验证 `403 – Forbidden – 服务器已经理解了请求,但是拒绝服务或这种请求的访问是不允许的。 `404 – Not found – 没有发现该资源 `422 – Unprocessable Entity – 只有服务器不能处理实体时使用,比如图像不能被格式化,或者重要字段丢失。 `500 – Internal Server Error – API开发者应该避免这种错误。 使用详细的错误包装错误:状态码、数据、header头信息 { "errors": [ { "userMessage": "Sorry, the requested resource does not exist", "internalMessage": "No car found in the database", "code": 34, "more info": "http://dev.mwaysolutions.com/blog/api/v1/errors/12345" } ] }
26.6Rest API案例
注:可先过一边传统的开发
新建Spring Initializr、引入Spring Web的项目spring-boot-day8
创建实体类User
1 2 3 4 5 6 7 8 9 10 11 12 13 14 15 16 17 18 19 20 21 22 23 24 25 26 27 28 29 30 31 32 33 34 35 36 37 38 39 40 41 42 43 44 45 46 47 48 49 50 51 52 53 54 55 56 57 58 59 60 61 62 63 64 65 66 67 68 69 package com.study.entity;import java.util.Date;public class User { private Integer id; private String name; private Double salary; private Date birthday; public User () { } public User (Integer id, String name, Double salary, Date birthday) { this .id = id; this .name = name; this .salary = salary; this .birthday = birthday; } public Integer getId () { return id; } public void setId (Integer id) { this .id = id; } public String getName () { return name; } public void setName (String name) { this .name = name; } public Double getSalary () { return salary; } public void setSalary (Double salary) { this .salary = salary; } public Date getBirthday () { return birthday; } public void setBirthday (Date birthday) { this .birthday = birthday; } @Override public String toString () { return "User{" + "id=" + id + ", name='" + name + '\'' + ", salary=" + salary + ", birthday=" + birthday + '}' ; } }
创建实体类Pet
1 2 3 4 5 6 7 8 9 10 11 12 13 14 15 16 17 18 19 20 21 22 23 24 25 26 27 28 29 30 31 32 33 34 35 36 37 38 39 40 41 42 43 44 45 46 47 48 49 50 51 52 53 54 55 56 package com.study.entity; public class Pet { private Integer id; private String name; private Integer age; public Pet () { } public Pet (Integer id, String name, Integer age) { this .id = id; this .name = name; this .age = age; } public Integer getId () { return id; } public void setId (Integer id) { this .id = id; } public String getName () { return name; } public void setName (String name) { this .name = name; } public Integer getAge () { return age; } public void setAge (Integer age) { this .age = age; } @Override public String toString () { return "Pet{" + "id=" + id + ", name='" + name + '\'' + ", age=" + age + '}' ; } }
创建控制器UserController
1 2 3 4 5 6 7 8 9 10 11 12 13 14 15 16 17 18 19 20 21 22 23 24 25 26 27 28 29 30 31 32 33 34 35 36 37 38 39 40 41 42 package com.study.controller.v1;import com.study.entity.User;import org.slf4j.Logger;import org.slf4j.LoggerFactory;import org.springframework.web.bind.annotation.*;import java.util.Date;@RestController @RequestMapping("/v1/users") public class UserController { private static final Logger logger = LoggerFactory.getLogger(UserController.class); @GetMapping("/{id}") public User findUserById (@PathVariable("id") Integer id) { logger.info("本次id:{}" ,id); return new User (id,"茶白" ,1234.56 ,new Date ()); } }
测试路径:http://localhost:8080/v1/users/1
安装Postman进行测试:Download Postman | Get Started for Free (访问官网后自动识别版本,下载后双击打开即安装完毕)
用来测试restful风格的接口
1 2 3 4 5 6 7 8 9 10 11 12 13 14 15 16 17 18 19 20 21 22 23 24 25 26 27 28 29 30 31 32 33 34 35 36 37 38 39 40 41 42 43 44 45 46 47 48 49 50 51 52 53 54 55 56 57 58 59 60 61 62 63 64 65 66 67 68 69 70 71 72 73 74 75 76 77 78 79 80 81 82 83 84 85 86 87 88 89 90 91 92 93 94 95 96 97 98 99 100 101 102 103 104 105 106 107 108 109 110 111 112 113 114 115 116 117 118 119 120 121 122 123 124 125 126 127 128 129 130 131 132 133 134 135 136 137 138 139 140 141 142 143 package com.study.controller.v1;import com.study.entity.Pet;import com.study.entity.User;import org.slf4j.Logger;import org.slf4j.LoggerFactory;import org.springframework.web.bind.annotation.*;import java.util.ArrayList;import java.util.Arrays;import java.util.Date;import java.util.List;@RestController @RequestMapping("/v1/users") public class UserController { private static final Logger logger = LoggerFactory.getLogger(UserController.class); @GetMapping("/{id}") public User findUserById (@PathVariable("id") Integer id) { logger.info("本次id:{}" ,id); return new User (id,"茶白" ,1234.56 ,new Date ()); } @GetMapping public List<User> findAllUser () { ArrayList<User> users = new ArrayList <>(); users.add(new User (1 ,"张三" ,1000.00 ,new Date ())); users.add(new User (2 ,"李四" ,2000.00 ,new Date ())); users.add(new User (3 ,"王五" ,3000.00 ,new Date ())); return users; } @PostMapping public void addUser (@RequestBody User user) { logger.info("name:{},salary:{},birthday:{}" ,user.getName(),user.getSalary(),user.getBirthday()); } @PutMapping("/{id}") public void updateUser (@PathVariable("id") Integer id,@RequestBody User user) { logger.info("id:{},name:{},salary:{},birthday:{}" ,id,user.getName(),user.getSalary(),user.getBirthday()); } @DeleteMapping("/{id}") @ResponseBody public void deleteUser (@PathVariable("id") Integer id) { logger.info("本次删除用户的id:{}" ,id); } @GetMapping("/{id}/pets/{petId}") public Pet findPetById (@PathVariable("id") Integer id,@PathVariable("petId") Integer petId) { logger.info("宠物主人的id:{}" ,id); logger.info("宠物id:{}" ,petId); return new Pet (1 ,"小灰灰" ,5 ); } @GetMapping("/{id}/pets") public List<Pet> findAllPet (@PathVariable("id") Integer id) { logger.info("宠物主人的id:{}" ,id); List<Pet> pets = Arrays.asList( new Pet (1 ,"熊大" ,20 ), new Pet (2 ,"熊二" ,10 ), new Pet (3 ,"光头强" ,50 ) ); return pets; } }
测试路径:
(1)http://localhost:8080/v1/users
(2)http://localhost:8080/v1/users
(3)http://localhost:8080/v1/users/1
(4)http://localhost:8080/v1/users/1
(5)http://localhost:8080/v1/users/1/pets/1
(6)http://localhost:8080/v1/users/1/pets
RestFul标准版: 利用RestFul响应类ResponseEntity和状态码HttpStatus优化UserController
1 2 3 4 5 6 7 8 9 10 11 12 13 14 15 16 17 18 19 20 21 22 23 24 25 26 27 28 29 30 31 32 33 34 35 36 37 38 39 40 41 42 43 44 45 46 47 48 49 50 51 52 53 54 55 56 57 58 59 60 61 62 63 64 65 66 67 68 69 70 71 72 73 74 75 76 77 78 79 80 81 82 83 84 85 86 87 88 89 90 91 92 93 94 95 96 97 98 99 100 101 102 103 104 105 106 107 108 109 110 111 112 113 114 115 116 117 118 119 120 121 122 123 124 125 126 127 128 129 130 131 132 133 134 135 136 137 138 139 140 141 142 143 144 145 146 147 148 149 150 151 package com.study.controller.v1;import com.study.entity.Pet;import com.study.entity.User;import org.slf4j.Logger;import org.slf4j.LoggerFactory;import org.springframework.http.HttpStatus;import org.springframework.http.ResponseEntity;import org.springframework.web.bind.annotation.*;import java.util.ArrayList;import java.util.Arrays;import java.util.Date;import java.util.List;@RestController @RequestMapping("/v1/users") public class UserController { private static final Logger logger = LoggerFactory.getLogger(UserController.class); @GetMapping("/{id}") public ResponseEntity<User> findUserById (@PathVariable("id") Integer id) { logger.info("本次id:{}" ,id); User user = new User (id, "茶白" , 1234.56 , new Date ()); return new ResponseEntity <>(user, HttpStatus.OK); } @GetMapping public ResponseEntity<List<User>> findAllUser () { ArrayList<User> users = new ArrayList <>(); users.add(new User (1 ,"张三" ,1000.00 ,new Date ())); users.add(new User (2 ,"李四" ,2000.00 ,new Date ())); users.add(new User (3 ,"王五" ,3000.00 ,new Date ())); return new ResponseEntity <>(users,HttpStatus.OK); } @PostMapping public ResponseEntity<Void> addUser (@RequestBody User user) { logger.info("name:{},salary:{},birthday:{}" ,user.getName(),user.getSalary(),user.getBirthday()); return new ResponseEntity <>(HttpStatus.NO_CONTENT); } @PutMapping("/{id}") public ResponseEntity<Void> updateUser (@PathVariable("id") Integer id,@RequestBody User user) { logger.info("id:{},name:{},salary:{},birthday:{}" ,id,user.getName(),user.getSalary(),user.getBirthday()); return new ResponseEntity <>(HttpStatus.NO_CONTENT); } @DeleteMapping("/{id}") @ResponseBody public void deleteUser (@PathVariable("id") Integer id) { logger.info("本次删除用户的id:{}" ,id); } @GetMapping("/{id}/pets/{petId}") public ResponseEntity<Pet> findPetById (@PathVariable("id") Integer id,@PathVariable("petId") Integer petId) { logger.info("宠物主人的id:{}" ,id); logger.info("宠物id:{}" ,petId); Pet pet = new Pet (1 , "小灰灰" , 5 ); return new ResponseEntity <>(pet,HttpStatus.OK); } @GetMapping("/{id}/pets") public ResponseEntity<List<Pet>> findAllPet (@PathVariable("id") Integer id) { logger.info("宠物主人的id:{}" ,id); List<Pet> pets = Arrays.asList( new Pet (1 ,"熊大" ,20 ), new Pet (2 ,"熊二" ,10 ), new Pet (3 ,"光头强" ,50 ) ); return new ResponseEntity <>(pets,HttpStatus.OK); } }
再次启动服务,用Postman测试上面路径,从Postman中可以查看到相应状态码
26.7最终项目结构
26开发方式演变 1 2 3 4 5 6 7 8 9 10 11 12 13 14 15 16 17 18 19 20 # 传统方式开发:基于javaweb开发 - 项目业务代码 + view 写在一个项目中- 如业务代码+view(isp、thymeleaf、freemark)在一起的- 概述:在前后端不分离的架构中,前端和后端的职责通常不会明确地分离,后端负责生成并渲染整个HTML页面,包括页面渲染,数据处理和业务逻辑,提供完整的页面。后端承担了生成整个页面的责任,而前端的工作相对较少,主要是一些简单的交互和样式调整以及美化。这种架构模式适用于一些简单的 Web 应用程序,但在复杂的应用场景下可能会导致前端和后端的耦合度高、开发效率低下等问题。- 页面渲染:后端负责生成整个页面的 HTML 结构,通常使用模板引擎(如JSP、Thymeleaf、Freemarker等)将动态数据嵌入到页面模板中,最终生成完整的 HTML 页面。- 数据处理和业务逻辑:后端负责处理客户端的请求,并执行相应的业务逻辑。这包括从数据库中检索数据、对数据进行逻辑处理、验证用户身份等操作。- 提供完整的页面:后端生成的页面通常是一个完整的 HTML 文档,其中包含了所有的页面内容、样式和交互行为。后端负责将生成的页面直接返回给客户端浏览器。- 视图解析器:在传统的开发中,特别是在使用基于服务器端渲染的 Web 应用程序中,视图解析器起着至关重要的作用,通常使用模板引擎来构建动态页面。视图解析器会根据请求中的 URL 匹配相应的模板,并将模板渲染成最终的 HTML 页面,然后返回给客户端。- 注意:在以前没有用到restful风格时,我们请求一个后端接口,正常返回走的是视图解析器,除非我们引入依赖使用注解使它以json数据形式返回这样就不走视图解析器了# 过渡引言 - 传统的 Web 开发确实通常由一个后端程序员完成,因为在那个时代,Web 应用的需求相对简单,前后端的职责交织在一起,而且前端技术相对简单,主要是 HTML、CSS 和少量的 JavaScript。然而,随着互联网的发展和用户需求的提高,Web 应用变得越来越复杂,传统的后端渲染模式已经不能满足这些需求,因此引入了前后端分离的开发模式。# 前后分段分离 - 前端系统(vue) - 前后端通信方式:axja异步通信 通过异步请求调用我们后端的restfulapi去完成整个数据的交互- 后端系统 (java) 只用写接口即可 即controller 用restfuapi风格- 概述:前后端分离架构下,前端和后端的职责明确分离。前端负责 UI 展示和用户交互,后端负责数据处理和业务逻辑。因此,后端不再需要渲染动态页面,而是提供数据接口供前端调用。后端对各种业务逻辑进行处理,把处理的结果得到的数据封装成接口以json或者xml形式响应给调用者,并写接口文档,供前端调用,前端根据接口文档调接口,拿到json数据并进行相应处理,最后展示到页面上。- 接口测试工具postman 接口文档生成工具swapper
前后端不分离时代
单页面下的全分离时代
28.异常处理 27.0概述 1 2 3 4 5 6 7 8 9 10 11 12 13 14 15 16 17 18 19 20 21 22 23 24 25 26 27 28 29 30 31 32 33 34 35 36 37 38 39 40 41 42 43 44 45 46 47 48 49 50 51 52 53 54 55 56 57 58 59 60 1.开发方式演变 a.传统方式开发 基于javaweb方式开发 项目业务代码 + view 写在一个项目中 业务代码+view(jsp、thymeleaf、freemark) b.前后端分离开发 前后端分离 天下 前端系统(Vue) ajax 异步请求 后端系统(java) 接口 controller ===> 传统web方式 /user/findById?id=21 =====> GET POST PUT DELETE GET /users users/001(RestFul API) 2.springboot异常处理 异常处理: 当出现异常改如何处理====>当controller中方法在执行过程中如果出现异常,我们应该如何处理异常这种方式 称之为异常处理 a.传统方式开发异常处理 以整合thymeleaf为例(jsp也可) @Component public class GlobalExceptionResolver implements HandlerExceptionResolver { //resolveExcpetion: 当控制器中任意一个方法出现异常时,如果该控制器的方法没有自己异常处理(try...catch),则会进入当前方法 //注意:在异常处理这个方法中 完成自定义异常处理 //参数1: request 当前请求对象 //参数2: response 当前请求对应响应对象 //参数3: 当前出现错误的方法对象 //参数4: 出现异常的异常对象 //返回值: modelAndview 模型和视图 @Override public ModelAndView resolveException(HttpServletRequest request, HttpServletResponse response, Object handler, Exception ex) { System.out.println("这是全局异常处理...."); System.out.println("当前异常为: "+ex); ModelAndView modelAndView = new ModelAndView(); //针对不同异常类型跳转不同页面 if(ex instanceof UserNameNotFoundException){ modelAndView.setViewName("error"); return modelAndView; } modelAndView.setViewName("500"); return modelAndView; } } b.前后端分离开发异常处理 前端系统通过ajax和后端系统交互,即使后端系统出错了也不可能返回一张页面,要返回一个json格式错误 不能返回moduleandview ajax<------>controller @ControllerAdvice public class GlobalExceptionResolver { //处理指定异常 @ExceptionHandler(value = IllegalNumberException.class) @ResponseBody public ResponseEntity<String> illegalNumberExceptionHandler(Exception ex) { System.out.println("进入非法参数异常处理"); return new ResponseEntity<String>(ex.getMessage(), HttpStatus.INTERNAL_SERVER_ERROR); } //处理exception子类异常 @ExceptionHandler(value = Exception.class) //用在方法上 作用:用来处理指定异常 value属性: 用来指定处理异常类型 @ResponseBody public ResponseEntity<String> exceptionHandler(Exception ex) { System.out.println("进入自定义异常处理"); return new ResponseEntity<>(ex.getMessage(), HttpStatus.INTERNAL_SERVER_ERROR); } }
27.1传统开发的异常处理 以整合thymeleaf为例 新建Spring Initializr、Spring Web项目
pom.xml引入thymeleaf依赖
1 2 3 4 5 <!--thymeleaf--> <dependency> <groupId>org.springframework.boot</groupId> <artifactId>spring-boot-starter-thymeleaf</artifactId> </dependency>
修改application.properties为application.yml,添加thymeleaf配置
1 2 3 4 5 6 spring: thymeleaf: prefix: classpath:/templates/ suffix: .html cache: flase#记得idea也要做相应设置
新建hello.html
1 2 3 4 5 6 7 8 9 10 <!DOCTYPE html > <html lang ="en" > <head > <meta charset ="UTF-8" > <title > hello</title > </head > <body > <h1 > Hello, SpringBoot!</h1 > </body > </html >
新建MvcConfig配置类 由于我们不能直接访问页面 又没有写控制器 只能通过配置类访问页面 查看效果
1 2 3 4 5 6 7 8 9 10 11 12 13 14 15 16 17 18 19 20 21 22 package com.study.config; import org.springframework.context.annotation.Configuration; import org.springframework.web.servlet.config.annotation.ViewControllerRegistry; import org.springframework.web.servlet.config.annotation.WebMvcConfigurer; @Configuration public class MvcConfig implements WebMvcConfigurer { @Override public void addViewControllers (ViewControllerRegistry registry) { registry.addViewController("/hello" ) .setViewName("hello" ); } }
访问127.0.0.1:8080/hello
1 2 Hello, SpringBoot! # ==>thymeleaf正常运行
新建DemoController
1 2 3 4 5 6 7 8 9 10 11 12 13 14 15 16 17 18 19 20 21 22 23 24 25 26 27 28 29 30 31 32 33 34 35 36 37 package com.study.controller;import com.study.exceptions.UserNameNotFoundException;import org.springframework.stereotype.Controller;import org.springframework.web.bind.annotation.RequestMapping;import org.springframework.web.bind.annotation.RestController;@Controller @RequestMapping("demo") public class DemoController { @RequestMapping("demo") public String demo () { System.out.println("demo ok..." ); int n = 1 / 0 ; return "hello" ; } @RequestMapping("login") public String login (String username, String password) { System.out.println("login..." ); System.out.println("username = " + username); System.out.println("password = " + password); if ("xiaocui" .equals(username) && "123456" .equals(password)){ return "hello" ; }else { throw new UserNameNotFoundException ("用户名不正确!" ); } } }
新建500.html
1 2 3 4 5 6 7 8 9 10 <!DOCTYPE html > <html lang ="en" > <head > <meta charset ="UTF-8" > <title > 500</title > </head > <body > <h1 > 系统内部错误,请稍后再试...</h1 > </body > </html >
新建error.html
1 2 3 4 5 6 7 8 9 10 <!DOCTYPE html > <html lang ="en" > <head > <meta charset ="UTF-8" > <title > error</title > </head > <body > <h1 > 系统错误,用户名不正确!!!</h1 > </body > </html >
自定义全局异常解析类GlobalExceptionResolver 新建exception包存放异常处理类
1 2 3 4 5 6 7 8 9 10 11 12 13 14 15 16 17 18 19 20 21 22 23 24 25 26 27 28 29 30 31 32 33 34 35 36 37 38 39 40 41 42 43 44 45 46 package com.study.exceptions;import org.springframework.stereotype.Component;import org.springframework.web.servlet.HandlerExceptionResolver;import org.springframework.web.servlet.ModelAndView;import javax.servlet.http.HttpServletRequest;import javax.servlet.http.HttpServletResponse;@Component public class GlobalExceptionResolver implements HandlerExceptionResolver { @Override public ModelAndView resolveException (HttpServletRequest request, HttpServletResponse response, Object handler, Exception ex) { System.out.println("这是全局异常处理..." ); System.out.println("当前异常为:" + ex); ModelAndView modelAndView = new ModelAndView (); if (ex instanceof UserNameNotFoundException){ modelAndView.setViewName("error" ); return modelAndView; } modelAndView.setViewName("500" ); return modelAndView; } }
自定义异常UserNameNotFoundException
1 2 3 4 5 6 7 8 9 10 11 12 13 14 package com.study.exceptions;public class UserNameNotFoundException extends RuntimeException { public UserNameNotFoundException (String message) { super (message); } }
测试路径:
(1)http://localhost:8080/demo/demo
1 2 3 demo ok... 这是全局异常处理... 当前异常为:java.lang.ArithmeticException: / by zero
(2)http://localhost:8080/demo/login?username=xiaozhu&password=123456
1 2 3 4 5 login... username = xiaozhu password = 123456 这是全局异常处理... 当前异常为:com.study.exceptions.UserNameNotFoundException: 用户名不正确!
27.2RestFul的异常处理 前后端分离 新建Spring Initializr、Spring Web项目spring-boot-day10、启动下看环境是否正常运行
新建控制器DemoController
1 2 3 4 5 6 7 8 9 10 11 12 13 14 15 16 17 18 19 20 21 22 23 24 25 26 27 28 29 30 31 32 33 34 35 36 37 38 39 40 41 42 43 44 45 46 47 48 49 package com.study.controller; import com.study.exceptions.IllegalNumberException; import org.springframework.http.HttpStatus; import org.springframework.http.ResponseEntity; import org.springframework.web.bind.annotation.GetMapping; import org.springframework.web.bind.annotation.PathVariable; import org.springframework.web.bind.annotation.RequestMapping; import org.springframework.web.bind.annotation.RestController; @RestController @RequestMapping("demos") public class DemoController { @GetMapping public ResponseEntity<String> demos () { System.out.println("demo ok" ); return new ResponseEntity <>("demo ok" , HttpStatus.OK); } @GetMapping("/{id}") public ResponseEntity<String> demo (@PathVariable("id") Integer id) { System.out.println("demo ok" + id); if (id<0 ) throw new IllegalNumberException ("无效id,请检查!" ); return new ResponseEntity <>("demo ok" ,HttpStatus.OK); } }
新建全局异常解析类GlobalExceptionResolver
1 2 3 4 5 6 7 8 9 10 11 12 13 14 15 16 17 18 19 20 21 22 23 24 25 26 27 28 29 30 31 32 33 package com.study.exceptions;import org.springframework.http.HttpStatus;import org.springframework.http.ResponseEntity;import org.springframework.web.bind.annotation.ControllerAdvice;import org.springframework.web.bind.annotation.ExceptionHandler;import org.springframework.web.bind.annotation.ResponseBody;@ControllerAdvice public class GlobalExceptionResolver { @ExceptionHandler(value = IllegalNumberException.class) 用在方法上 作用:用来处理指定异常 value属性:用来指定处理异常类型 @ResponseBody public ResponseEntity<String> IllegalNumberException (Exception ex) { System.out.println("进入非法参数异常处理" ); return new ResponseEntity <>(ex.getMessage(), HttpStatus.INTERNAL_SERVER_ERROR); } @ExceptionHandler(value = Exception.class) @ResponseBody public ResponseEntity<String> exceptionHandler (Exception ex) { System.out.println("进入自定义异常处理" ); return new ResponseEntity <>(ex.getMessage(),HttpStatus.INTERNAL_SERVER_ERROR); } }
自定义异常IllegalNumberException
1 2 3 4 5 6 7 8 9 10 11 12 13 14 package com.study.exceptions; public class IllegalNumberException extends RuntimeException { public IllegalNumberException (String message) { super (message); } }
测试路径:
(1)http://localhost:8080/demos
demo ok
(2)http://localhost:8080/demos/1
demo ok1
(3)http://localhost:8080/demos/0
demo ok0
(4)http://localhost:8080/demos/-1
demo ok-1
项目结构
29.CORS跨域 28.0概述
1 2 3 4 5 6 7 8 9 10 11 12 13 14 15 16 17 18 19 20 21 22 23 24 25 26 27 28 29 30 31 32 33 34 35 36 37 38 39 40 41 42 43 44 45 46 47 48 49 50 51 52 53 54 55 56 57 58 59 60 61 1.什么是CORS 定义: 跨域资源共享 2.什么跨域资源共享 解释: 允许浏览器可以从当前源服务器通过ajax访问另外一个源服务地址 前端系统 域名 ajax 后端系统 域名 超级链接 form表单提交不存在跨域资源共享问题 3.同源策略 是浏览器的一个默认安全功能,不同源的客户端脚本在没有明确授权的情况下,不能读写对方资源。 同源策略是浏览器安全的基石 限ajax请求 4.什么是源 origin 源[origin]就是协议、域名和端口号。例如:http://www.baidu.com:80这个URL。 协议: http 域名: www.baidu.com 端口: 80 url: http://www.baidu.com:80 url: https://www.baidu.com:80 url: http://www.baizhiedu.com:80 url: http://www.baidu.com:90 都不同源协议 同源:域名 端口号不能有差异 测试: http://www.a.com/test/index.html 端口没指定默认80端口 1.http://www.a.com/dir/page.html 同源 2.http://www.child.a.com/test/index.html 不同源 3.https://www.a.com/test/index.html 不同源 4.http://www.a.com:8080/test/index.html 不同源 5.哪些操作不会受到同源限制 1.<script src="..."></script>, <img>, <link>, <iframe> 6.哪些操作会受到同源限制 ajax 报错出现跨域: Access-Control-Allow-Origin 7.模拟跨域错误 8.springboot中如何解决跨域问题? 1.局部解决跨域 @CrossOrigin: 这个注解用在类上 代表解决类中所有方法运行允许其他域中资源访问 2.全局解决跨域 @Configuration public class CorsConfig { @Bean public CorsFilter corsFilter() { UrlBasedCorsConfigurationSource source = new UrlBasedCorsConfigurationSource(); CorsConfiguration corsConfiguration = new CorsConfiguration(); corsConfiguration.addAllowedOrigin("*"); // 1允许任何域名使用 corsConfiguration.addAllowedHeader("*"); // 2允许任何头 corsConfiguration.addAllowedMethod("*"); // 3允许任何方法(post、get等) source.registerCorsConfiguration("/**", corsConfiguration);//4处理所有请求的跨域配置 return new CorsFilter(source); } }
28.1CORS简介
CORS :CORS是一个W3C标准,全称是”跨域资源共享”(Cross-origin resource sharing)。它允许浏览器向跨源服务器,发出XMLHttpRequest(ajax)请求,从而克服了AJAX只能同源使用的限制。
**同源策略[same origin policy]**:是浏览器的一个安全功能,不同源的客户端脚本在没有明确授权的情况下,不能读写对方资源。同源策略是浏览器安全的基石。
源[origin]: 就是协议、域名和端口号。例如:百度一下,你就知道这个URL中:协议为http、域名为www.baidu.com、端口号为80。
同源 :若地址里面的协议、域名和端口号均相同,则属于同源。
1 2 3 4 5 6 # 同源举例 - 例如判断下面的URL是否与 http://www.a.com/test/index.html 同源 http://www.a.com/dir/page.html --------->同源,协议、域名、端口号均相同 http://www.child.a.com/test/index.html ->不同源,域名不相同 https://www.a.com/test/index.html ------>不同源,协议不相同 http://www.a.com:8080/test/index.html -->不同源,端口号不相同
哪些操作不受同源限制:
页面中的链接、重定向以及表单提交是不会受到同源策略限制的;
跨域资源的引入是可以的,如嵌入到页面中的<script src="..."></script>,<img>,<link>,<iframe>等。
哪些操作受到同源限制:
在浏览器中发起一个AJAX请求,会受到同源策略限制,**出现错误:Access-Control-Allow-Origin**
模拟跨域错误:
pom.xml引入thymeleaf依赖
1 2 3 4 5 <!--thymeleaf--> <dependency> <groupId>org.springframework.boot</groupId> <artifactId>spring-boot-starter-thymeleaf</artifactId> </dependency>
修改application.properties为application.yml,添加thymeleaf配置
1 2 3 4 5 6 spring: thymeleaf: prefix: classpath:/templates/ suffix: .html cache: flase#记得idea也要做相应设置
新建cors.html 在restful写thymeleaf页面 不正确只是作为演示 !!!
1 2 3 4 5 6 7 8 9 10 11 12 13 14 15 16 17 18 19 20 21 22 23 24 25 26 27 28 29 30 31 <!DOCTYPE html > <html lang ="en" > <head > <meta charset ="UTF-8" > <title > Title</title > <script > function test ( var xhr = new XMLHttpRequest (); xhr.onreadystatechange = function ( if (xhr.status ==200 && xhr.readyState ==4 ){ console .log (xhr.responseText ); document .getElementById ("msg" ).innerText ="返回结果为: " +xhr.responseText ; } } xhr.open ("GET" ,"http://localhost:8080/demos" ); xhr.send (); } </script > </head > <body > <h1 > cors跨域测试</h1 > <input type ="button" value ="点我发送ajax请求" οnclick ="test()" > <h4 id ="msg" > </h4 > </body > </html >
新建MvcConfig
1 2 3 4 5 6 7 8 9 10 11 12 13 14 15 16 17 18 19 20 package com.study.config;import org.springframework.context.annotation.Configuration;import org.springframework.web.servlet.config.annotation.ViewControllerRegistry;import org.springframework.web.servlet.config.annotation.WebMvcConfigurer;@Configuration public class MvcConfig implements WebMvcConfigurer { @Override public void addViewControllers (ViewControllerRegistry registry) { registry.addViewController("/cors" ).setViewName("cors" ); } }
启动项目后,浏览器访问:http://localhost:8080/cors,可以正常访问,不存在跨域问题。
注:在跨域中localhost不能解析为127.0.0.1 不能认为相同
使用IDEA内置的浏览器打开页面:此时路径变成了http://localhost:63342/spring-boot-day10/templates/cors.html?_ijt=oru29oe9dkg5rkhii47uic36ig&_ij_reload=RELOAD_ON_SAVE,存在跨域问题。 端口不一样了
28.2Springboot中如何解决cors跨域问题 前后端不在一个域 如何让前端系统访问后端接口 ===》cors跨域资源共享 需要做些配置后可允许浏览器从当前域访问另一个域 默认是不可以的
以下两种方法使用其中一种即可:
(1)控制器类上添加@CrossOrigin注解 局部解决跨域
这个注解用在类上 代表解决类中所有方法运行允许其他域中资源访问
1 2 3 4 5 6 7 8 9 10 11 12 13 14 15 16 17 18 19 20 21 22 23 24 25 26 27 28 29 30 31 32 33 34 35 36 37 38 39 40 41 42 43 44 45 46 47 package com.study.controller;import com.study.exceptions.IllegalNumberException;import org.springframework.http.HttpStatus;import org.springframework.http.ResponseEntity;import org.springframework.web.bind.annotation.*;@CrossOrigin @RestController @RequestMapping("demos") public class DemoController { @GetMapping public ResponseEntity<String> demos () { System.out.println("demo ok" ); return new ResponseEntity <>("demo ok" , HttpStatus.OK); } @GetMapping("/{id}") public ResponseEntity<String> demo (@PathVariable("id") Integer id) { System.out.println("demo ok" + id); if (id<0 ) throw new IllegalNumberException ("无效id,请检查!" ); return new ResponseEntity <>("demo ok" ,HttpStatus.OK); } }
(2)全局解决跨域问题:编写cors全局配置类,对所有页面生效 放到配置包下
1 2 3 4 5 6 7 8 9 10 11 12 13 14 15 16 17 18 19 20 21 22 23 24 25 26 27 28 package com.study.config;import org.springframework.context.annotation.Bean;import org.springframework.context.annotation.Configuration;import org.springframework.web.cors.CorsConfiguration;import org.springframework.web.cors.UrlBasedCorsConfigurationSource;import org.springframework.web.filter.CorsFilter;@Configuration public class CorsConfig { @Bean public CorsFilter corsFilter () { UrlBasedCorsConfigurationSource source = new UrlBasedCorsConfigurationSource (); CorsConfiguration corsConfiguration = new CorsConfiguration (); corsConfiguration.addAllowedOrigin("*" ); corsConfiguration.addAllowedHeader("*" ); corsConfiguration.addAllowedMethod("*" ); source.registerCorsConfiguration("/**" ,corsConfiguration); return new CorsFilter (source); } }
最终项目结构:
30.Jasypt加密 29.0 概述
1 2 3 4 5 1.原理 引入jasypt依赖 2.使用 (1)类 =====> root + 秘钥(暴露) =====> 加密之后结果 每一次运行都会生成一个新的加密结果 每个加密结果都是可用 (2)加密之后结果 ====> 类.方法 秘钥 =====> root
29.1 引言
Jasypt 也即Java Simplified Encryption是Sourceforge.net上的一个开源项目。在当地时间11月23号的通告中,Jasypt 1.4的新特征包括:加密属性文件(encryptable properties files)、Spring Framework集成、加密Hibernate数据源配置、新的命令行工具、URL加密的Apache wicket集成以及升级文档。
根据Jasypt文档,该技术可用于加密任务与应用程序,例如加密密码、敏感信息和数据通信、创建完整检查数据的sums. 其他性能包括高安全性、基于标准的加密技术、可同时单向和双向加密的加密密码、文本、数字和二进制文件。Jasypt也可以与Acegi Security整合也即Spring Security。Jasypt亦拥有加密应用配置的集成功能,而且提供一个开放的API从而任何一个Java Cryptography Extension都可以使用Jasypt。
Jasypt还符合RSA标准的基于密码的加密,并提供了无配置加密工具以及新的、高可配置标准的加密工具。
29.2SpringBoot整合Jasypt加密 我们这里以SpringBoot整合Jasypt加密为例 普通java也可以
新建Spring Initializr、Spring Web的spring-boot-jasypt项目
pom.xml引入依赖
1 2 3 4 5 6 7 8 9 10 11 12 13 14 15 16 17 18 19 20 21 22 23 24 25 26 27 <dependency > <groupId > mysql</groupId > <artifactId > mysql-connector-java</artifactId > <version > 5.1.38</version > </dependency > <dependency > <groupId > com.alibaba</groupId > <artifactId > druid</artifactId > <version > 1.2.11</version > </dependency > <dependency > <groupId > org.mybatis.spring.boot</groupId > <artifactId > mybatis-spring-boot-starter</artifactId > <version > 2.2.2</version > </dependency > <dependency > <groupId > com.github.ulisesbocchio</groupId > <artifactId > jasypt-spring-boot-starter</artifactId > <version > 3.0.4</version > </dependency >
修改application.properties为application.yml,编写如下配置:
1 2 3 4 5 6 7 8 9 10 11 12 13 14 15 16 17 18 19 20 21 22 23 24 mysql: host: ENC(+Szc93CJDBbbOZShvgnUxeZiec3+Xc6BCKt2IFE9JdZy7kmy4NOk+xZAXcuT57So) spring: datasource: type: com.alibaba.druid.pool.DruidDataSource driver-class-name: com.mysql.jdbc.Driver url: jdbc:mysql://${mysql.host}:3306/ems-thymeleaf?characterEncoding=UTF-8 username: ENC(SAYP3WbR7jm0HYPlg3b9IWvMEZBBK+M8+rmDcFrwH8p+WNwxyYWkuZ1FvZztGELF) password: ENC(SAYP3WbR7jm0HYPlg3b9IWvMEZBBK+M8+rmDcFrwH8p+WNwxyYWkuZ1FvZztGELF) mybatis: mapper-locations: classpath:com/study/mapper/*.xml type-aliases-package: com.study.entity jasypt: encryptor: algorithm: PBEWITHHMACSHA512ANDAES_256
启动类添加注解扫描
1 2 3 4 5 6 7 8 9 10 11 12 13 14 15 package com.study;import org.mybatis.spring.annotation.MapperScan;import org.springframework.boot.SpringApplication;import org.springframework.boot.autoconfigure.SpringBootApplication;@SpringBootApplication @MapperScan("com.study.dao") public class SpringBootJasyptApplication { public static void main (String[] args) { SpringApplication.run(SpringBootJasyptApplication.class, args); } }
新建实体类User
1 2 3 4 5 6 7 8 9 10 11 12 13 14 15 16 17 18 19 20 21 22 23 24 25 26 27 28 29 30 31 32 33 34 35 36 37 38 39 40 41 42 43 44 45 46 47 48 49 50 51 52 53 54 55 56 57 58 59 60 61 62 63 64 65 66 67 68 69 70 71 72 73 74 75 76 77 78 package com.study.entity;public class User { private Integer id; private String username; private String realname; private String password; private Boolean gender; public User () { } public User (Integer id, String username, String realname, String password, Boolean gender) { this .id = id; this .username = username; this .realname = realname; this .password = password; this .gender = gender; } public Integer getId () { return id; } public void setId (Integer id) { this .id = id; } public String getUsername () { return username; } public void setUsername (String username) { this .username = username; } public String getRealname () { return realname; } public void setRealname (String realname) { this .realname = realname; } public String getPassword () { return password; } public void setPassword (String password) { this .password = password; } public Boolean getGender () { return gender; } public void setGender (Boolean gender) { this .gender = gender; } @Override public String toString () { return "User{" + "id=" + id + ", username='" + username + '\'' + ", realname='" + realname + '\'' + ", password='" + password + '\'' + ", gender=" + gender + '}' ; } }
新建UserDAO
1 2 3 4 5 6 7 8 9 10 11 12 13 14 15 16 17 18 19 20 21 22 23 package com.study.dao;import com.study.entity.User;import java.util.List;public interface UserDAO { List<User> findAll () ; }
新建UserDAOMapper
1 2 3 4 5 6 7 8 9 10 11 12 13 <?xml version="1.0" encoding="UTF-8" ?> <!DOCTYPE mapper PUBLIC "-//mybatis.org//DTD Mapper 3.0//EN" "http://mybatis.org/dtd/mybatis-3-mapper.dtd" > <mapper namespace="com.study.dao.UserDAO" > <!--findAll--> <select id="findAll" resultType="User" > select id,username,realname,password,gender from `user` </select> </mapper>
新建UserDaoTests
新建UserService
1 2 3 4 5 6 7 8 9 10 11 12 13 14 15 16 17 18 19 20 21 22 23 24 package com.study.service; import com.study.entity.User; import org.springframework.stereotype.Service; import java.util.List; public interface UserService { List<User> findAll () ; }
新建UserServiceImpl
1 2 3 4 5 6 7 8 9 10 11 12 13 14 15 16 17 18 19 20 21 22 23 24 25 26 27 28 29 30 31 package com.study.service;import com.study.dao.UserDAO;import com.study.entity.User;import org.springframework.beans.factory.annotation.Autowired;import org.springframework.stereotype.Service;import org.springframework.transaction.annotation.Transactional;import java.util.List;@Service @Transactional public class UserServiceImpl implements UserService { private UserDAO userDAO; @Autowired public UserServiceImpl (UserDAO userDAO) { this .userDAO = userDAO; } @Override public List<User> findAll () { return userDAO.findAll(); } }
新建UserController
1 2 3 4 5 6 7 8 9 10 11 12 13 14 15 16 17 18 19 20 21 22 23 24 25 26 27 28 29 30 31 32 33 34 35 package com.study.controller;import com.study.entity.User;import com.study.service.UserService;import org.springframework.beans.factory.annotation.Autowired;import org.springframework.http.HttpStatus;import org.springframework.http.ResponseEntity;import org.springframework.web.bind.annotation.GetMapping;import org.springframework.web.bind.annotation.RequestMapping;import org.springframework.web.bind.annotation.RestController;import java.util.List;@RestController @RequestMapping("/users") public class UserController { private UserService userService; @Autowired public UserController (UserService userService) { this .userService = userService; } @GetMapping public ResponseEntity<List<User>> users () { List<User> users = userService.findAll(); return new ResponseEntity <>(users, HttpStatus.OK); } }
测试Jasypt加密算法
1 2 3 4 5 6 7 8 9 10 11 12 13 14 15 16 17 18 19 20 21 22 23 24 25 26 27 28 29 30 31 32 33 34 35 36 37 38 39 40 41 42 package com.study;import org.jasypt.encryption.StringEncryptor;import org.junit.jupiter.api.Test;import org.springframework.beans.factory.annotation.Autowired;import org.springframework.boot.test.context.SpringBootTest;@SpringBootTest public class JasyptTest { private StringEncryptor stringEncryptor; @Autowired public JasyptTest (StringEncryptor stringEncryptor) { this .stringEncryptor = stringEncryptor; } @Test public void test () { for (int i = 0 ; i < 10 ; i++) { String root = stringEncryptor.encrypt("root" ); System.out.println("root = " + root); } } @Test public void test1 () { String localhost = stringEncryptor.encrypt("localhost" ); System.out.println("localhost = " + localhost); String decrypt = stringEncryptor.decrypt("+Szc93CJDBbbOZShvgnUxeZiec3+Xc6BCKt2IFE9JdZy7kmy4NOk+xZAXcuT57So" ); System.out.println("decrypt = " + decrypt); } }
注意: 启动前配置好秘钥参数:-Djasypt.encryptor.password=123456 测试哪块哪块加密钥 配置文件加密启动主程序也要给密钥才可
启动项目进行测试:测试前配置传递秘钥参数,测试路径:http://localhost:8080/users
最终项目结构:


项目最终结构:
 项目最终结构: